Bohemian Romance Jewelry

D-I-Y-

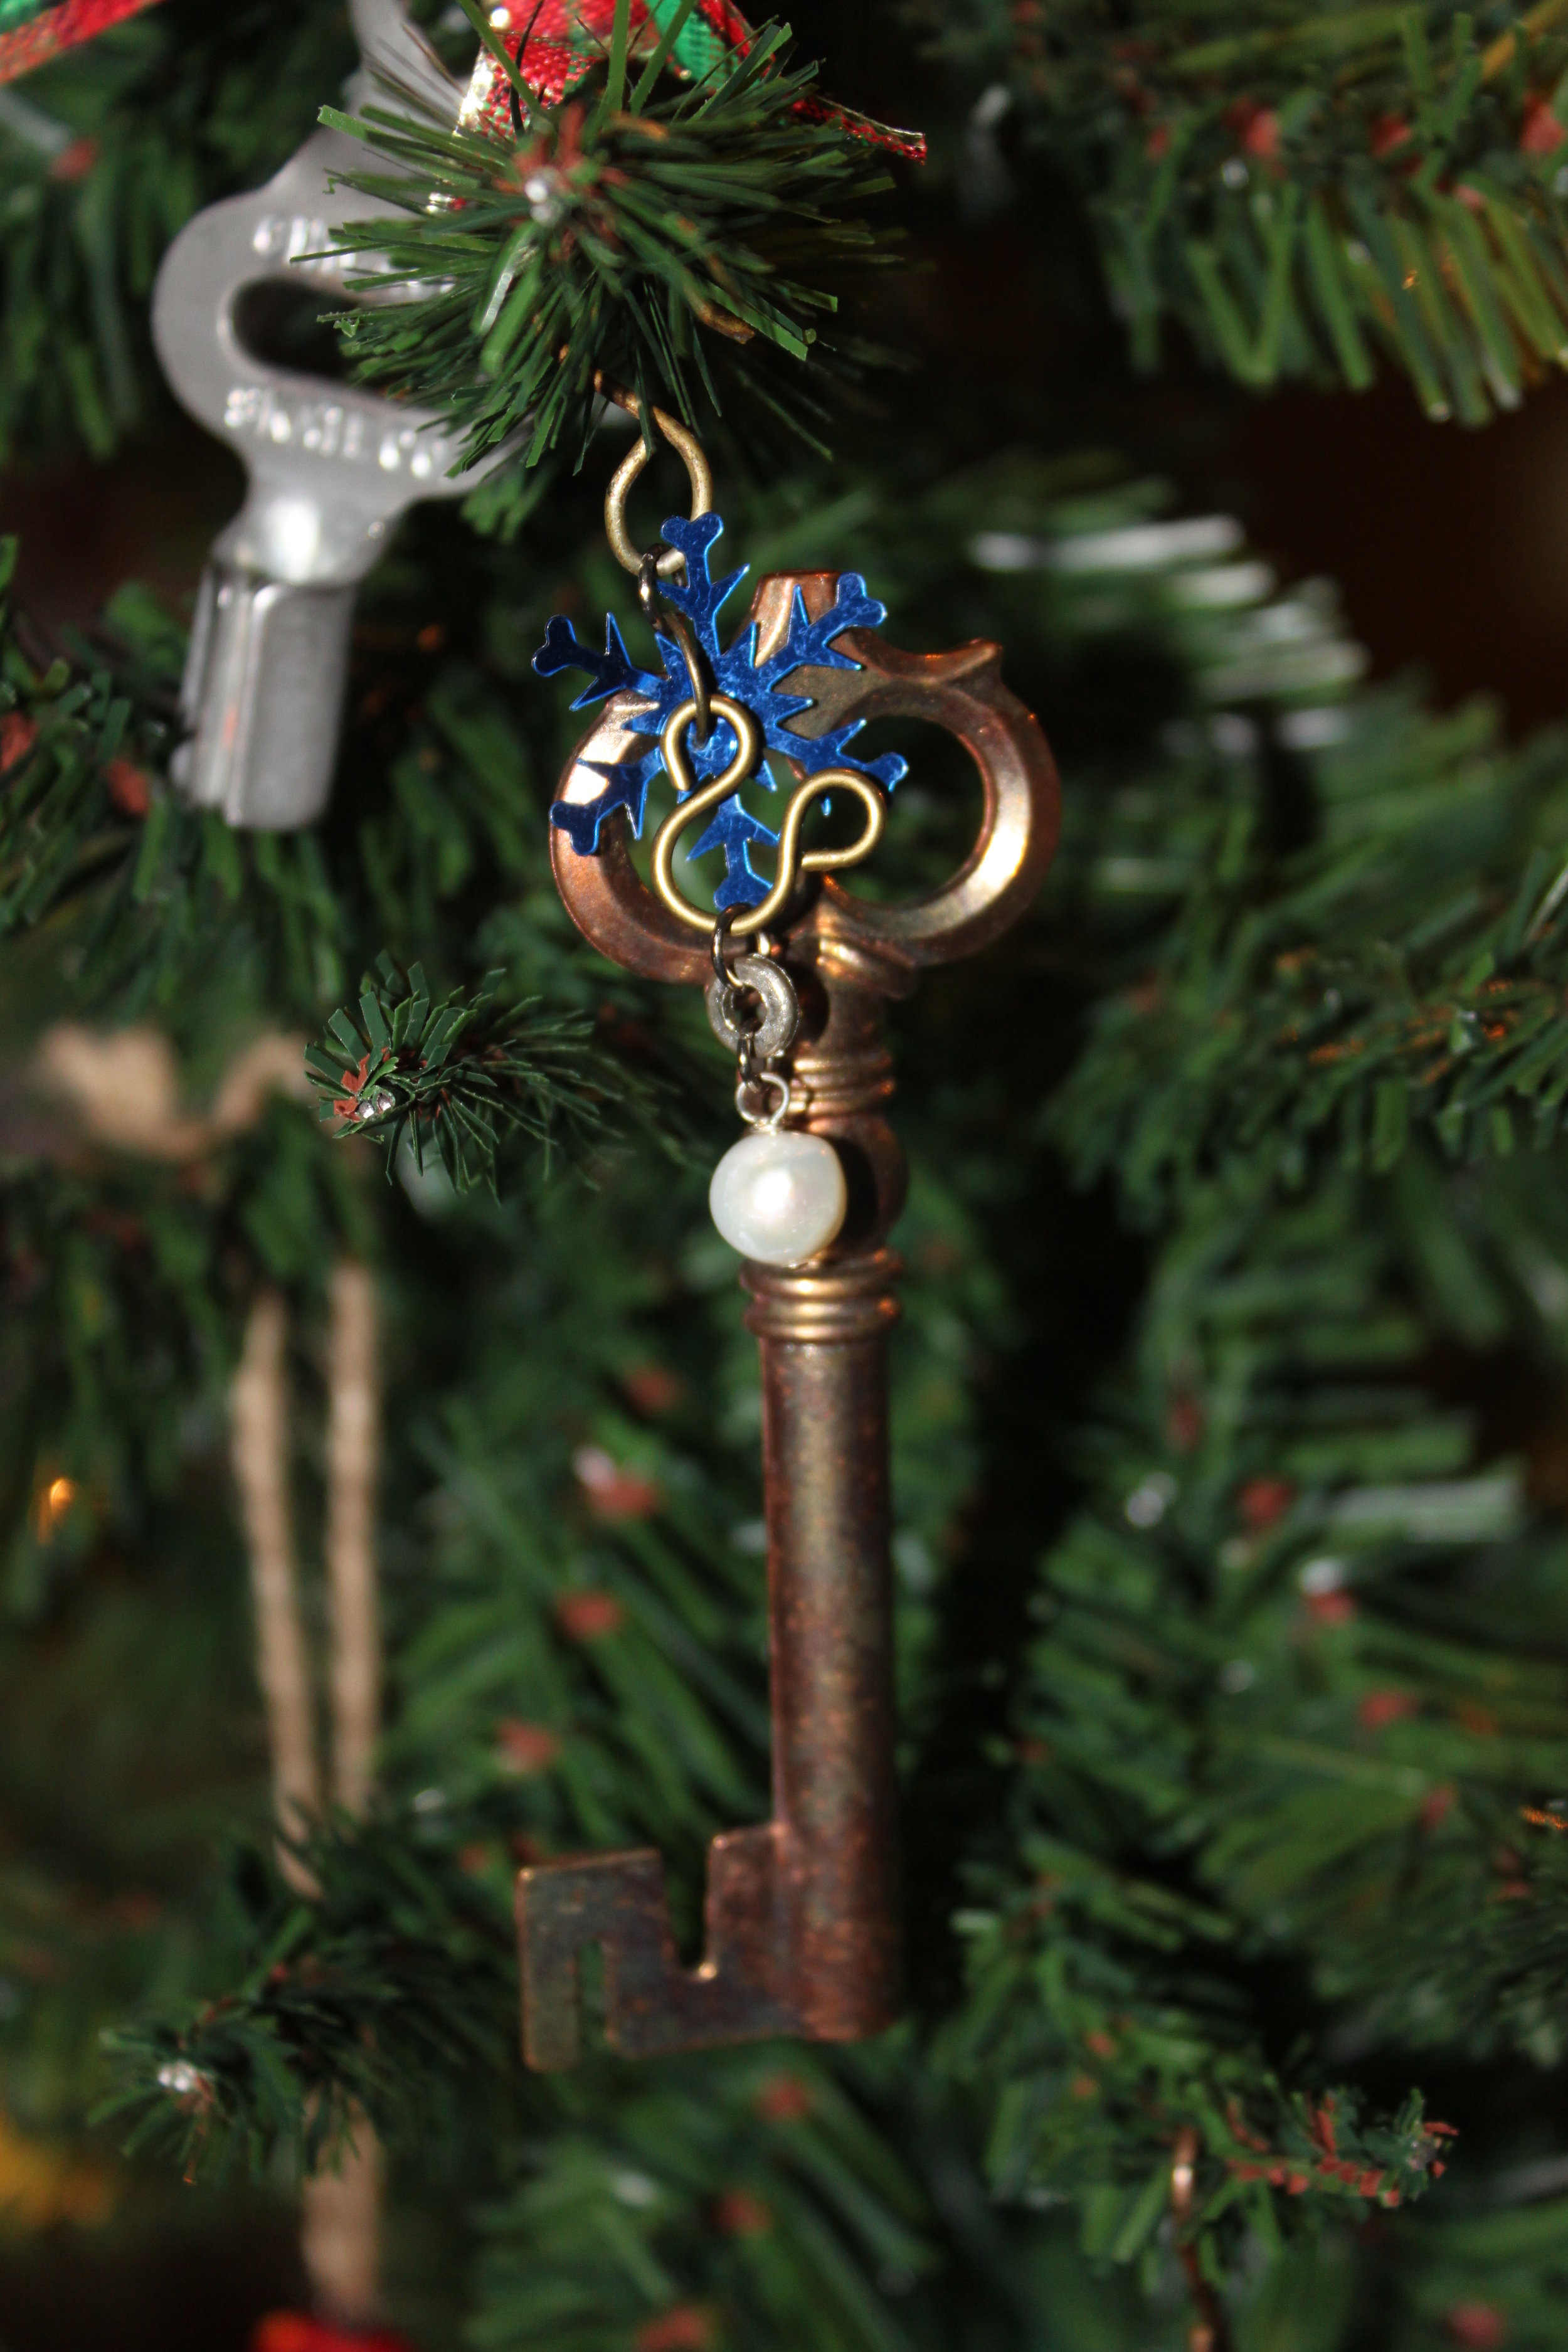
DIY Steampunk Snowflake Skeleton Key Ornament

D-I-Y-Samantha ExtanceComment

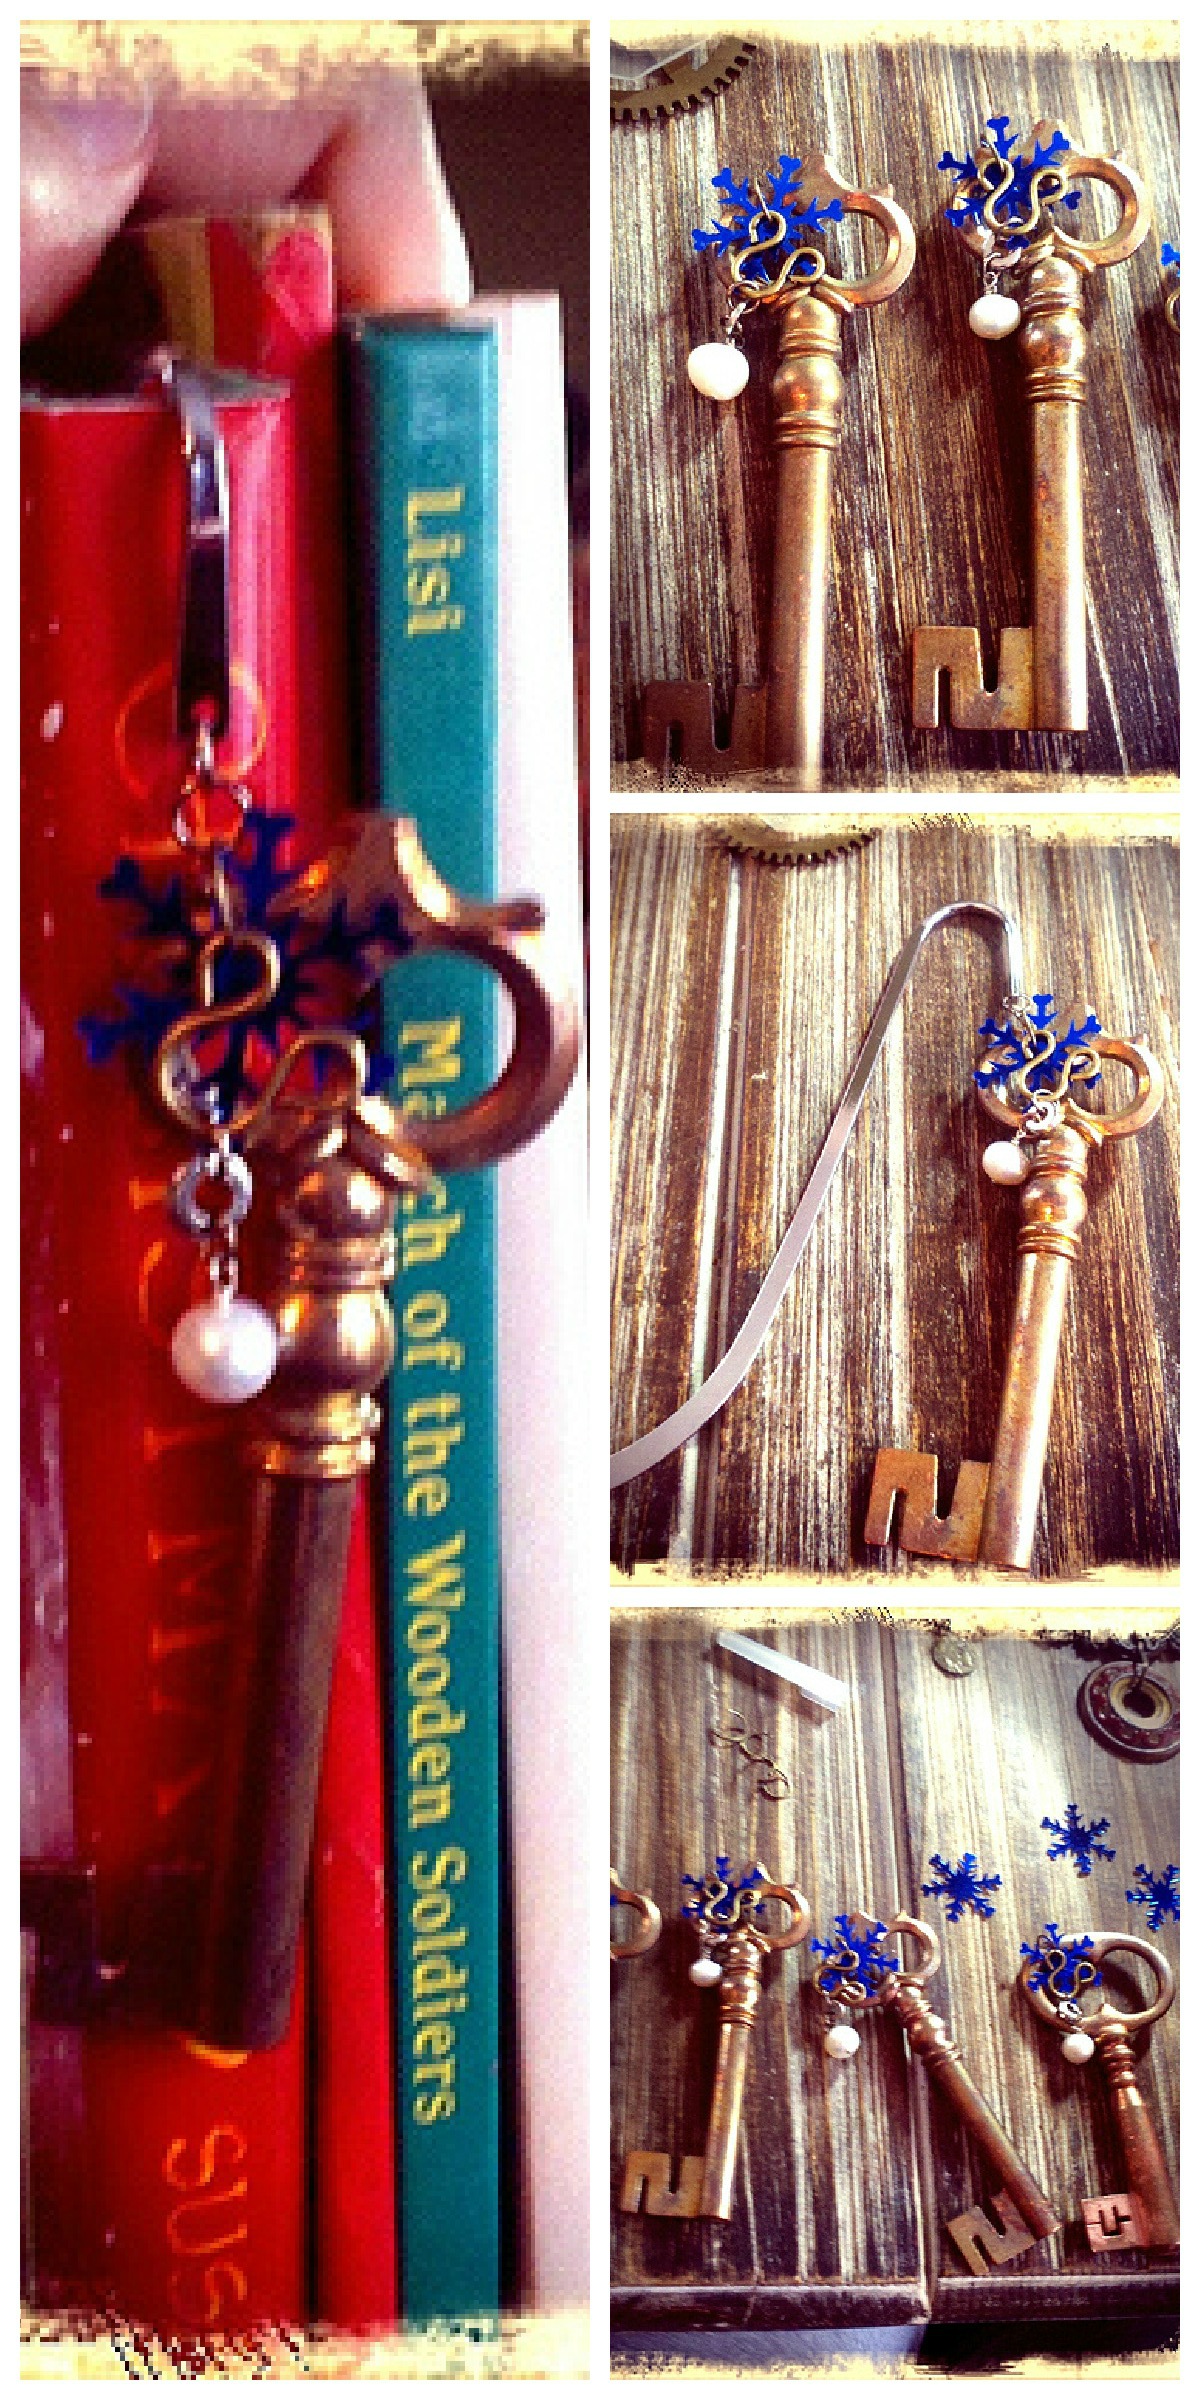
Steampunk your Christmas Tree this holiday season with this simple, elegant, and cheap-to-make ornament! Here's what you'll need: Materials:

  • Skeleton Key (salvaged or purchased from the dollar bin at Michaels. Fake keys are better to hang on your tree because they're lighter and won't weigh the branch down)
  • Snowflake Sequin
  • Washer (small)
  • Pearl (or any other bead you desire)
  • Clothing Hook
  • Christmas Tree Hook
  • Jump rings (2 small and 1 large)
  • Headpin (1)

Materials Cost Roughly: $4-5.

Tools:

  • Awl (and junk wood/cardboard surface)
  • Pair of flat nosed pliers
  • Pair of needle nosed pliers
  • Wire cutters (or toenail clippers)

Steps:

  1. Using your awl poke a hole in your sequin (big enough to fir your large jump ring through). Be sure to protect your table/ work surface by putting down thick cardboard or a scrap of wood underneath where you are poking a hole in your sequin. Set aside.
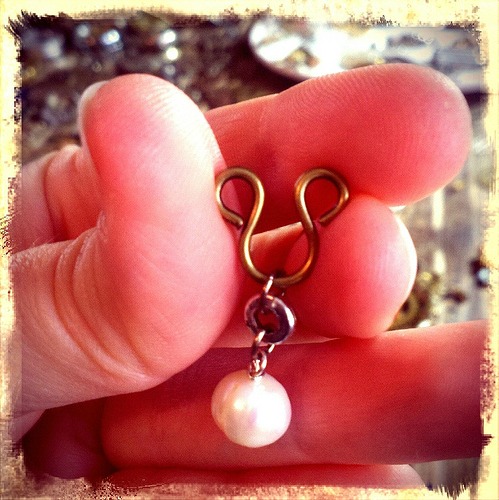
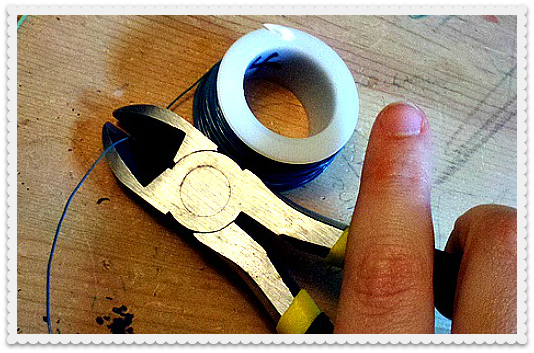
  2. Take your pearl/bead and thread it on your headpin. With your flat nosed pliers bend the excess pin horizontally so that it is parallel to the pearl/bead. Place your pointer finger next to the pearl/bead and cut off excess pin with your wire cutters/toenail clippers. (You need roughly the width of your pointer finger.) Next, with your needle nosed pliers grab the very end of your pin and curl it into a loop. Be sure to close the loop completely. Then using your flat nosed pliers attach the pearl/bead to your washer.
  3. Attach your washer with a small jump ring to your clothing hook.
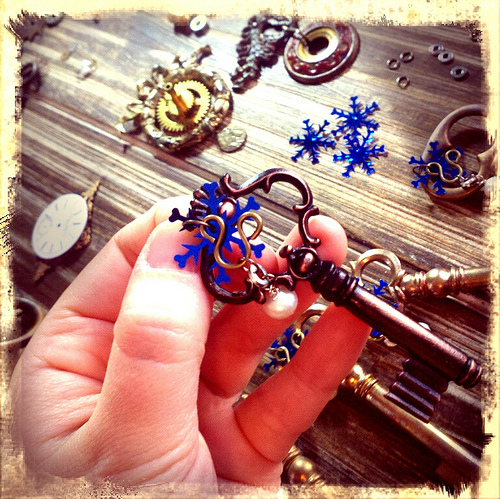
  4. Thread your skeleton key, snowflake sequin and clothing hook (on the opposite side of the washer and pearl) onto a large jump ring. Close securely.
  5. Grab your small jump ring and attach it to the large one you just closed. Close securely.
  6. Attach your tree hook to the small jump ring.
  7. Hang on your tree with pride!

Feel free to personalize this ornament, maybe paint your loved ones' initials on the sequin or a part of the key; or perhaps create little paper tags that say "To Santa's Workshop" or "Reindeer Stables" and attach it to the ornament as well to make it extra Christmas-y; or the ornament could also double as a gift--instead of putting it on a Christmas Tree Hook you could attach. As always, Merry Making!

DIY Steampunk Christmas Tree Garland

D-I-Y-Samantha ExtanceComment

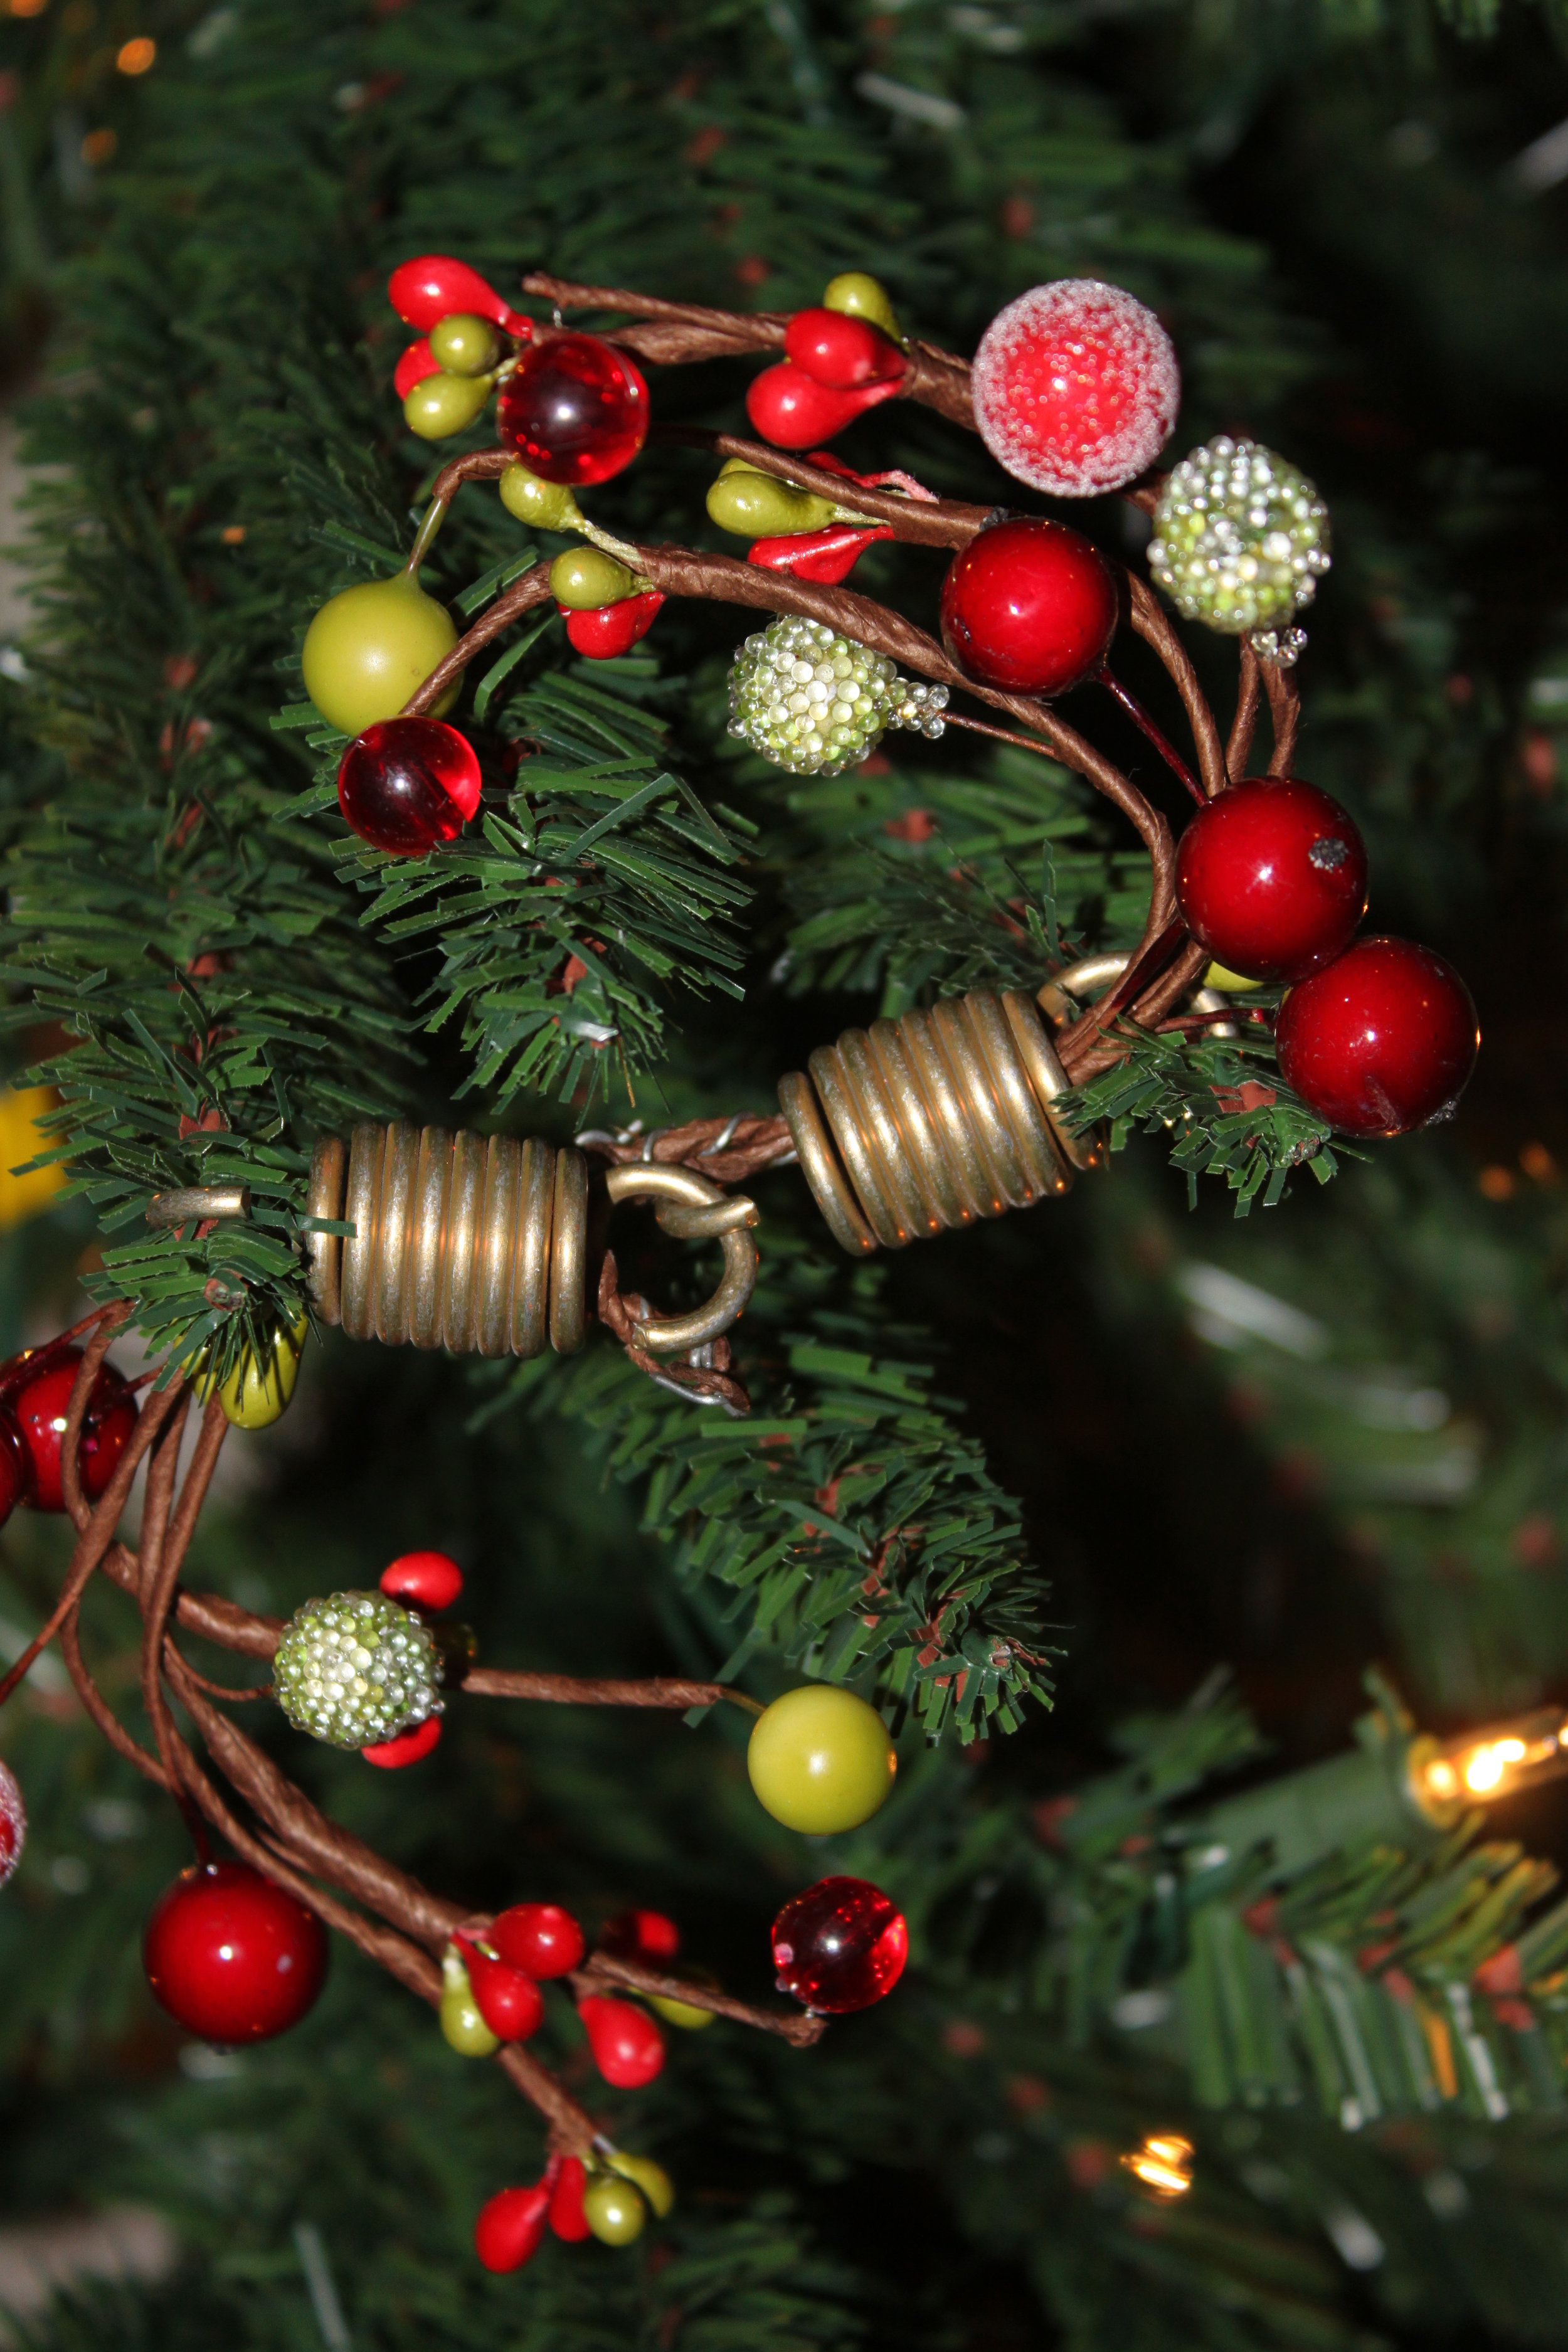
This is perhaps my favorite creation for my tiny tree this year! This steampunk garland not only provide texture and color to my tree but also a sense of movement. Each of the berry twigs nestled within each spring oscillates in a stylish swirl. This is one garland that doesn't just hang on your tree! It's simple to make and another kid friendly DIY--here's what you'll need: Materials: (No Tools are Necessary for this DIY) 

  • Twigs of fake berries (bright colors are best; also, purchase twigs with wire inside so that they're shape-able)
  • Springs (I used springs that already have hooks attached to them so it would be easier to assemble and hang the finished garland. I'd recommend using those but if you can't find springs with hooks then just attach your springs using wire, ribbon, or the berry twigs themselves; Also, the number of springs you'll need entirely depends on how long you'd like your garland)

Steps:

  1. Weave the berry twigs through your springs. I choose for mine to go in an oscillating spiral pattern (I swirling up and the next one down).
  2. Attach the springs together. (If you are using wire, ribbon, or berry twigs, be sure to go through at least 2 parts of the spring to stop the wire from sliding off.)
  3. Hang on your tree!

As always, Merry Making!

DIY Skate Key Ornament

D-I-Y-Samantha ExtanceComment

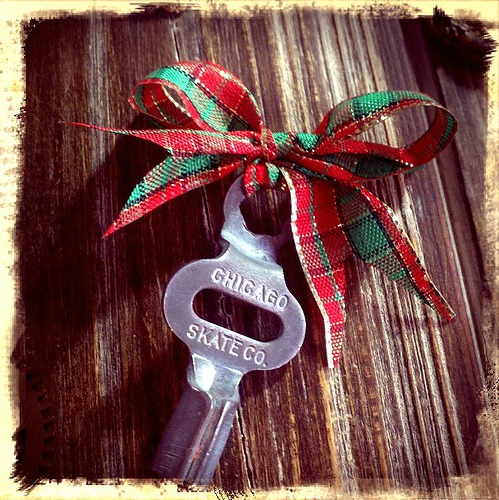
To me Christmas tree decorations are all about nostalgia and remembering tradition, and what better way to do that then to upcycle items you find into ornaments! Here is another simple, yet elegant, steampunkish ornament for your  tree! This DIY is perfect for the kiddos because it's quick and easy. Materials:

  • Skate Key
  • Ribbon (your choice of color, personally I love pairing plaids with dull metal tones)

Tools:

  • Scissors

Steps:

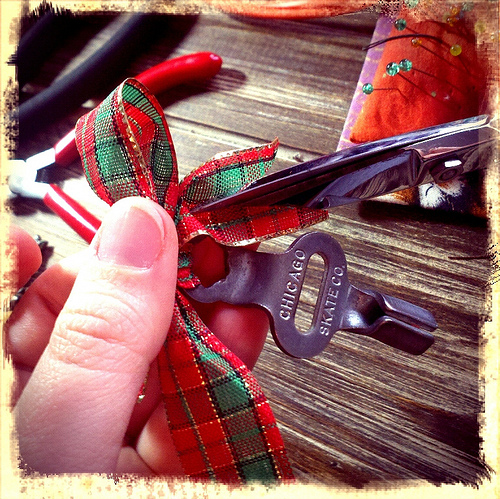
  1. Cut a length of ribbon (I wanted to tie a medium sized bow so I cut approximately 1-1.5 inches of ribbon).
  2. Thread your ribbon through your the top part of your skate key.
  3. Tie a knot at the top of your key.
  4. Next tie an elegant bow.
  5. Last, cut the ends of your ribbon so that they are even. Also, cut an upside "V" into each end so your ends are more decorative.
  6. Hang on the tree (through one of the bow loops) or attach with a Christmas tree hook.

Merry Making to you this Holiday Season!

Santa's Pocket Watch Christmas Tree Ornament

D-I-Y-Samantha ExtanceComment

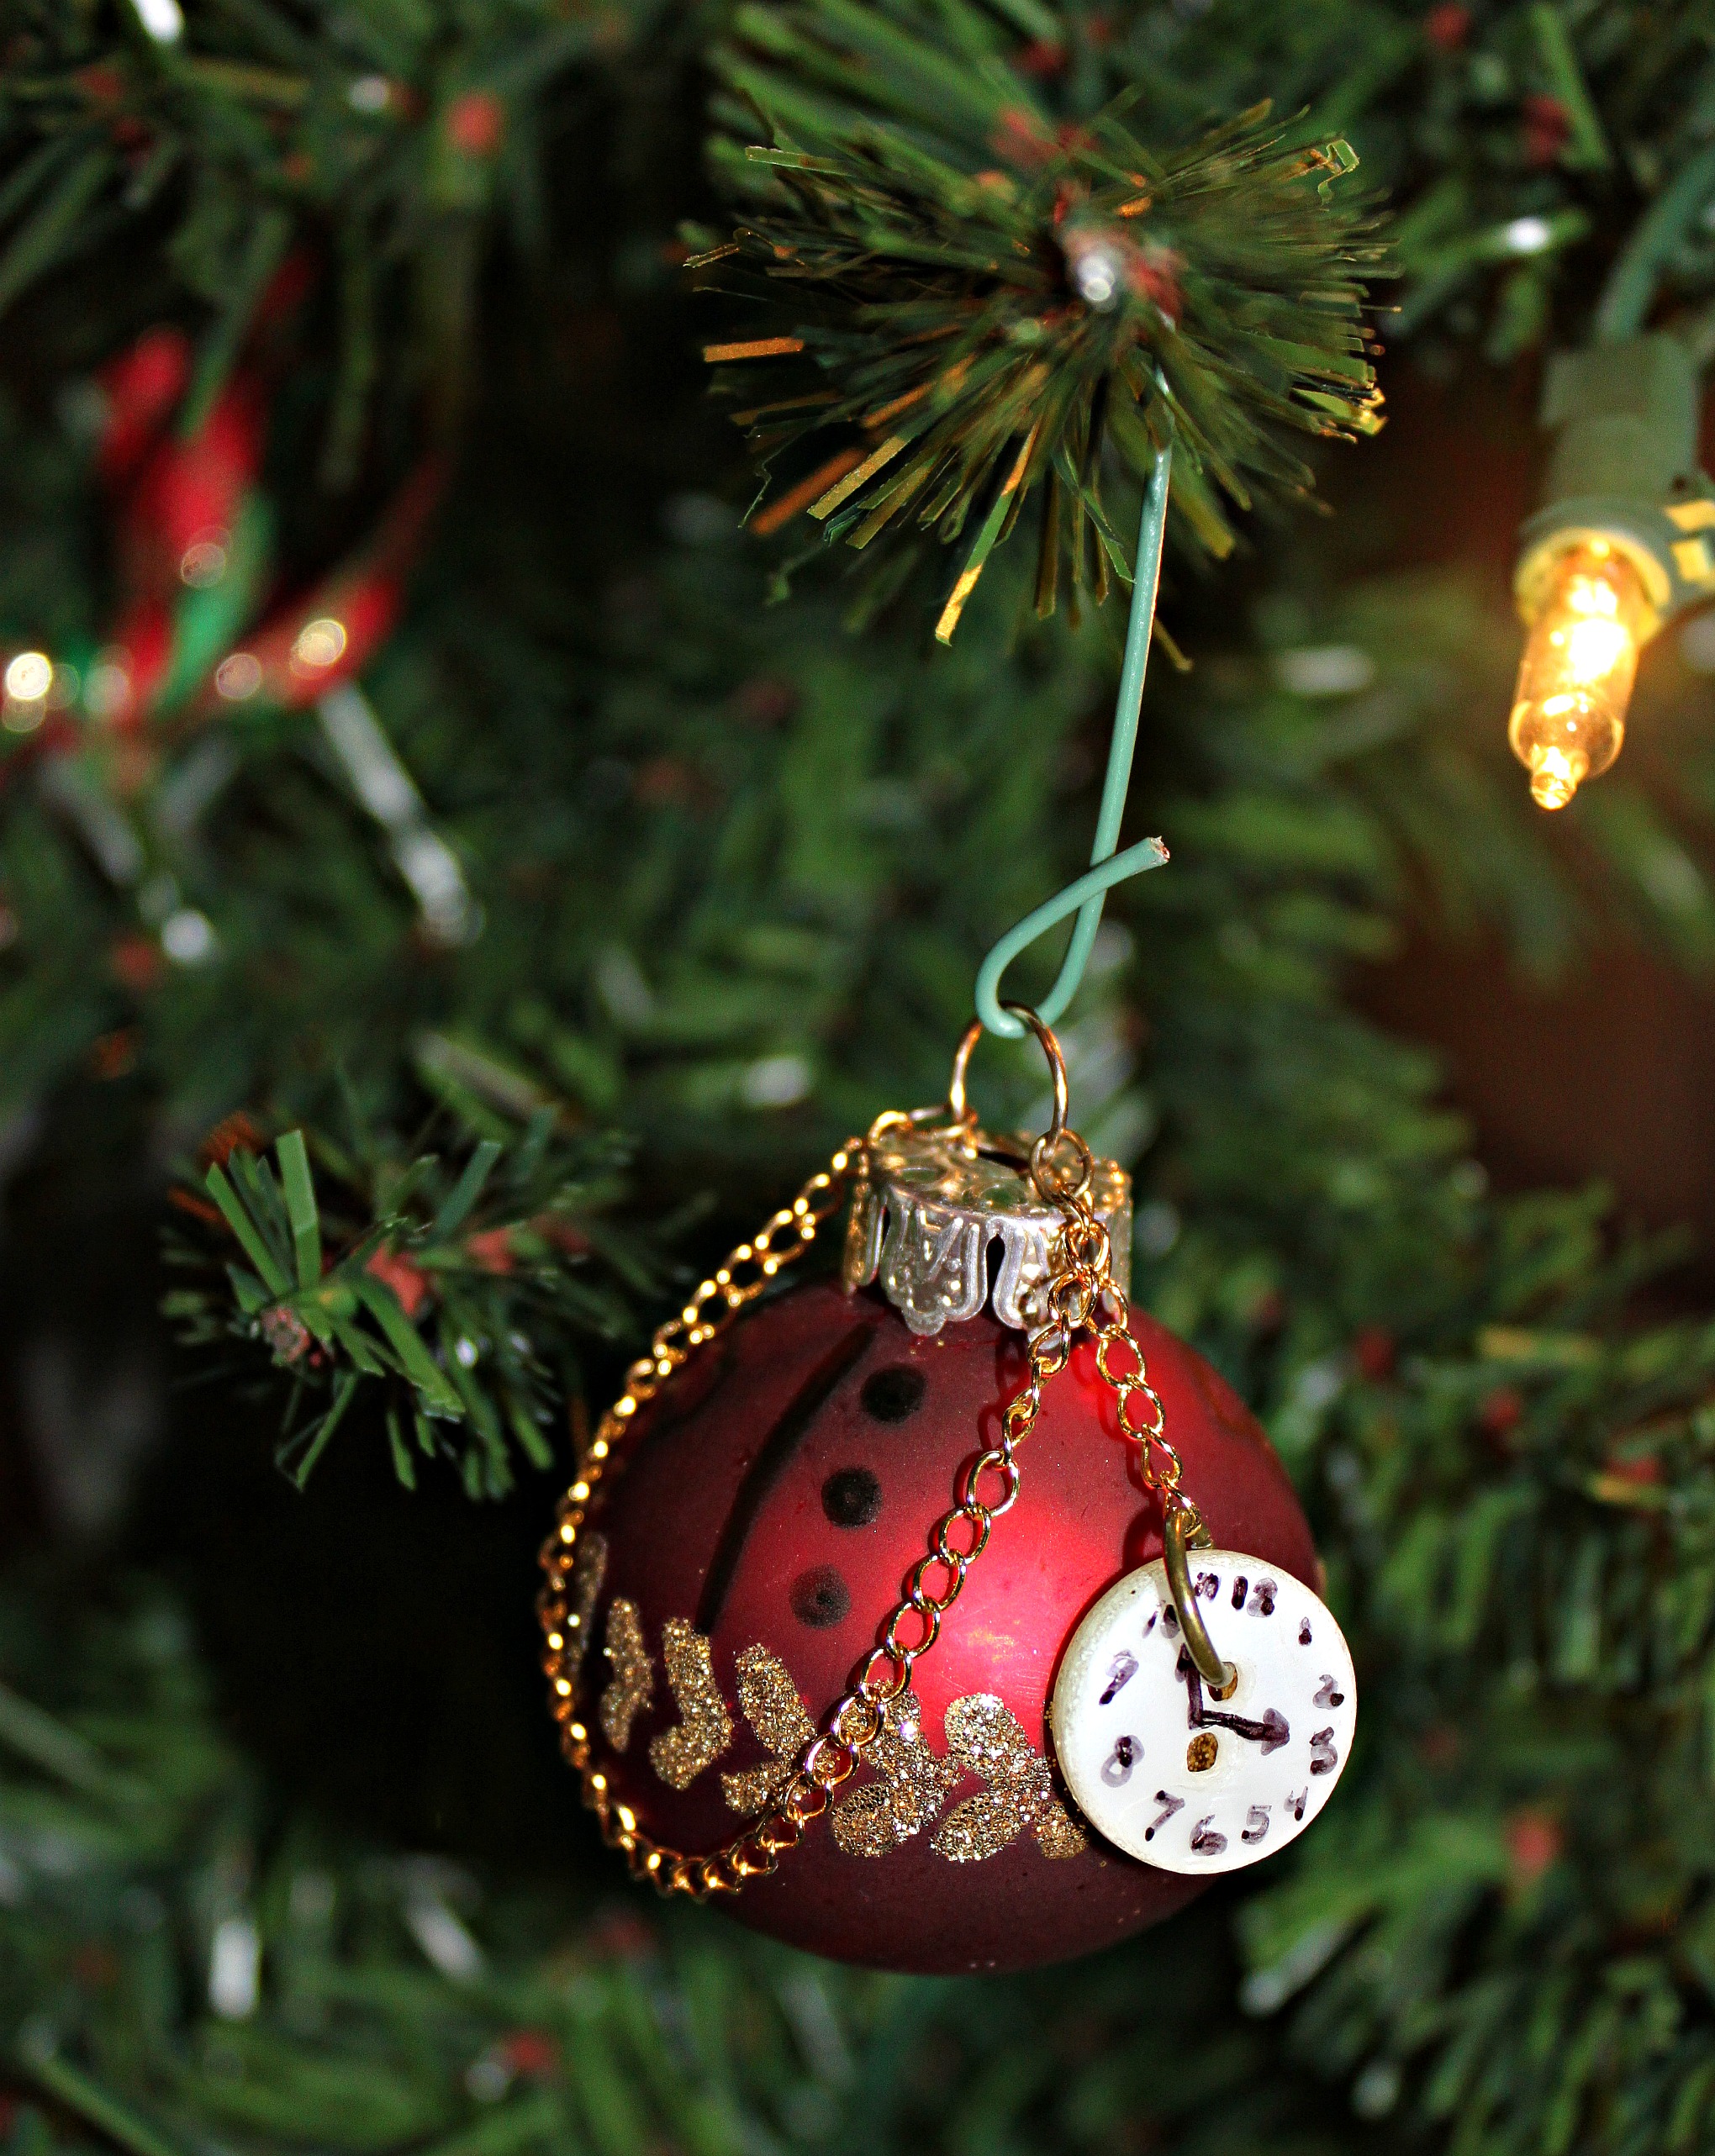
This is a great way to dress up a plain red Christmas ball. It's simple, easy, and costs next-to-nothing to make. Here's what you'll need: Materials:

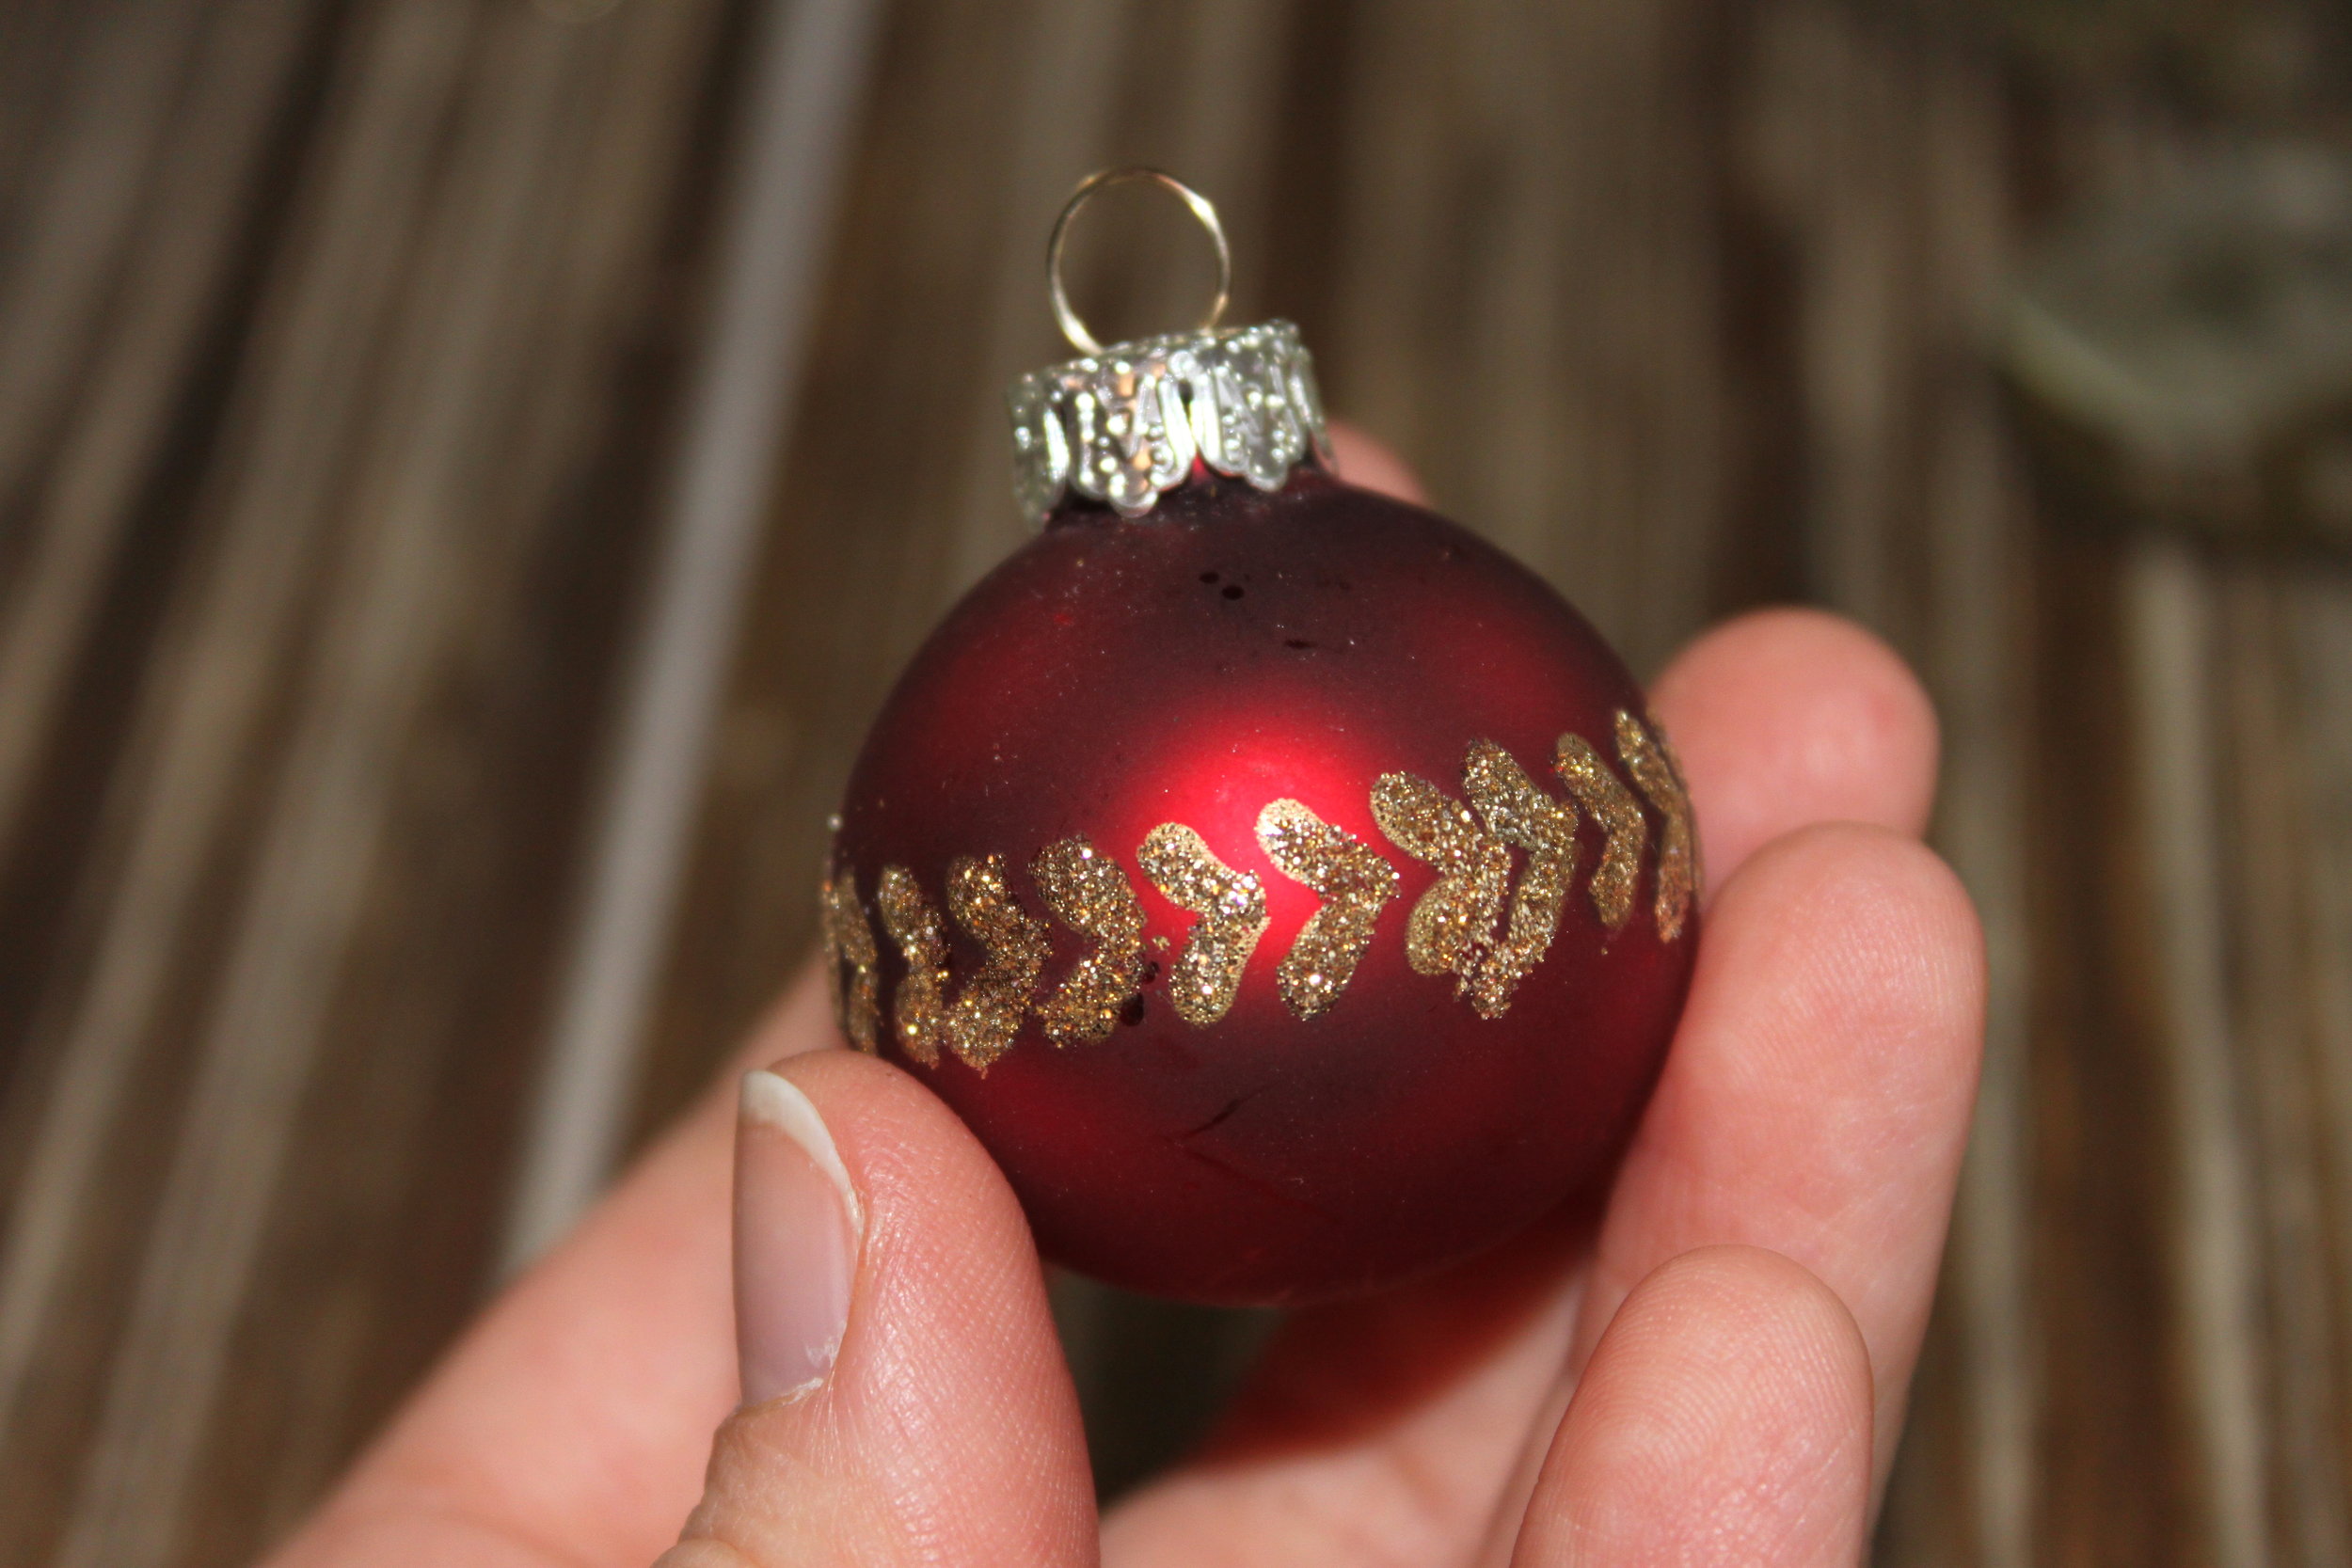
  • Red Christmas Ball
  • Length of Chain (It's best to use something that you'd ordinarily throw away--like broken chain from a necklace or bracelet). The amount of chain you'll need depends on the size of your ornament. Mine was small so I used approximately 1/2 inch of chain.
  • Flat faced button
  • Jump Rings (2 small and 1 large--the large jump ring must fit through one of your button holes)
  • Christmas Tree Hook

I choose this ornament in particular because the gold glittery pattern in the middle looks like a flashy belt. Maybe you want to give your plain red ornament a fancy belt--use some paint & glitter to accomplish this!

Total Cost: Personally, Zero dollars! Check around your house for these materials. Odds are you have a plain red Christmas ball packed away, a loose button, and a bit of broken chain. If are purchasing all of these items, I'd estimate it would cost approximately $6-10 depending on the price of your Christmas ball.

Tools:

  • Fine Sharpie Pen
  • Flat nosed pliers
  • Wire cutters/toenail clippers (in case you need to shorten your chain)

Steps:

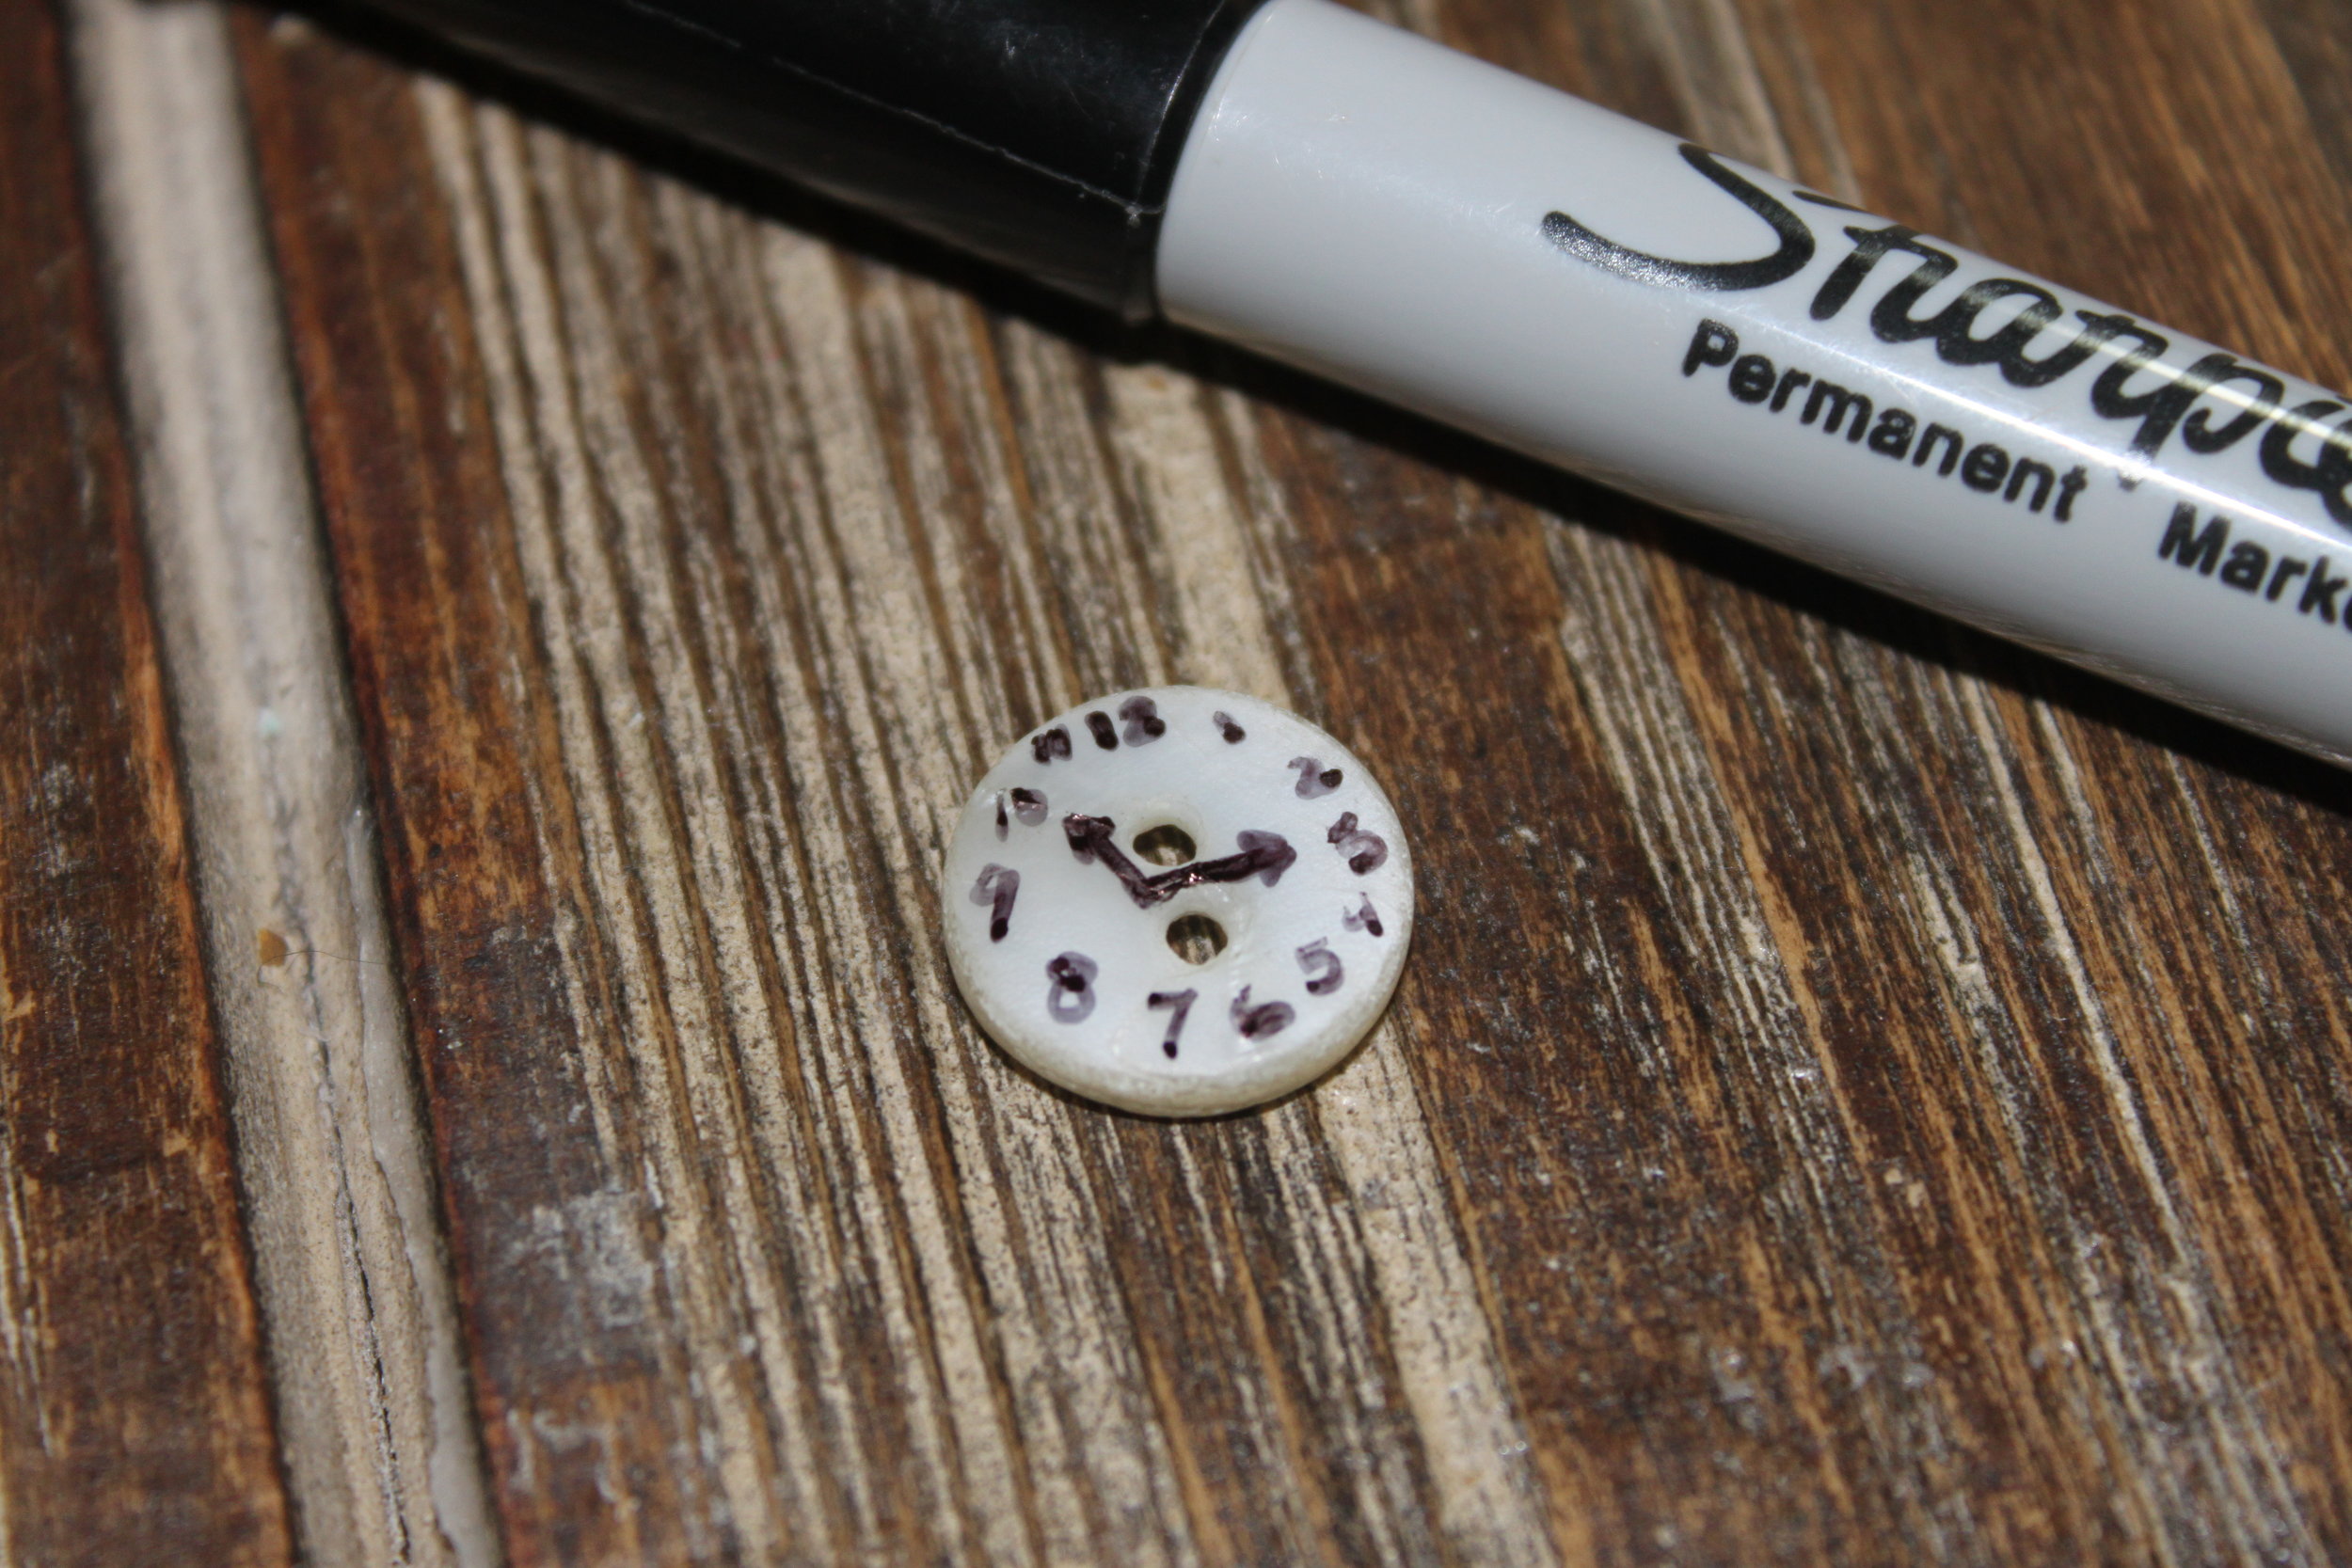
  1. With your Sharpie pen write the hours of the clock onto your flat faced button. Once you're done, draw 2 clock hands. Let dry.
  2. Adjust the length of your chain (if necessary) with your wire cutters/toenail clippers. Keep in mind that you want the chain to drape along one side of your Christmas ball and also remember to leave room for your button to dangle.
  3. Next, attach the button to your chain with your large jump ring. Use your flat nosed pliers to open & close your jump ring securely.
  4. Attach your chain to the wire portion (the top) of your Christmas ball) with 1 of your small jump rings.
  5. Drape the remaining chain along one side of your Christmas ball (in the direction of the opposite side that your chain is attached to the ball).
  6. Grab your small jump ring, and thread your chain onto it. Next, attach your chain to the wire portion (the top) of Christmas ball--remember to leave enough chain for your button to dangle nicely.
  7. Close your jump ring.
  8. Attach your Christmas Tree Hook and hang on the tree with pride!

As always, Merry Making!

DIY Steampunk Gift Wrap

D-I-Y-Samantha Extance1 Comment

There is nothing more wonderful than the sound of crinkling wrapping paper, the sharp tweet from the metal hinge of your scissors, and last the slide and crack of tape being measured & broken. I love gift wrapping (if you couldn't tell from my somewhat silly/poetic description above)! To me the wrapping is just as much of  a gift as the present itself. One of my favorite holiday pastimes--up there with baking cookies with all the lovely ladies in my family--I just pop in some holiday tunes, pile up all the treasures I have for my loved ones, (imbibe a little jolliness) and wrap away. Here are a few DIYS and ideas that are perfect (for more than  just your holiday gift wrapping) for that steampunker in your life! Happy Wrapping!
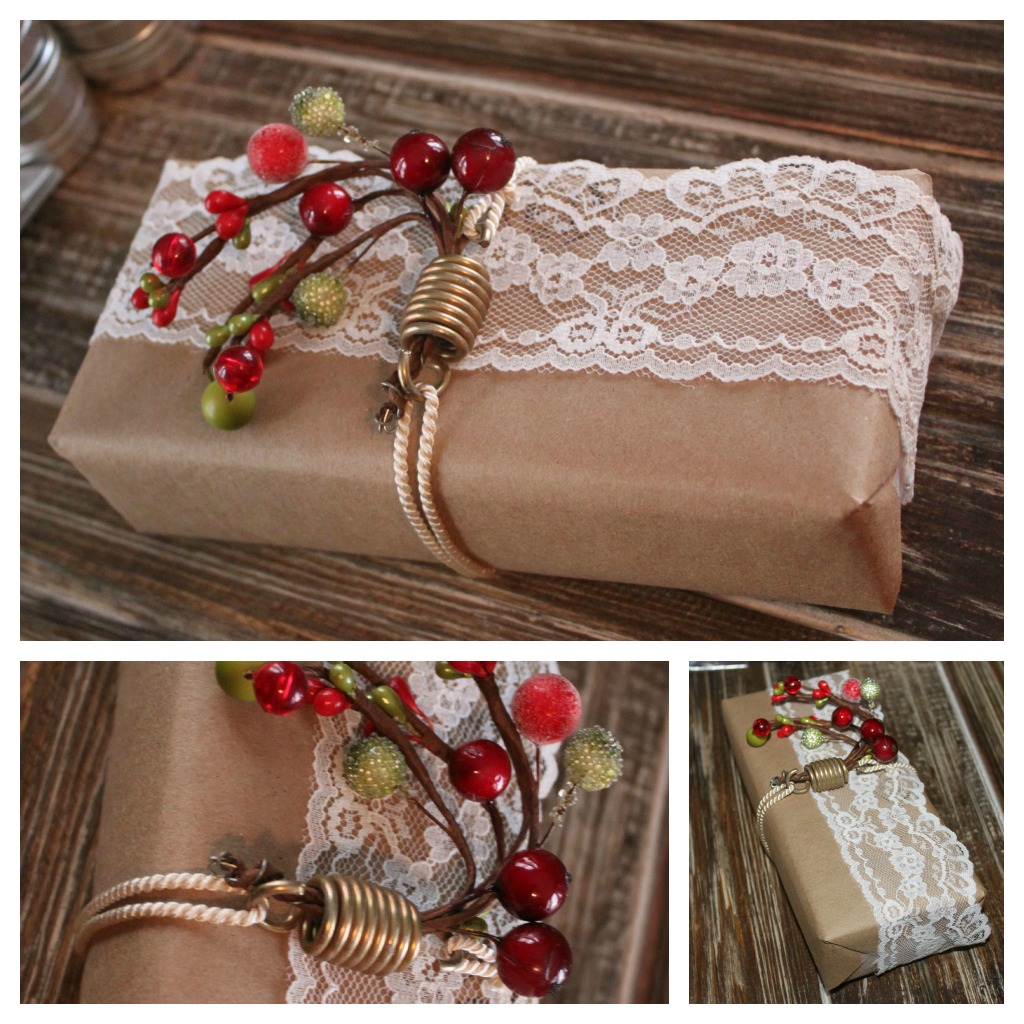
Jolly Spring Wrapping:(Materials: Wrapping paper, lace, ribbon, a spring, and a twig of berries; Tools: Scissors & tape) Wrap your present in your paper, taping it up. Next measure the amount of lace you'll need to fix around your box and cut. Then tape in place. Next thread your twig of berries through your spring and arrange your berries decoratively. And last, attach your spring to the top of your box with ribbon. (I made a knot in the back to hide it).

Frilly Girl Wrapping: (Materials: lace, thick ribbon, and mini doll's purse or coin purse; Tools: Scissors & tape) First, measure your lace and cut the length you need. Then tape it in place. Next measure your ribbon (remember to leave yourself room for a bow) and cut. Tie your ribbon over the lace. Before making your knot thread your purse through one of the ribbon ends. Then make your knot & bow!
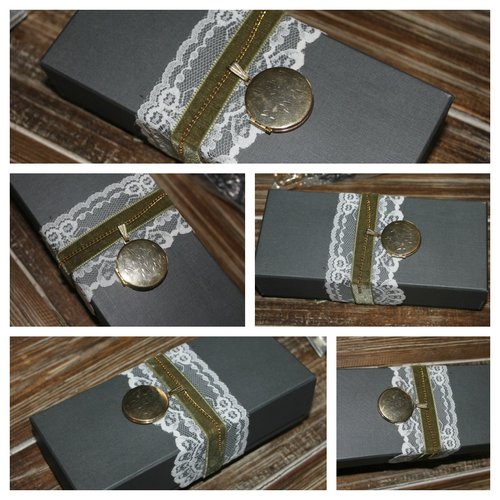
Sweetheart Locket Wrapping: (Materials: Lace, ribbon, a small safety pin and a locket on its chain; Tools: Scissors & tape) First, measure your lace and cut the length you need. Then tape it in place. Next measure your ribbon (remember to leave yourself room for a knot) and cut. Tie your ribbon over the lace and hide the knot in the back. Next affix your locket in place on the top. Flip over to the back (making sure not to lose the locket's place) and safety pin the locket in place. To do so thread through both side of your chain and then through both your lace and ribbon. Tuck any excess chain behind the lace (tape in place if desired).

My favorite aspect of this wrapping is that it's both a tag (if you have it engraved with your loved one's name or initials) and a present itself!
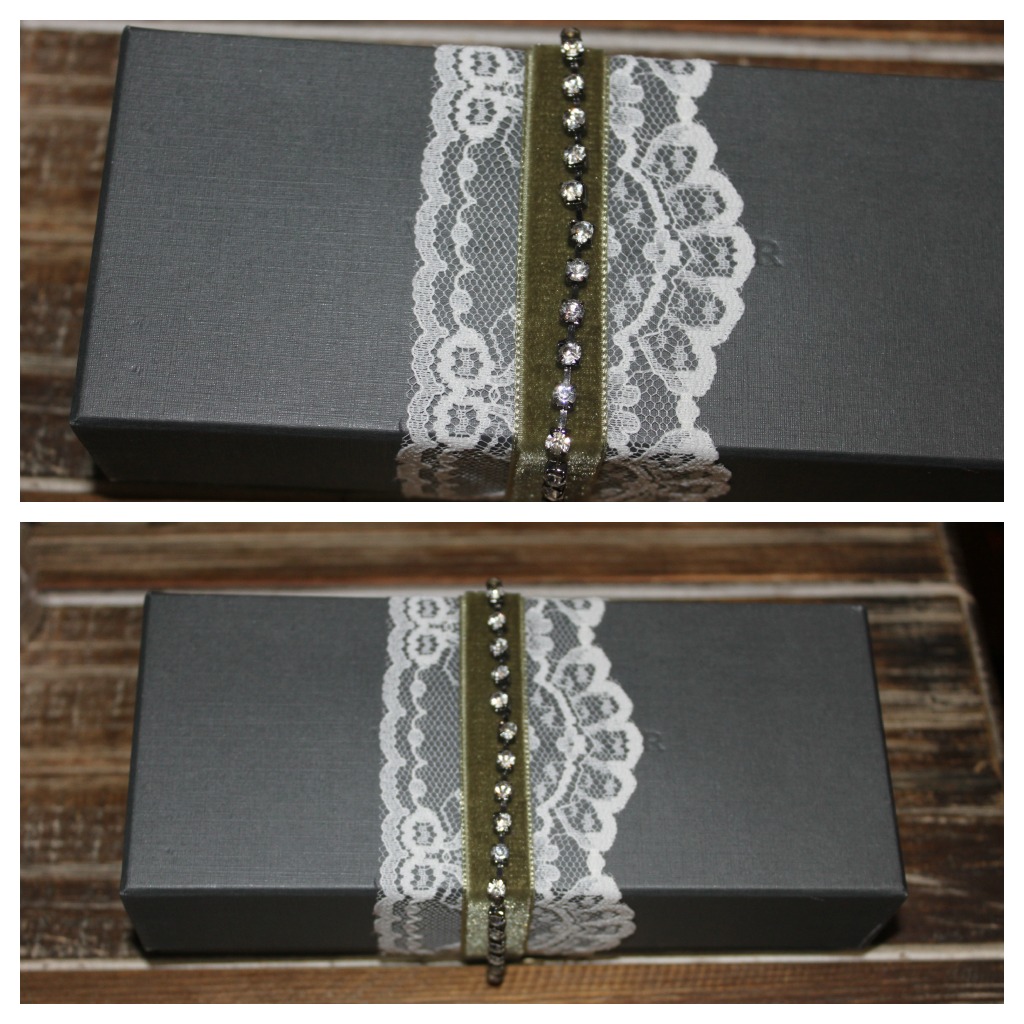
Sweetheart Bracelet Wrapping: (Materials: Lace, ribbon, a small safety pin--maybe 2, and a bracelet; Tools: Scissors & tape) First, measure your lace and cut the length you need. Then tape it in place. Next measure your ribbon (remember to leave yourself room for a knot) and cut. Tie your ribbon over the lace and hide the knot in the back. Next affix your bracelet in place on the top. Flip over to the back (making sure not to lose the bracelet's place) and safety pin in place. To do so thread one safety pin through one end of your bracelet and then through both your lace and ribbon. Repeat for the other side. (If your bracelet fits around your present, simply close shut as you would around your wrist but I'd advise still safety pinning in the back for extra security).

My favorite aspect of this wrapping is that it's also a present itself!

Flower & Spring Wrapping: (Materials: Ribbon or lace ribbon like I used, a fake flower, and a spring ; Tools: Scissors & tape) First, thread your flower through your spring. Next measure your lace ribbon and cut the length you need. Remember to leave yourself room to tie a bow and also tie onto your spring. After you've finished cutting, tie your lace ribbon onto the spring and then around your box. Make a big bow on the front!
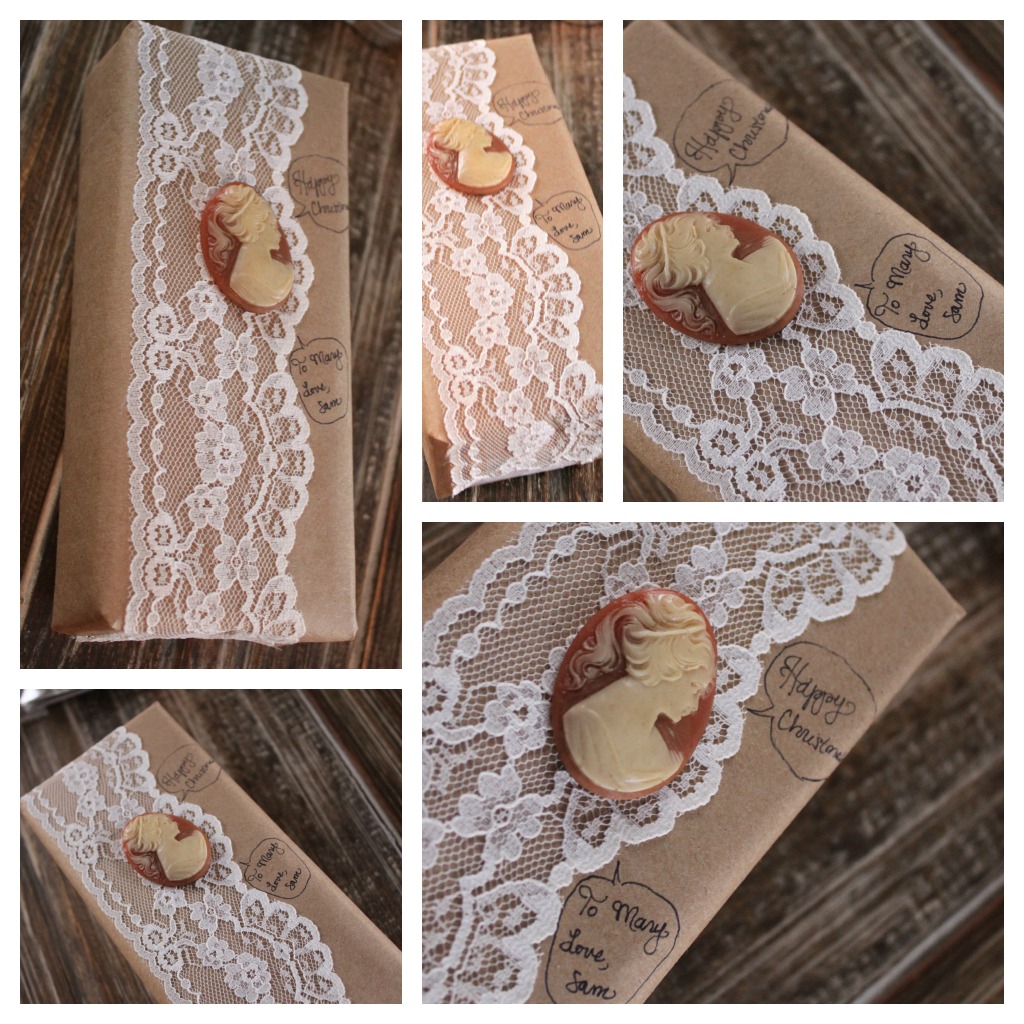
Cameo Comic Bubble Wrapping: (Materials: Lace, wrapping paper, tacky glue, plastic or cheap reproduction cameo, and a pen ; Tools: Scissors & tape) Wrap your present. Next measure the amount of lace you'll need to fix around your box and cut. Then tape in place. Using tacky glue (or any kind of all-purpose glue), affix your cameo onto the top of your present. Last, write your holiday message and/or tag onto the paper and draw a comic book/graphic novel style word bubble on your paper.

I love this gift wrap because you can really personalize it.
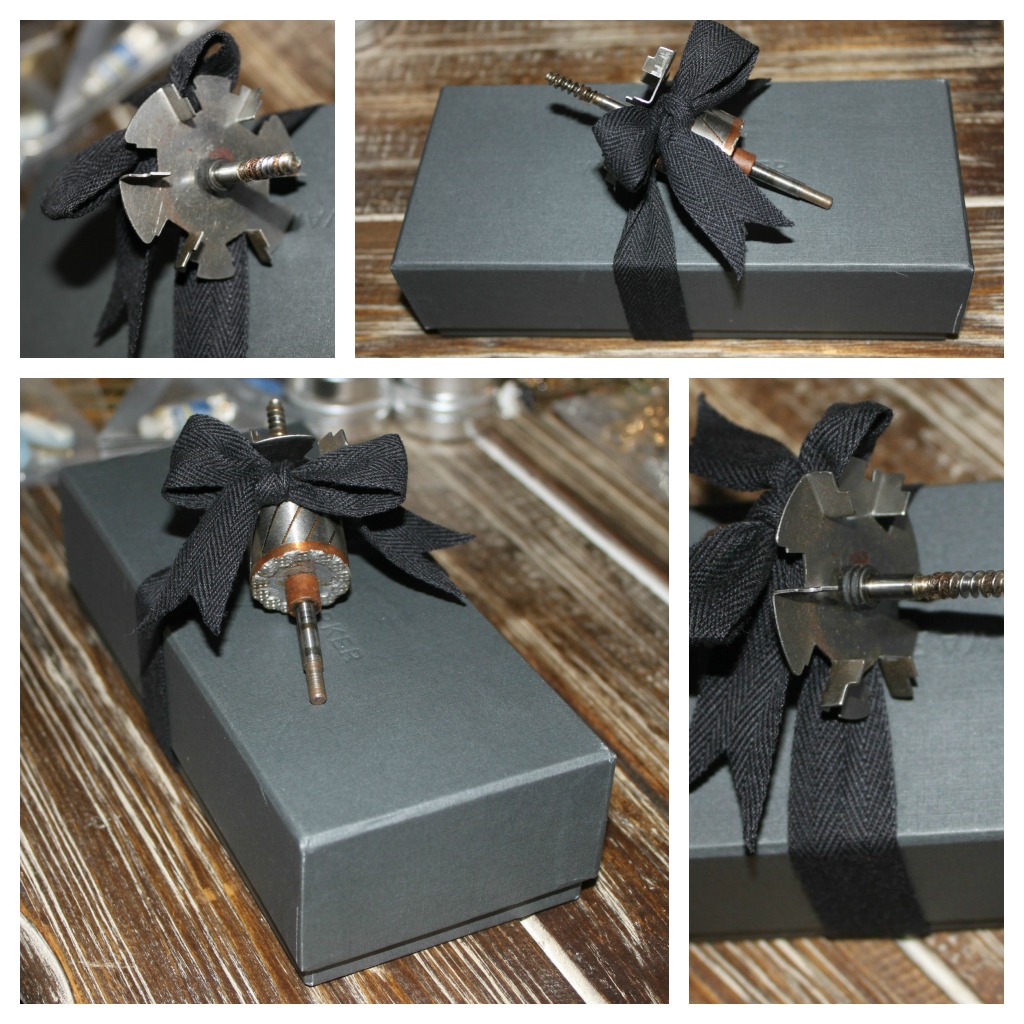
Clock Part Wrapping: (Materials: Ribbon and clock part/ or gear ; Tools: Scissors) Measure the amount of ribbon you'll need to fix around both your box and clock part. Remember to leave room for a bow and an extra knot. Cut. (Also, make your ribbon prettier by cutting an upside down V into each of the ends). Tie around ribbon around your box. Next, place your clock part on top and tie your ribbon around it. Knot. Then make a bow.

This wrapping is really great for guys, gear enthusiasts, tinker-types, or those friends who prefer a more gender neutral wrapped gift. I used a clock part that was big and bulky but you can simplify this wrapping idea by using a clock gear or other machine part.

Key to Wonderland Wrapping: (Materials: Lace, wrapping paper, and snowflake skeleton key ornament; Tools: Scissors & tape) Wrap your present. Next measure the amount of lace you'll need to fix around your box and cut. Then tape in place. Last, hook your snowflake skeleton key ornament through the lace (or if you prefer or are traveling with your wrapped gifts, safety pin it in place). I will be posting a DIY on how to make your own snowflake skeleton key tree ornament within the next week so stay tuned!

What I love about this wrapping is that it's also a present itself--you can take the key off your package and hang it on the tree!
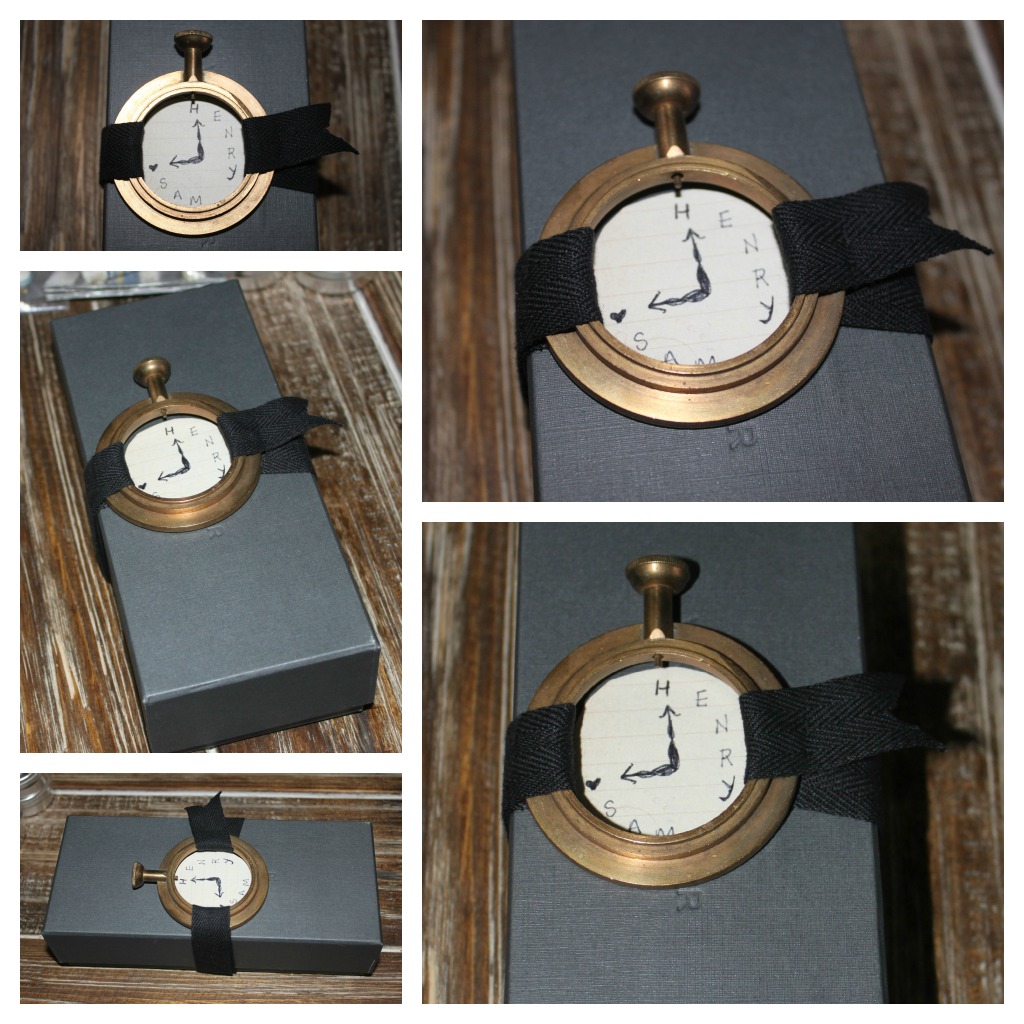
Pocket Watch Wrapping: (Materials: Wrapping paper, ribbon, and a pocket watch frame; Tools: Scissors, needle & thread--thread should match the color of your ribbon, a pen & tape) Wrap your present. Measure the amount of ribbon you'll need to fix around both your box and pocket watch frame (on both sides). Remember to leave room for a a length of ribbon to hang off (pictured on the far right) and to loop around to the back (on the opposite side of the pocket watch frame which has ribbon hanging off the side). Cut. (Make your ribbon prettier by cutting an upside down V into each of the ends). Now loop your ribbon around one side of the pocket watch frame and stitch in place. Leave a little ribbon hanging off to the side decoratively (pictured right). The decorative ribbon should be on top.

The ribbon looped around toward the bottom will be tied around the box and looped through the opposite side of  pocket watch frame. Pull tight and then bring the rest of the ribbon to the back. Flip over your present, and stitch the remaining length of ribbon in place. Cut off any excess. (You can also choose to tie the ribbon in the back but it often makes the frame look funny in the front which is why I suggest stitching it instead).

Last, write your holiday message inside the pocket watch frame on your wrapping paper.
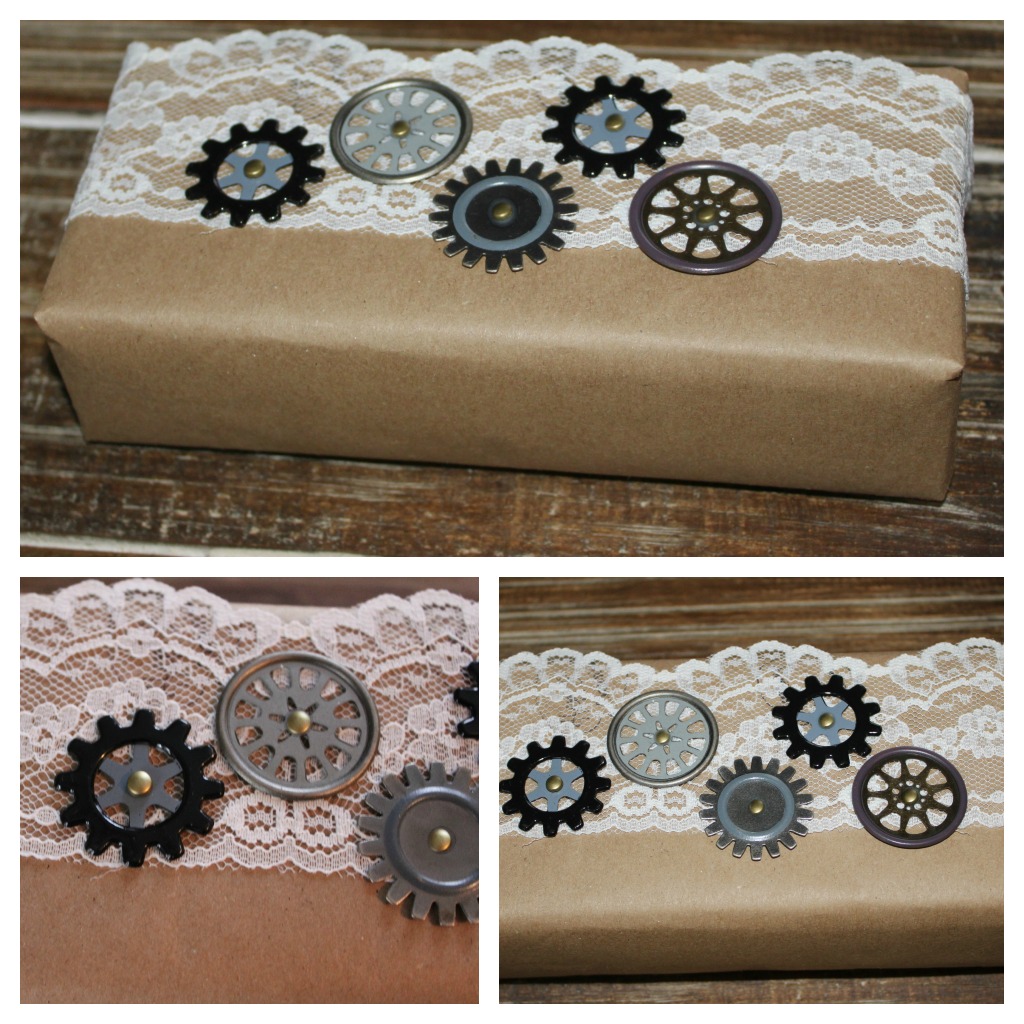
Gears & Lace Wrapping: (Materials: Lace, reproduction or real gears, and brads; Tools: Scissors & tape) Wrap your present. Next, measure your lace and cut the length you need. Then place your gears decoratively on your lace. Once you're happy with their positioning, attach them using a brad. Thread both the gear and the lace onto the brad and pull the brad closed. Repeat with your other gears. Once you've finished, tape your lace in place.

This is by far the easiest and cheapest gift wrap (if you purchase reproduction gears at your local craft store or Michaels).

Steampunk Stamp Wrapping Paper: (Materials: Plain wrapping paper or even recycled paper grocery bags which is what I use, stamp ink in holiday colors, and steampunk stamp; Tools: Scissors and tape) Lay out your paper. Load your stamp with ink and pound away! Create patterns (using a variety of stamps) or just repeat one stamp over & over. If you feel really ambitious you can even highlight the stamp after it's dried by coloring in the image with colored pencil or sketching in the negative space.

Also, you can create steampunk holiday gift tags with stamps--you'll need manilla shipping labels, steampunk stamps, and stamp ink. I purchased my stamps from 123stitch.com! Merry Wrapping to You all! Hope this post gave you lots of ideas! Stay tuned for more Christmas & Holiday Steampunk DIYs over the next month!
Steampunk Home Decor: Silhouette Pictures

D-I-Y-Samantha ExtanceComment

Steampunking your home can be a little pricey--especially if you are searching for antiques & oddities to display throughout; however, that doesn't have to be the case. Here is a simple DIY that can give your walls a little whimsy. Now, let's get creative! Here's what you'll need:

  • Oval picture frame & mat (I purchased mine from Michaels when they had a frame sale, full price this frame is $19.99)
  • Felt (1-2 pieces), the felt I choose had an ornate pattern which made it appear like leather. I recommend using a patterned felt to create your silhouette because it offers up another element of texture (.79 cents ea, $1.58)
  • 1 piece of Scrapbook paper (any color/pattern of your choosing) Personally, I love DCWV (they even have Steampunk scrapbook paper) (1 sheet, $1.00)
  • Tacky Glue
  • Scissors
  • Exacto Knife
  • Paper & Pencil (for tracing)
  • Black Sharpie Maker (optional)

Total Cost (excluding tools): $20.99 (per silhouette)

Steps:

  1. After you've purchased your supplies, download  the silhouette head (or feel free to draw your own). Re-size it to fit your frame. This is how I re-sized my silhouette: I eye-balled it and enlarged the image on my computer. I then pulled out the stock photo from the frame and placed it over the silhouette on the computer screen. If your silhouette fits inside of the stock photo's parameters (with a little room left over for the embellishments [the hat, bubble pipe, etc.] you'll be making), then you can print your image. (If the silhouette doesn't fit, keep re-sizing your image.) Here is the silhouette template:  Steampunkin Template--BohemianRomanceSilhouette
  2. Once you've printed your silhouette, trace her onto the wrong size of your felt with your pencil. Remember your silhouette will be flipped (facing the opposite direction once you've cut her out and flipped the silhouette over).
  3. Now it's time to draw her embellishments. Draw on a hat, or a pipe with bubbles, or anything else you fancy! For more intricate embellishments, for instance, the microscope, it's better drawn on paper. Keep that in mind as you are drawing on your felt.
  4. Once you are done drawing & tracing, use your scissors to cut out your silhouette & embellishments. Set aside.
  5. Grab your stock photo from the frame and your sheet of scrapbooking paper. On the wrong side of your scrapbooking paper, trace the stock photo's oval outline. Cut out and set aside. If your stock photo sheet fills the whole frame, and is not just a photo taped to the mat, be sure to trace lightly the photo's outline (on the right side of your scrapbooking paper) so you know where to place your silhouette and embellishments.
  6. Next, glue your silhouette and embellishments in place on your scrapbooking paper. Let it dry for 5-10 mins.
  7. Place your scrapbooking paper in your frame and close.
  8. Hang on the wall and brace yourself for the flood of compliments you'll be getting! (People love whimsy!)

To make the Microscope (or any other intricate embellishment or prop):

  1. Find an image of the object you desire, in this case a microscope. Be aware of copyright. I used an image of a microscope from The Graphics Fairy. Her images are free for creative use (and she has a steampunk collections of images).
  2. Re-size accordingly (as detailed in Step 1 above).
  3. Trace from your computer screen (or you can print it and cut it out). I choose to trace the image so that I could use heavy cardstock which jams in my printer.
  4. Once you've finished tracing, cut out the image.
  5. Color (optional). I colored my microscope with a sharpie marker so that it would also look like a silhouette.
  6. Glue in place.

If you don't want to make one of your own, you can also purchase a print of either of my silhouettes from me on my Etsy shop (coming soon). Then assemblage is super simple, 1. Purchase 2. Pull out of package 3. Place in frame! For all the rest of you, Happy Making!
DIY Steampunk Crown & DIY Steampunk Pirate Queen Costume for Halloween

D-I-Y-Samantha ExtanceComment

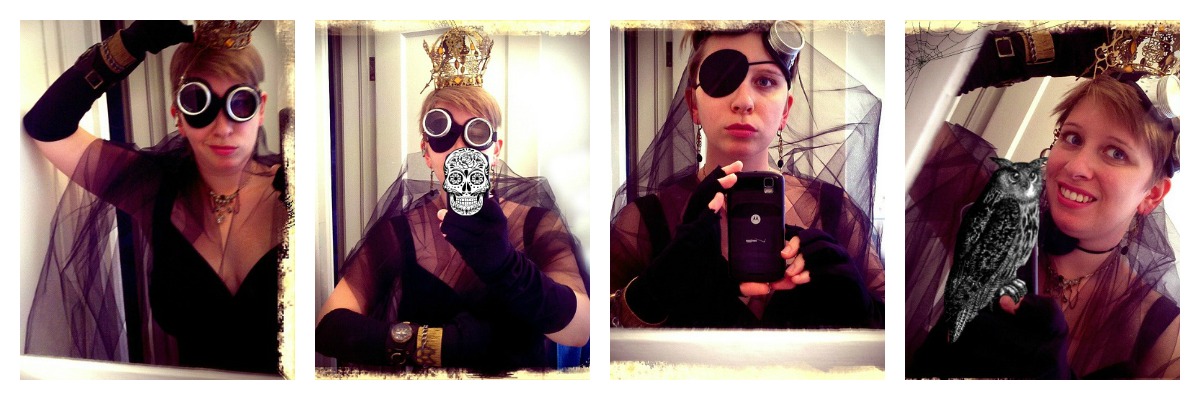
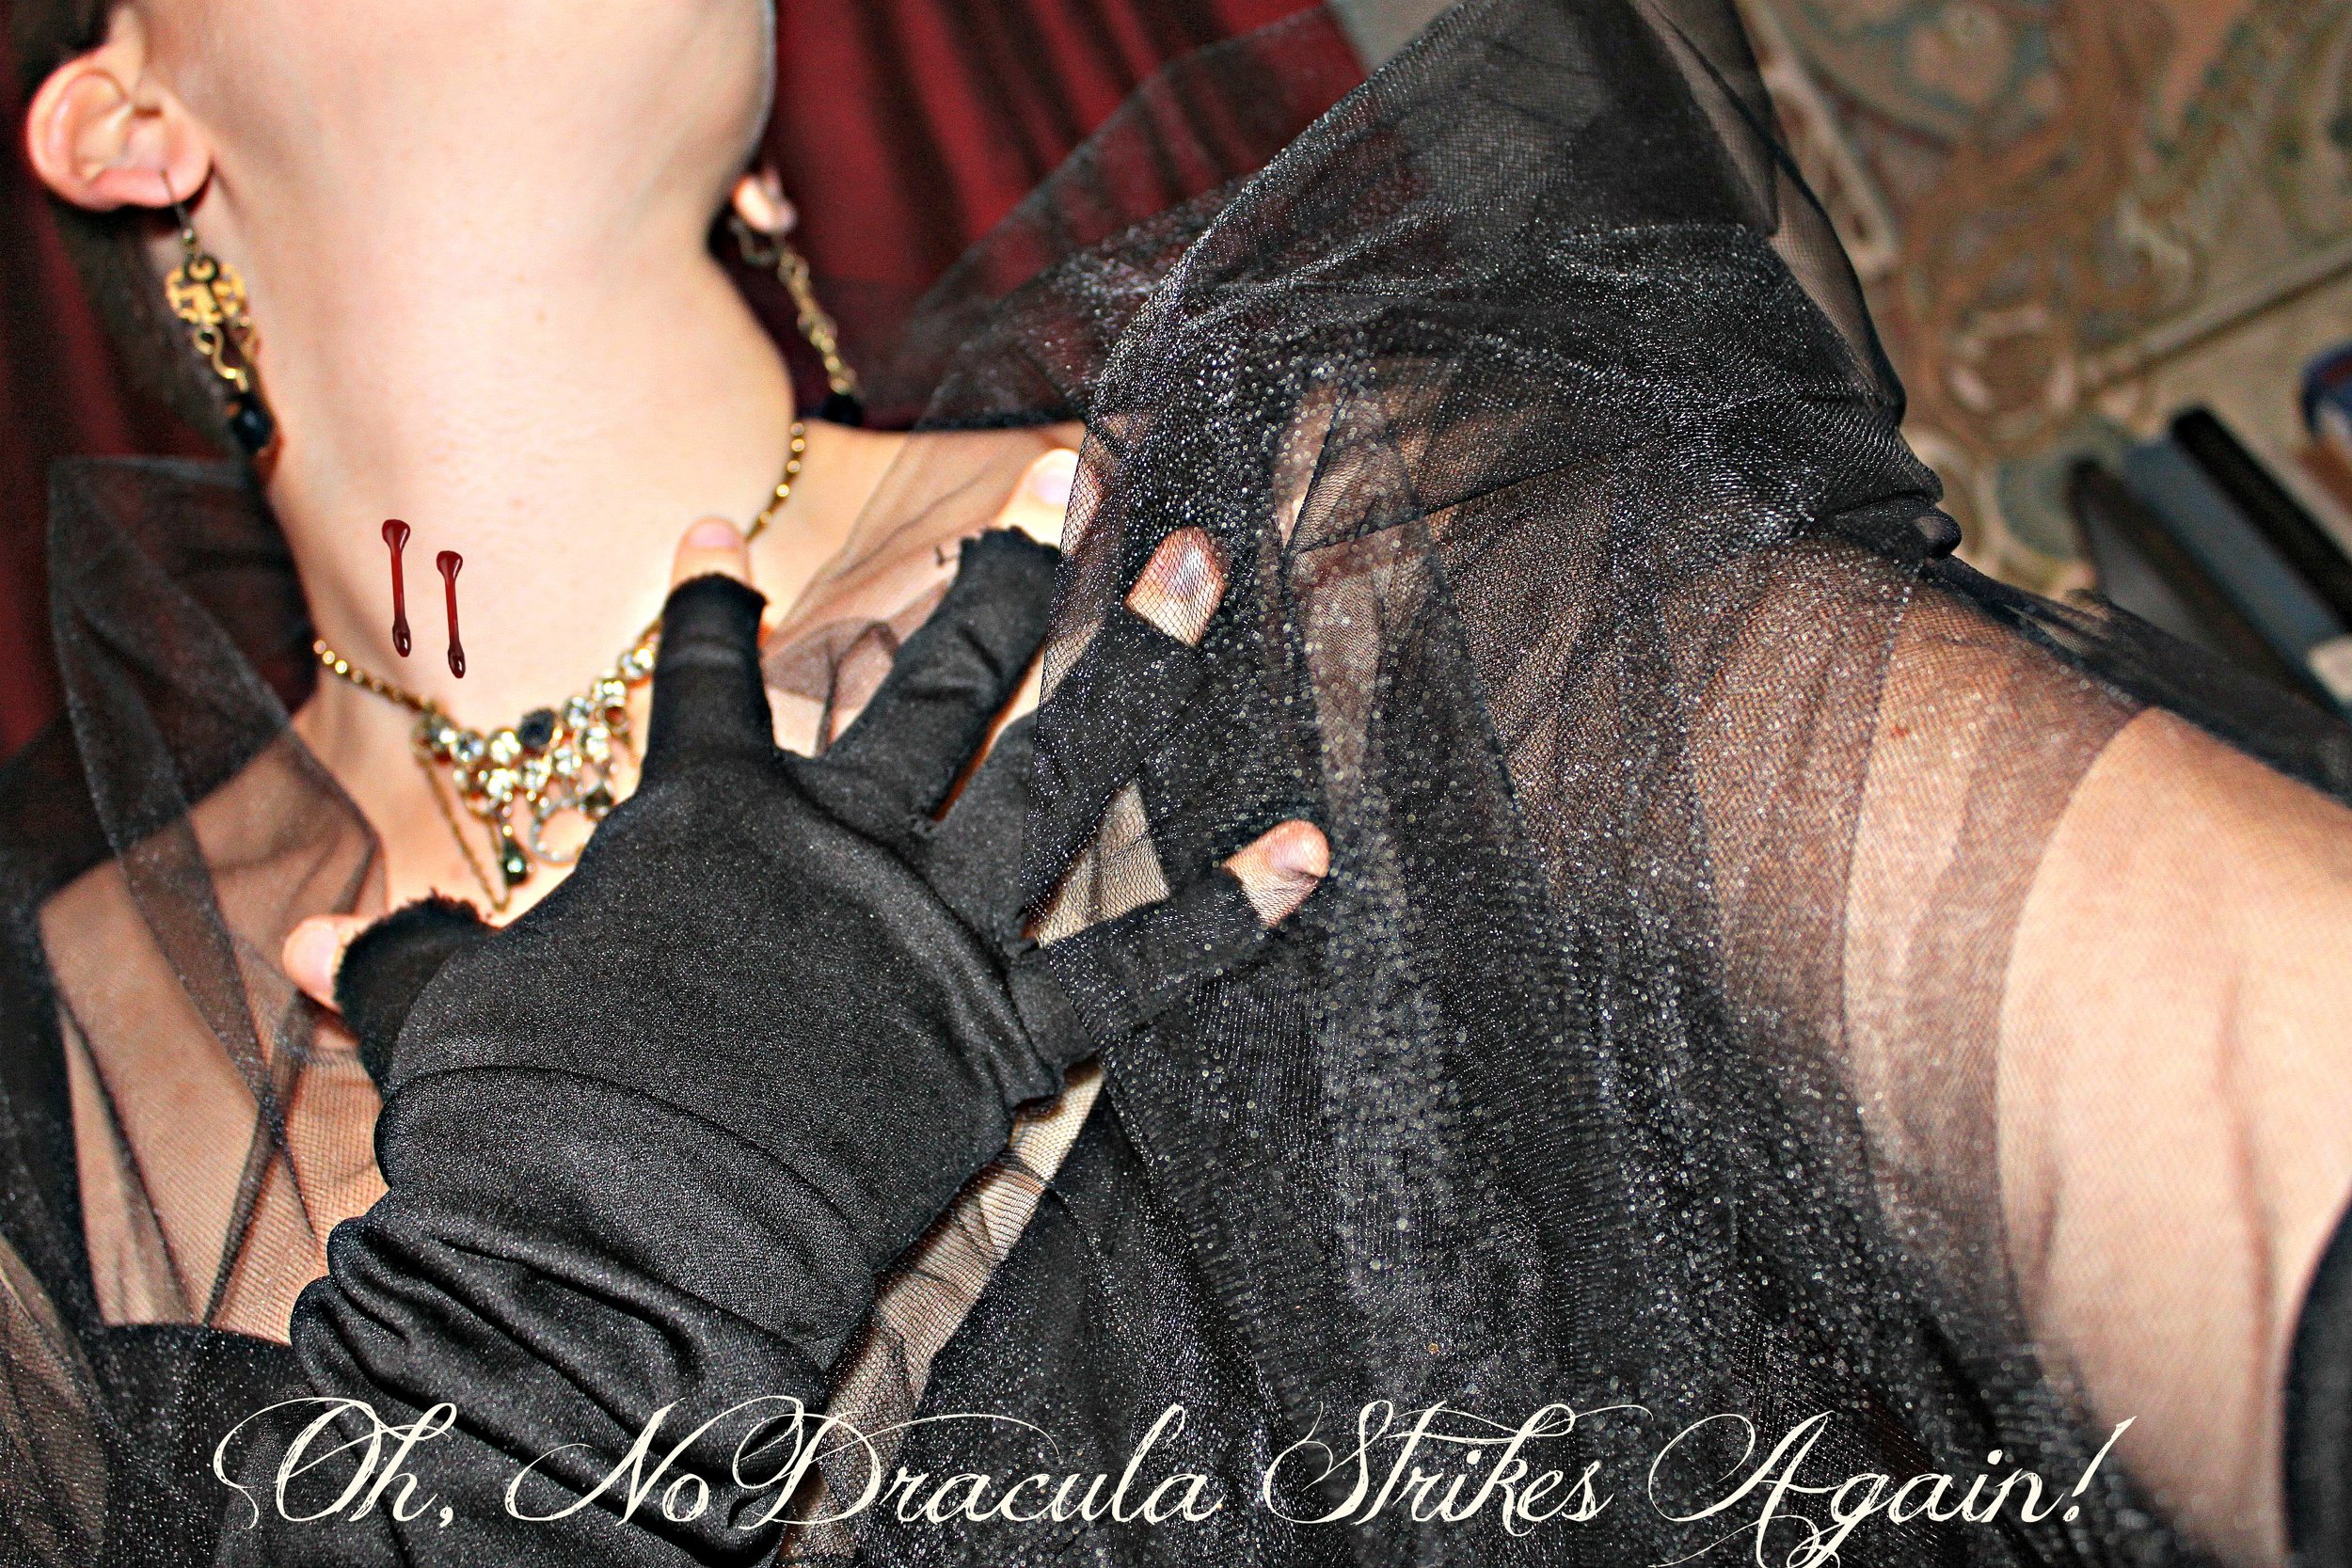
Like me I know a lot of you are making your own costumes not only for the fun of it but also because of your budget. Here is a DIY Steampunk Halloween costume that costs under $100 (and even less if you have some of these items already). Be a Steampunk Pirate Queen this Halloween (or Empress or Imperial Majesty...whichever title you prefer, after all you're the ruler).

(Forgive the phone in the mirror shooting--I did cover the phone up with some spooky overlays--check out PicMonkey's Halloween themes to edit pictures with! It's super fun & festive!)

Here's what you'll need:

  • A fancy dress (Now is the perfect time to dig up that unworn dress sitting lonely in the closet or that bridesmaids dress that you haven't put on since the wedding). If you don't have a dress, try pursing your local thrift stores for dresses. Steampunking it is easy with accessories and a little tulle! Don't worry if your dress is short--punk it up with your favorite pair of Fall/Winter boots! (Already Owned, hopefully)
  • Tulle (approximately 2-3 yards, depending on your size and how long you'd like it to trail after you). I'm a size 14 and so I purchased 2 yards. Tulle is cheap at Joann Fabrics during Halloween (go when you have a coupon)! $2.00
  • Elbow-Length Gloves (you can source these from anywhere, thrift stores or a cheap Halloween shop). I made my gloves fingerless but cutting off the ends. $12.99
  • Eye patch (any Halloween shop or Dollar Store has an eye patch you can purchase pretty cheaply) I bought mine at Party City where I also found my elbow length gloves. $1.99
  • Goggles (This may be harder to find than other items but check your local flea markets, estate sales, & thrift stores--which may have goggles for lower prices). My favorite pair of reproduction goggles is made by Restoration Hardware, click here to purchase or view their "German Goggles" in the RH online catalog. These goggles are simple, elegant, and relatively inexpensive. $24.99
  • Crown (or Large Christmas Tree Crown Ornament) The crown I am wearing is actually a Christmas Tree ornament that I purchased at a local shop, Garden Ridge (in their Gold Ornaments aisle). The DIY to make your own crown from a Christmas Tree ornament is below. Keep reading! $4.99 (Gears & Brads to adorn it with: approximately $14.99)
  • Steampunk Jewelry (or any mismatched metal & chain jewelry that you own already) Some of you I know already own a few of my pieces (thanks!)--mix & match them with other rhinestone or bling-ish jewelry you own to add a little sparkle. (Already owned or you can click here for my Etsy shop and find something to go with your costume!)

Total Cost (excluding a dress & jewelry): $61.95

The most important part of your costume...airship pirate's attitude. A Queen still gives her mateys a mightly Argh!!

DIY Steampunk Crown

Materials & Tools:

  • Crown Ornament (a filigree metal crown is best since it has many holes in it already) ($4.99)
  • Brads ($4.99)
  • 1-2 packages of reproduction metal gears ($5.99 each at Michaels--try their "Found Objects" or "Industrial Chic" brands) or salvaged machine or gear parts (preferable, sourced from local flea markets, estate sales & such)
  • Light bulbs (optional)
  • Rhinestone clip-on earrings (optional)
  • 2 Grandfather clock hands (optional)
  • Small magnifying glass & chain (optional)
  • Wire (as close to the color of your crown) & wire cutters (for attaching light bulbs)
  • Pair of flat nosed pliers

Steps:

1) If your ornament has any hooks or ribbons for hanging on the Christmas tree, remove them or cut the ribbons. Here's what mine looks like:

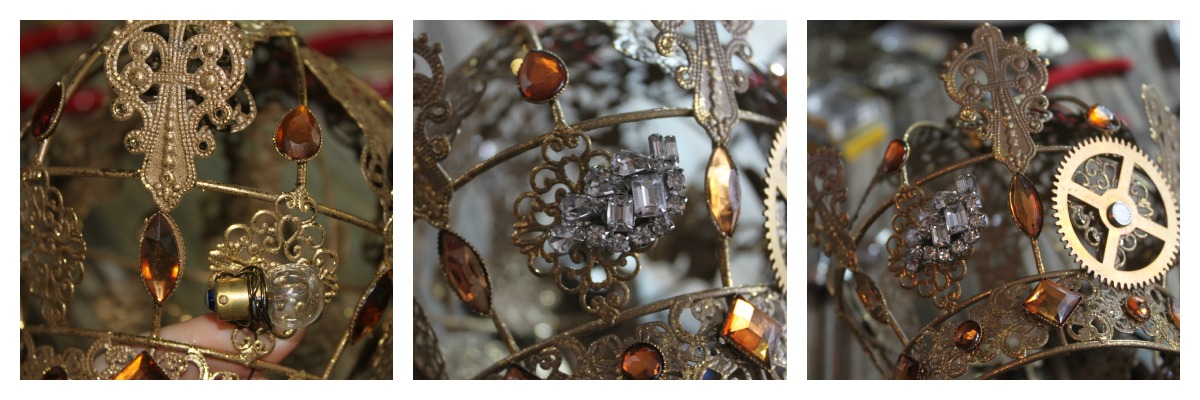
2) Next, lay out the items you wish to attach to your crown & begin placing them. Gears can be attached with brads through the holes in the crown's filigree. Secure them by prying apart the two ends of the brad so that they hold the gear in place. You may want to crimp the brad shut with a pair of flat nosed pliers (or any kind of flat pliers).

3) (Optional) To secure a light bulb to your crown, cut a length of wire (proportional to your bulb's size. For  tiny bulbs, approx. 1 inch) & loop the wire around the bulb through the filigree and back through again & around (Like sewing stitches) until the bulb is secure. Another option is to secure the light bulb in place with glue & a glue gun.

4) (Optional) For extra sparkle on your crown, add a rhinestone (or any sparkly gemstone) clip-on earring. The clip should hold, but if your earring is old and the fastener is loose you may want to secure it with a bit of wire (approximately 1/2 inch will suffice).

5) (Optional, but highly suggested) To attach your grandfather clock hands, use brads and secure in place with pliers as instructed in Step 2 above. If your grandfather clock hands are heavier and cannot be kept in place with brads, use a small screw, washer, & nut to hold it in place. A great selection can be found in the Science Projects section at Lowes or Home Depot in the Hardware section.

6) (Optional) To add a monocle, attach a length of chain (measure where you'd like it to fall--keep in mind it will whip you in the face so I'd advise to make it longer than eye-length. A good zone is between the bottom of your nose to your chin). Using a jump ring  attach the chain to a small magnifying glass (available at some dollar stores & grocery stores; available at bead shops, like the Bead Merchant on 15th street & Delaware). Using another jump ring, attach the other end of the chain to your crown with your pliers. You can dress up your magnifying glass chain as I did above by adding crystal beads & a piece of filigree!

7) Once you have attached all of your embellishments to your crown, wear proudly!

Other Ideas for Accessories: Faux-fur, a Sceptor, A Sword (for Knighting your minions), a Queenly cape, & a dance card

Have fun crafting your costumes! If any of you decide to be a Steampunk Pirate Queen please post or email your pictures to bohemianromancejewelry@gmail.com I'd love to see them! Check in later this week to find out how to Steampunk your Pumpkins!

DIY Steampunk Curtain Ties

D-I-Y-Samantha Extance1 Comment

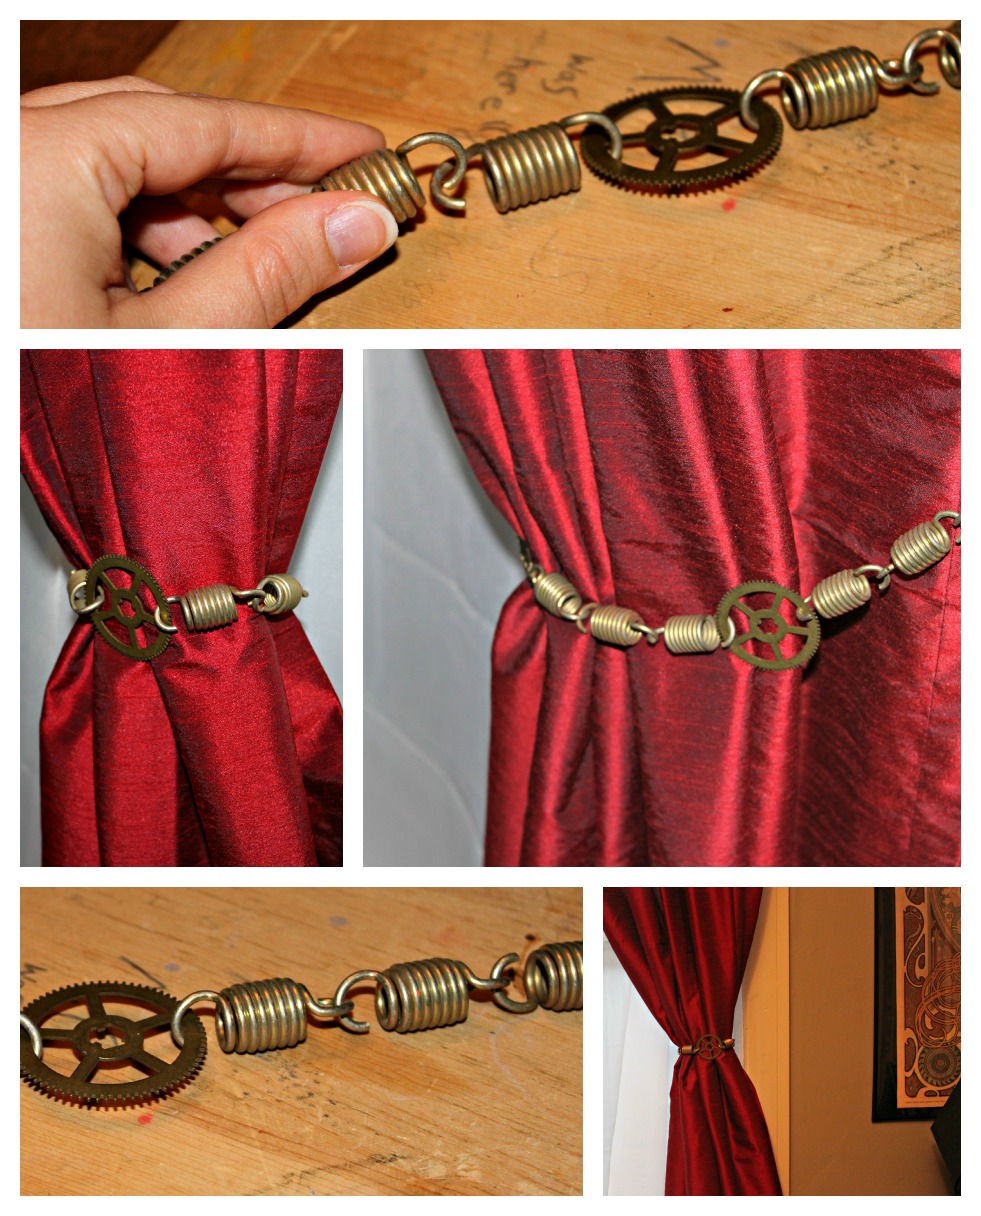
6 Different Steampunk Curtain Tie DIYS to subtly transform your decor! Materials & Tools are listed below by project. So let's get to makin'! Spring & Gear Steampunk Curtain Tie

  • 8-12 springs (depending on the thickness of your curtain)
  • Grandfather clock gear
  • Flat nosed pliers & jump rings

Steps:

  1. Link the springs together. (My springs are open ended, but if yours are closed ended connect your springs with a jump ring using your flat nosed pliers.) Link 4-6 springs together then add your grandfather clock gear.
  2. Next, add the remaining 4-6 springs to your gear & spring chain.
  3. Gather your curtain and place your spring & gear chain around it, connecting the two spring ends. (Again, mine are open ended so connecting them was simple; however, if your springs are closed ended, use a jump ring as detailed in Step 1.)

Skeleton Key & Chain Steampunk Curtain Tie

  • Skeleton key
  • Chain
  • 4 jump rings
  • Flat nosed pliers
  • Measuring tape
  • lobster claw or hook

Steps:

  1. Gather your curtain and measure out how much chain you need. Cut the amount needed.
  2. Add your lobster claw or hook to the end of your chain using a jump ring and your flat nosed pliers.
  3. Next, attach your skeleton key to your chain wherever you desire using your jump rings and your flat nosed pliers.
  4. Last, gather your curtain and place the chain around it and secure by connecting your lobster claw or hook to the last loop of your chain.

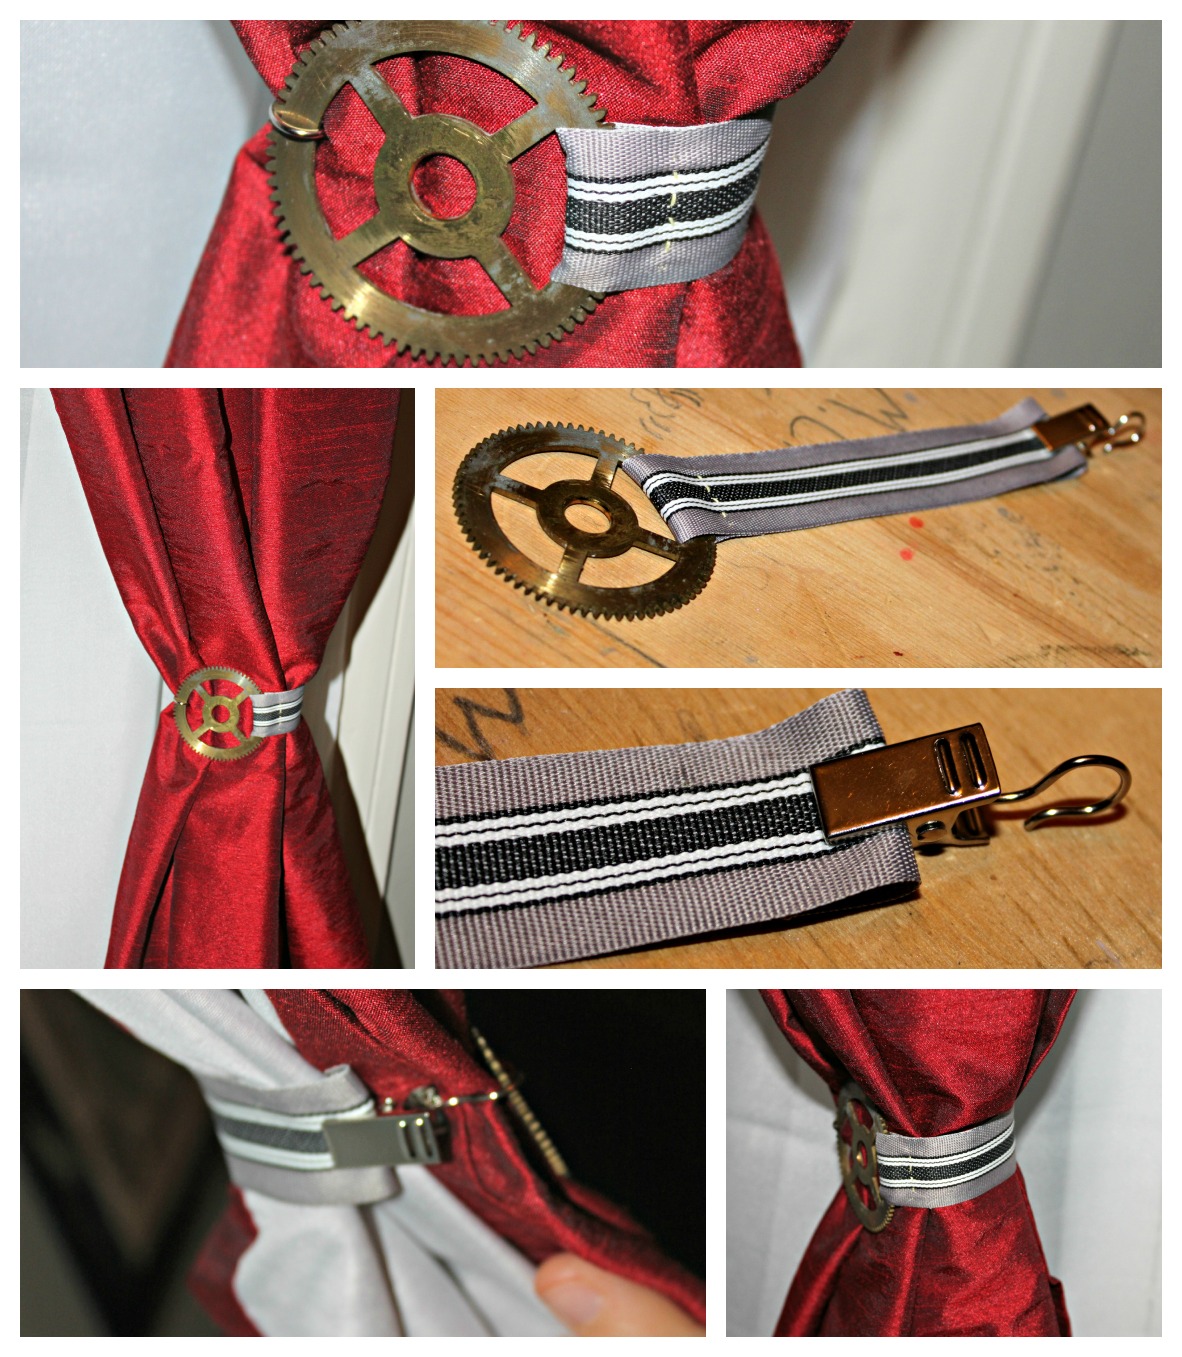
Ribbon & Gear Steampunk Curtain Tie

  • Ribbon
  • Grandfather clock gear
  • Needle & thread
  • Scissors
  • Clamp-hook
  • Measuring tape

Steps:

  1. Gather your curtain and measure its gathered width. Add a 1/2 inch. This width will equal the length of your ribbon.
  2. Cut your ribbon to your needed length.
  3. Next, fold one end of your ribbon around your grandfather clock gear. This is where your 1/2 inch allowance is used.
  4. With your needle & thread, sew the fold in place. Be sure to tie a sturdy knot. Cut off the excess thread.
  5. Place your clamp-hook on the other end of the ribbon.
  6. Gather your curtain once again and wrap the ribbon around it. Secure the tie in place by fishing the hook onto your gear.

Lightbulb, Velvet Ribbon & Gear Steampunk Curtain Tie

  • Velvet ribbon (or an old choker: if you do use an old choker you can skip ahead to Step 3)
  • Grandfather clock gear
  • Chain
  • Wire & wire cutters
  • Flat nosed pliers
  • Scissors
  • Measuring tape
  • Lightbulb or (lightbulbs)
  • 2 ribbon ends (or crimps)
  • 4 jump rings

Steps:

  1. Gather your curtain and measure its gathered width. Next measure your gear. Subtract your gear's width from your curtain width. This width is equal to the length of your ribbon.
  2. On each end of your velvet ribbon, place a ribbon end (or crimp) using your flat nosed pliers.
  3. Attach your gear to one end of your velvet ribbon with a jump ring using your flat nosed pliers. Set aside.
  4. For this step you'll need wire and wire cutters. Grab your lightbulb and begin wire wrapping its base. Be sure to create a loop so that you can connect the lightbulb (or lightbulbs) to your gear (and/or chain). Cut off excess wire.
  5. Connect your lightbulb to your gear using a jump ring and your flat nosed pliers (through the wire loop). Optional: you can attach another lightbulb to your gear. I suggest attaching the 2nd lightbulb to chain and then attaching the chain to your gear. It will give your curtain tie another added dimension.
  6. Last, wrap your velvet ribbon (or choker) around your gathered curtain and secure by connecting the loose end of your ribbon to the other side of your gear with a jump ring using your flat nosed pliers.

Clamp, Chain & Gear Steampunk Curtain Tie

  • C-Clamp
  • Grandfather clock gear
  • Chain (approximately 1-2 inches)
  • 2 jump rings
  • Flat nosed pliers

Steps:

  1. Attach your grandfather clock gear to the middle of your c-clamp with a jump ring and flat nosed pliers.
  2. Next, attach your chain to the bottom of the gear with a jump ring and flat nosed pliers.
  3. Attach the loose end of the chain to the hoop part of the c-clamp with a jump ring and pliers.
  4. Gather your curtain and hook your c-clamp around it. Last, clamp your curtain in place.

Clamp Simply Steampunk Curtain Tie

  • C-Clamp

Steps:

  1. Gather your curtain and position your c-clamp around it.
  2. Screw closed!

Enjoy your fabulous Steampunked Curtains!


Take a Stroll through a Steampunk Garden

D-I-Y-, InspirationSamantha Extance3 Comments

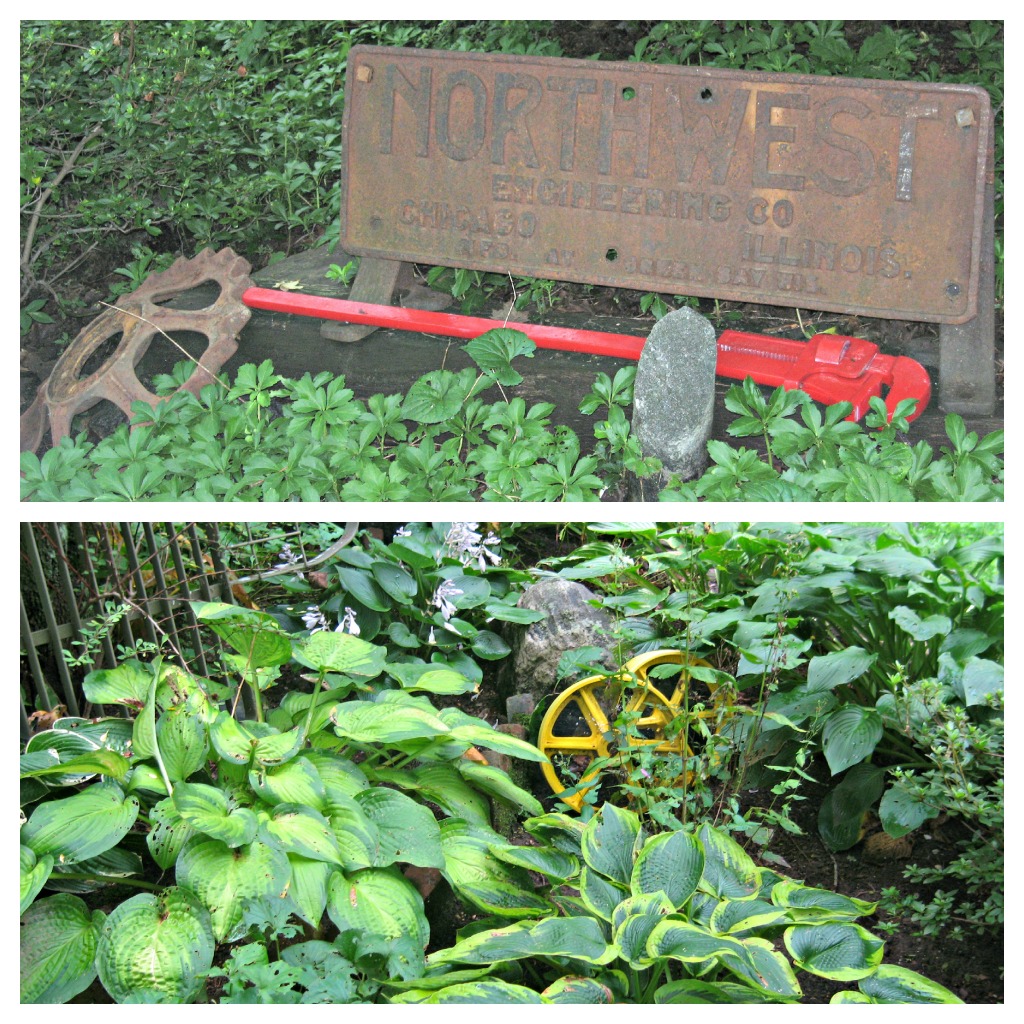
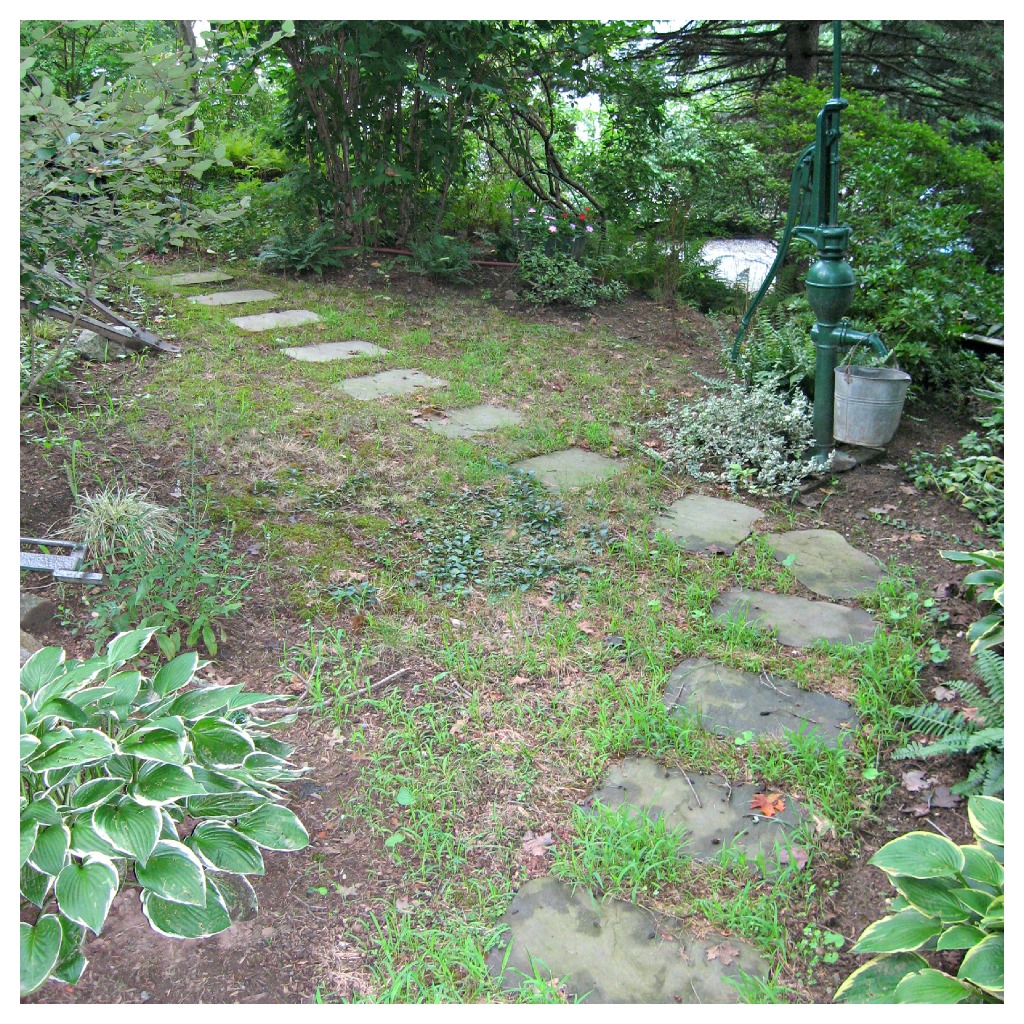
Take a stroll with me in my family's garden. There are subtle steampunk elements infused throughout the lush pachysandra and fragrant  lily-of-the-valley and get some ideas for your own steampunk garden! Here is the house, sheltered from the summer sun by large trees. Stones line a path along to the driveway off to the left which takes you past an antique water pump (painted forest green) with a tin milking pail hanging from its spout. Water pumps are a frequent fixture in our garden & yard--and are painted a variety of colors, from forest green to deep purple. Old farm equipment is also good for decorating your garden--the piece on the left was used for pulling tractor chains. You can leave the old equipment rusty for a more vintage look or finish it with a coat of paint to complement the colors of your flowers or other flora. Another great piece is the metal sphere inside of (or sometimes on the outside of) a globe (pictured bottom right). Birdbaths are also a must!

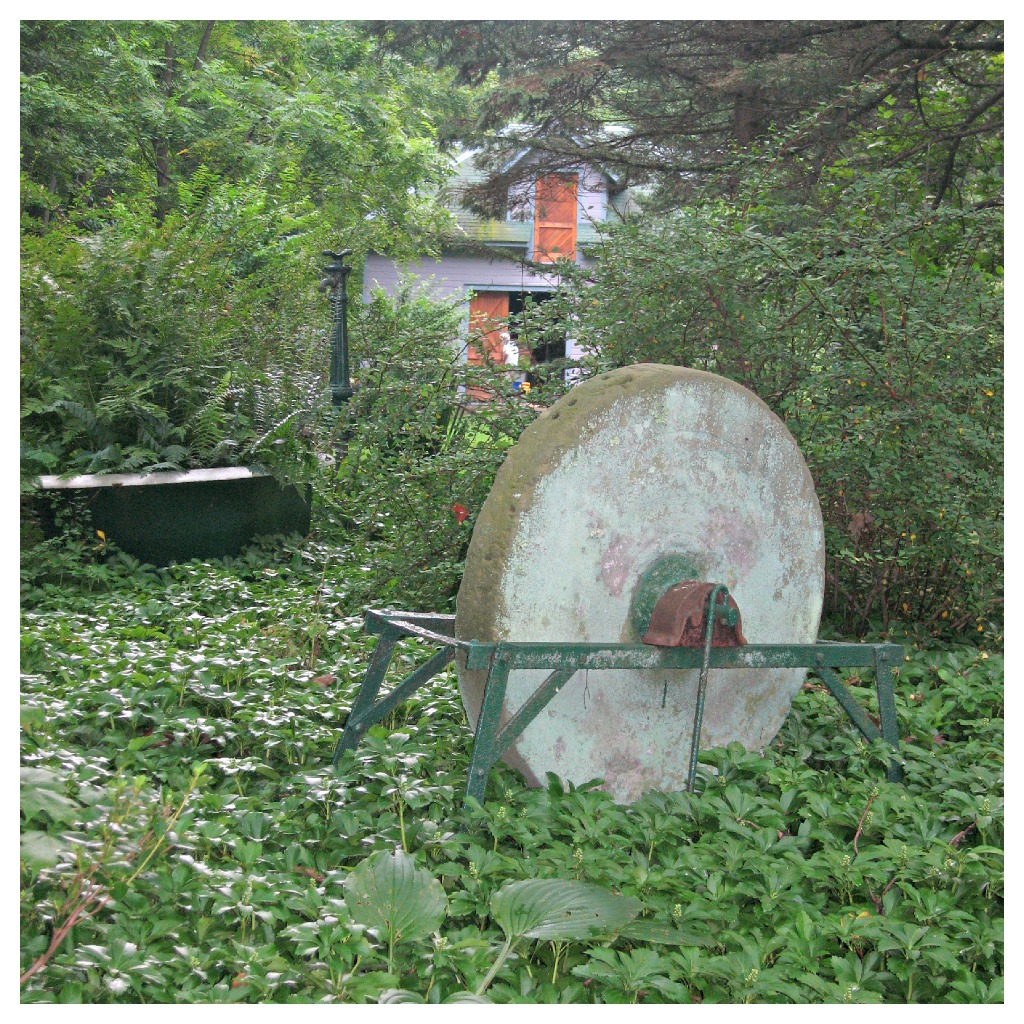
No steampunk garden would be complete without gears! Pictured on the bottom below are two large gears painted mustard yellow and hidden in the deep foliage. Painted, they offer a hint of color that accents the yellow of the leaves. Above is another gear, unpainted, to match the Northwest Engineering Company metal sign. Antique metal signs & business plates are another great way of giving your garden a steampunk feel. Here you can see the placement of the birdbath, globe sphere, and water pump in relationship to the landscape. Also, antique bathroom fixtures make wonderful planters. Worn out tools are another fantastic source for garden decoration. Here we've used an anvil and a large rusted-out wrench. It's perfect to place along steps. Among my favorite parts of our garden is the birdhouse structure my uncle made for my grams. He constructed it out of an old hayrake (the top) and a wagon wheel--both painted forest green. From the old blades hangs grams's many birdhouses & feeders. Pictured right is an important feature, every garden should have its own magical creature for the kiddos! Ours is an Ent. What I love about our garden & lawn is the variety of flowers, plants, and trees. My Uncle John is the landscaper & gardener in the family and if you are looking for gardening tips to recreate a Victorian-style garden, check out Old House Journal's summer & spring issues for gardening tips. This OHJ article offers some advice on planting Victorian flower beds. Thanks for taking a stroll with me! I am certainly enjoying a reprieve from the desert-heat of Oklahoma here in New York. Hope you are staying cool wherever you are!

DIY Steampunk Wedding Bouquet

D-I-Y-Samantha ExtanceComment

Materials & Tools:

  • Flowers, real or synthetic (your choice)
  • Floral wire (or any green colored wire) & wire cutters (or toenail clippers)
  • Needle & thread & scissors
  • Lace & ribbon (or you can choose any kind of fabric you'd like instead of lace)
  • clock gear
  • Pin


Steps:

  1. Arrange your flowers.
  2. Cut your floral wire using your wire cutters/toenail clippers. Wrap your flowers tightly with the wire to secure them.
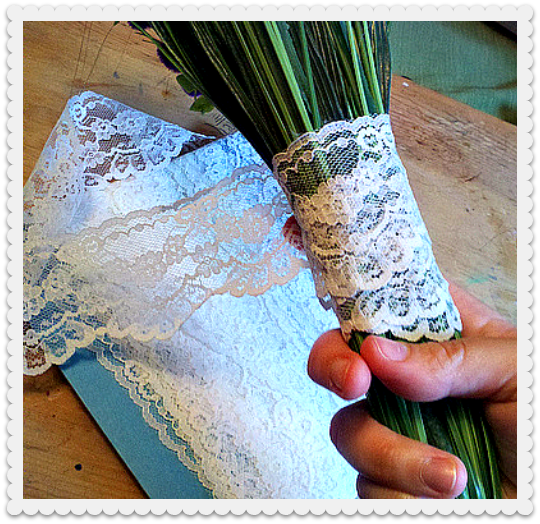
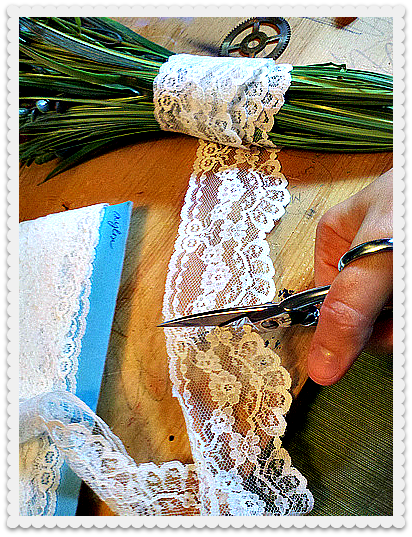
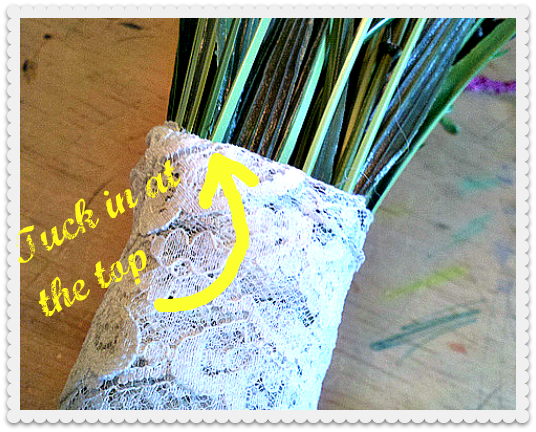
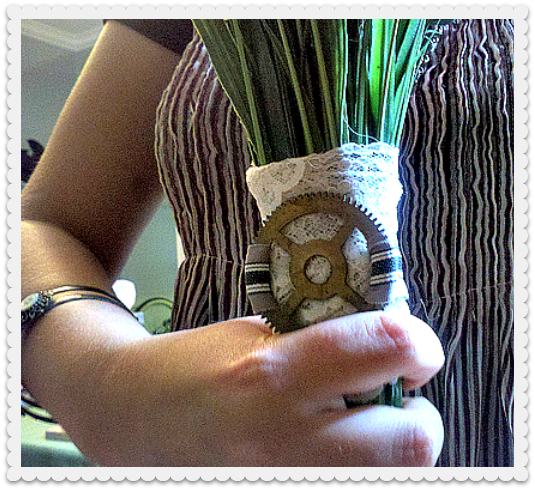
  3. Measure your lace by wrapping it around your flowers' stems for your desired width/look. I wrapped the lace 2-3 times around the stems. Once you are done wrapping your lace tuck the end into the top of your lace. 
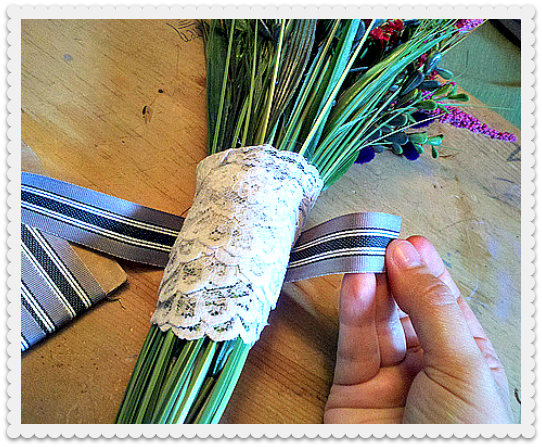
  4. Next, measure  the amount of ribbon you'll need to fit tightly around your bouquet. Be sure to leave yourself at least a 1/2 inch on one side for sewing the ribbon to your gear.
  5. Loop your ribbon through the gear. Sew your ribbon to your gear. Keep your stitches small and close. (You can also secure the ribbon to your gear with a hot glue gun.)
  6. Next, wrap the ribbon around your bouquet. Be sure to hold the gear in place in the front of your bouquet when you pull the loose end of the ribbon through the gear. Pin it in place with your pin (or hatpin). Cut off excess ribbon and tuck it under.
  7. Promenade proudly down the aisle!Variations:

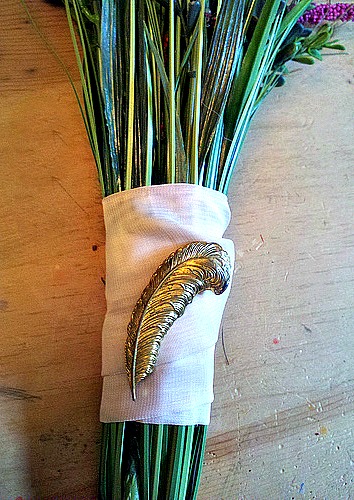
Instead of a gear, maybe pin a cameo to your bridal bouquet. It's a romantic & nostalgic twist and yet is elegant & simple.

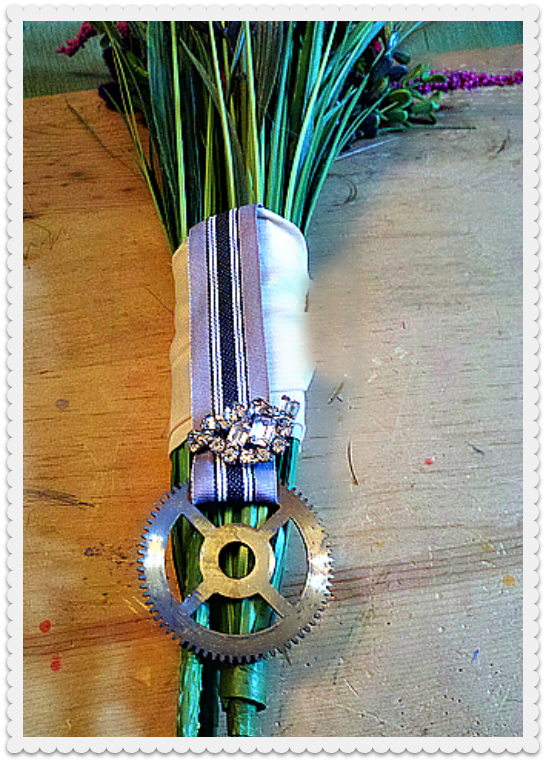
Or look for any other kinds of pins that you could attach to your fabric or lace that ties into your wedding's theme, your heritage, or your story as a couple. Here is another variation that combines both the cameo pin & clock gear, ribbon, and simple pastel pink fabric. It's more textured & intricate--offering a much more Stemapunk vibe.

This last variation is more simple than the above pictured cameo & gear bouquet & offers a hint of sparkle. Clip-on earrings are easy enough to find at vintage stores, flea markets, & estate sales which makes them even more appealing as materials for your bridal bouquet.

Happy Wedding Planning (or day-dreaming)!

Steampunk Grandfather Clock

D-I-Y-, Flea Market Finds, ShowsSamantha Extance3 Comments

I had purchased a broken grandfather clock at a thrift store 2 months ago in the hope of making a display piece out of it. As a rule, I never upcycle anything that can be restored. This clock was in a sad state when I happened upon it--the wood panel in the back was entirely overtaken by mold & wood rot. Luckily, the majority of the clock was in tact. Though it is still a work-in-progress (I hope to fashion it with wheels & a working clock mechanism), the exterior is finally done! Here it is in its various stages. I used clock plates, bicycle gears, chain, metal erector set pieces, a clock spring, an old whisk, and lots of screws & nails.

Want to DIY?, here are a few tips! To make your own steampunk grandfather clock (out of an already broken one), you will need the following hardware: screws (of various sizes, fitting your collected pieces), chain & jump rings, metal brackets (for heavier pieces, like the bicycle gear pictured above), Gorilla brand wood glue, nails (for extra support at the base of your grandfather clock), and metal connector pieces (like the metal erector set pieces that I used--which are a rare find; however, at Lowes Home Improvement you can purchase similar metal pieces in their hardware section categorized under hardware designated for "Science Projects."). The tools I used are fairly common: hammers (one large & one small), an awl (for making starter holes for screws & nails), pliers (for opening jump rings & chain links), and screwdrivers (of various sizes depending on the type of screws that fit into your collected pieces).

After you have gutted your clock, I recommend cleaning it thoroughly before beginning to steampunk it. Murphy's oil is great for wood, soap & water, a wood-friendly scrub brush, & (if you are dealing with mold) rubber gloves & a protective mask. Once you have collected pieces that you would like to affix to your clock, I suggest laying everything out before beginning to screw & nail it in or sketching it out beforehand.

As a display, at RAW; Tulsa's Solstice event, it had the desired effect of drawing a lot of attention & foot traffic. In the home & at an event like this one, it certainly is a conversation piece.

Thank Yous Galore, I must take this moment to thank a fellow Make;Tulsan and graphic designer extraordinaire, Michael Chaplin, for helping me transport the grandfather clock to the show & back home again. Sadly, I was not able to affix the clock with teleportation capabilities (sigh, if only). Thanks to RAW; Tulsa for the opportunity to showcase my work, have professional photographs taken, & video--everyone was so nice & I had such an amazing night; Thanks to 33forty & their wonderful staff who helped me with lighting & moving furniture & last but not least, to all of you who came!

DIY Steampunk Stamps

D-I-Y-Samantha Extance1 Comment

Writing letters in this digital age makes it all that more important for letter writing to be more artistic & personal. Give your letters & stationary a steampunk flair with these 2 simple DIY stamps!

Geared Up! Stamp

Materials & Tools:

  • Square block of wood
  • 3 gears (mine here are reproduction gears that you can purchase at Michaels--these work best because they are flat)
  • Hammer & 3 nails (the nail heads should be large enough so that they hold the gears in place)
  • 3 rubber washers (should be roughly the same width. See second picture below)

Steps:

1) Arrange your gears on your wooden block. Once you have them arranged as you desire, (using your nail) mark where you will hammer each gear into the wood.

2) Take a gear and place the rubber washer underneath it. Then hammer the gear in place with a nail. Be sure to hammer the nail straight so that the head is not crooked (because it makes stamping a little more difficult). Repeat for the other 2 gears.

3) Begin stamping!

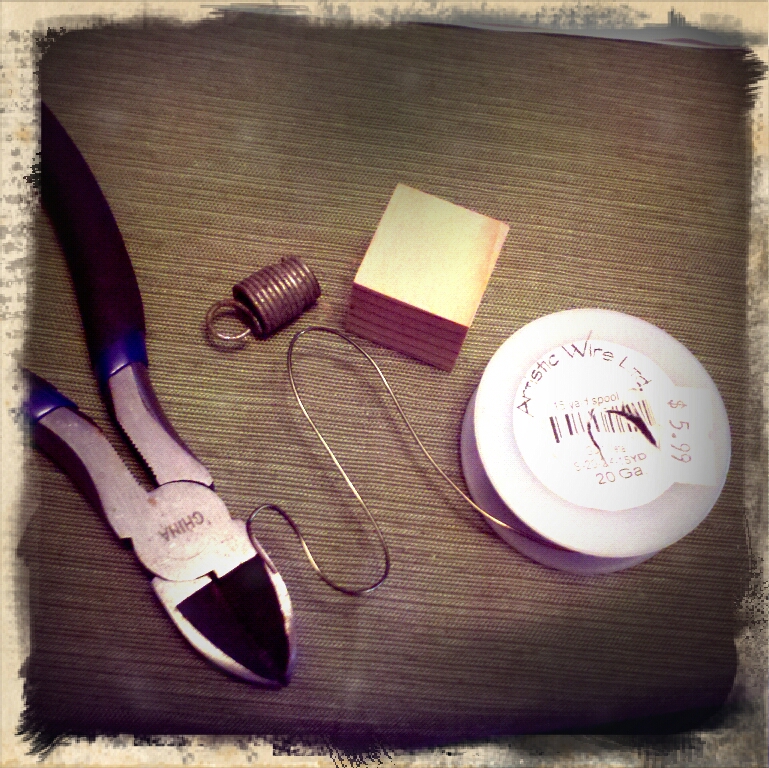
Steampunk Spring Stamp

Materials & Tools:

  • Square wood block
  • Wire cutters
  • 20 gauge wire
  • Spring

Steps:

1) Cut a length of wire using your wire cutters (if you do not own a pair of wire cutters, use a pair of toenail clippers). I cut mine about arm's length.

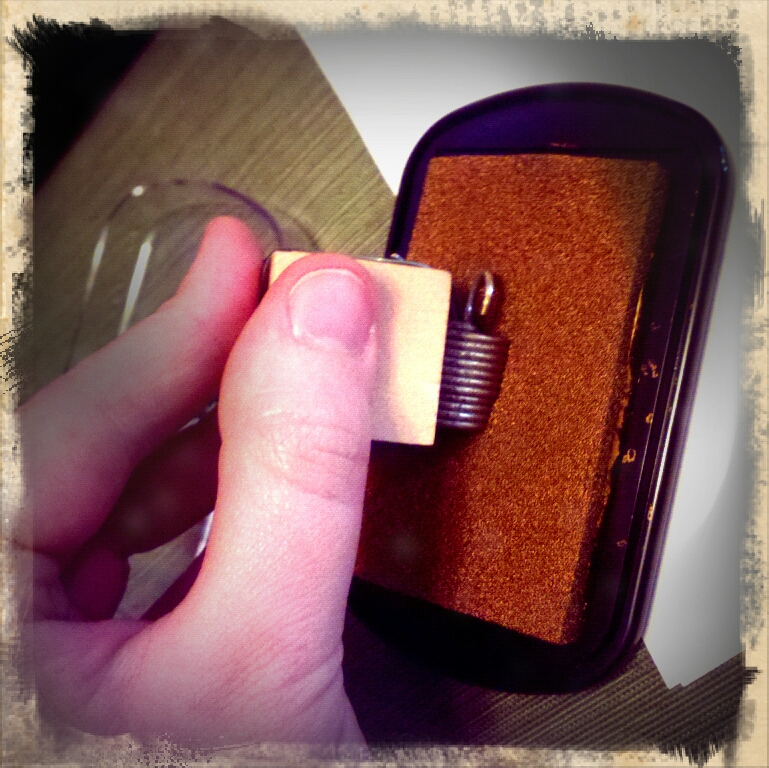
2) Thread the wire through the spring and around your wood block. Pinch the wire tight around the edges of the wood and pull the wire taut through the spring each time. 

3) Once you've wrapped all of the wire around your wood block & through your spring--wrap the loose end of wire to another piece of wire to secure it.

4) Being stamping!As always, Happy making!

D.I.Y. Antique Printer Drawer Jewelry Display

D-I-Y-Samantha Extance1 Comment

I am obsessed with antique printer drawers! They are perfect for displaying jewelry as well as other small bits and bobs you might collect and wish to show off. On Etsy there are several sellers who have upcycled printer drawers for the purpose of jewelry display. Most sellers' prices are steep but of course this depends entirely on the condition of the drawers and the amount of work that converting them requires. I bought all 4 of my drawers for $100 at a local antique shop (each drawer came with a complete set of letterpress letters, numerical signs, punctuation & symbols). If you're local to Tulsa, you should drop by Sidedoor Antiques (located on Harvard Avenue between 15th and 21st street). Be sure to tell William I said hello!

Once you have found your drawer, then comes the hard part--cleaning, decorating, and fitting your drawer with cup hooks. This D.I.Y. is broken down into 3 parts. (Believe me, you won't get it all done in 1 day!).

Part One: Cleaning Your Drawer

This part is the most time consuming. The older your drawer, the chances are the dirtier it is (after all--they do contain letterpress parts that were frequently used and slathered with ink).

Cleaning Supplies:

  • Method All-Purpose Disposable Wipes (Normally I would not suggest disposable anything, if you're like me you use rags for cleaning made from old socks and worn out clothing; however, cleaning each of the drawer's cubbies takes up a ton of rags (more than I had) and I did not want to just spread around dirt and ink--so just this once, use some wipes. Also with wipes, you do not run the risk of over-saturating your drawer with water.)
  • Vacuum cleaner
  • Razor blade
  • Wood polish & rag

Steps:

1) Using your vacuum cleaner, suck any loose dirt, dust, or lint from each cubby.

2) Once you are done, use a razor blade to scrape out the paper lining underneath each individual cubby. If your drawer does not have paper lining, then you can skip this step. If yours does, you should remove it. Each of my drawers had moldy paper lining because it had been wet at some time and not thoroughly dried out. If your drawer does have mold, please take care to cover your mouth and nose with a mask and wear gloves to protect yourself.

3) Once you've scraped away the paper lining, vacuum out the paper. Tweezers can be useful if you have paper that is stuck underneath the wood dividing the cubbies.

4) Wipe each individual cubby with a disposable wipe. Make sure to clean all four sides and the bottom of the drawer's cubby. Also wipe down the sides, bottom,  and back of the drawer.

5) After your drawer has dried a bit, wipe down each cubby and the drawer's back and sides with wood polish.

Part Two: Decorating Your Drawer

These are just a couple of suggestions on how to decorate your drawer! Have fun with it!

1) Paint the cubbies with chalkboard paint (or any other kind of paint you like). Two of mine are chalkboard painted (another obsession)--I have fun writing little messages in each of the cubbies.

2) Line each cubby with cut-outs from old magazines, books, postcards, or vintage fabric scraps using modge podge.

3) Keep it natural and seal your cubbies with modge podge wood sealant for a natural sheen that protects your wood! 

Part Three: Fitting Your Drawer

What is wonderful about converting your own drawer is customization. You can add cup hooks anywhere you wish. The drawer can be mounted on the wall or stand on your vanity table. Decide where you'd like to place your drawer and then begin to measure your drawer's dimensions so that you can fit it with the appropriate hardware.

Supplies You'll Need to Mount Your Drawer on the Wall:

  • flat brackets
  • screws (that fit into your bracket and do no exceed the depth of your drawer's wood)
  • screwdriver or drill
  • awl
  • measuring tape

Supplies You'll Need for a Freestanding Drawer (on the Vanity):

  • L-shaped brackets
  • screws (that fit into your bracket and do not exceed the depth of your drawer's wood)
  • screwdriver or drill
  • awl
  • measuring tape

For both kinds of drawer displays you will need cup hooks (or any other kind of hook you desire). Cup hooks are the easiest. The size depends entirely on your drawers dimensions.

Steps:

1) Measure your drawer's dimensions. Start first with its width (A) and height (B). Next measure its depth (C) and the width and height of each cubby (D). Not all of your cubbies are the same width and height so be sure to make note of that. Record each of your measurements.

2) Count how many cubbies your drawer has and record the number along with your other measurements. For the printer drawer I use as display for my business I only put one cup hook per cubby so that each pair of earrings or bracelet could be more easily seen. For my personal printer drawer (the one I use to hold and display all of my jewelry that I wear) I put 2 cup hooks per cubby where I could so that the drawer could increase its holding capacity. This is a choice that's up to you.

3) Using your screws and screwdriver, attach your brackets to the back of your printer drawer. I recommend attaching the bracket to a thicker part of your drawer for more stability. Obviously, if you are mounting your drawer on the wall--keep in mind how it will hang and likewise, if you are standing it up on your vanity, how it will stand when your brackets are in place. It's best to mark the spots where you'll want to screw in your brackets with pencil first before drilling. (You can also lean your drawer up against the wall if your prefer, as is pictured in BlueBirdHeaven's photo above).

4) Once your brackets are in place, use your awl and start a hole in each individual cubby and then screw in your cup hook. Repeat (many, many times). You may also want to use a pair of flat nosed pliers to help you screw in the cup hook.

Part Four: Enjoy!

Have fun putting all of your jewelry & tiny bric-a-brac in your new display! As always, Happy Making!
D.I.Y. Steampunk Flower Vase

D-I-Y-Samantha Extance1 Comment

Here is a simple & elegant way to steampunk your dinner table or wedding reception--a clock part vase!

Materials Needed: Bud vase (or any glass or metal vase that fits inside your clock's mechanism), flowers & clock (or machine) part.

1) Fit your bud vase inside of your clock mechanism. (If you want to conceal the vase, choose a metal one that blends in with your clock part's metal. Also for another variation, you can use test tubes too & fix them throughout your clock's mechanisms for a wilder, more overgrown look). Fill with water.

2) Arrange your flowers!

And for a completely different look for your wedding or dinner table, you can either make paper flowers or purchase beautiful fake bouquets and splay them across your clock mechanism.

As always, Happy Making!


D.I.Y. Steampunk Teddy Bear

D-I-Y-Samantha Extance1 Comment

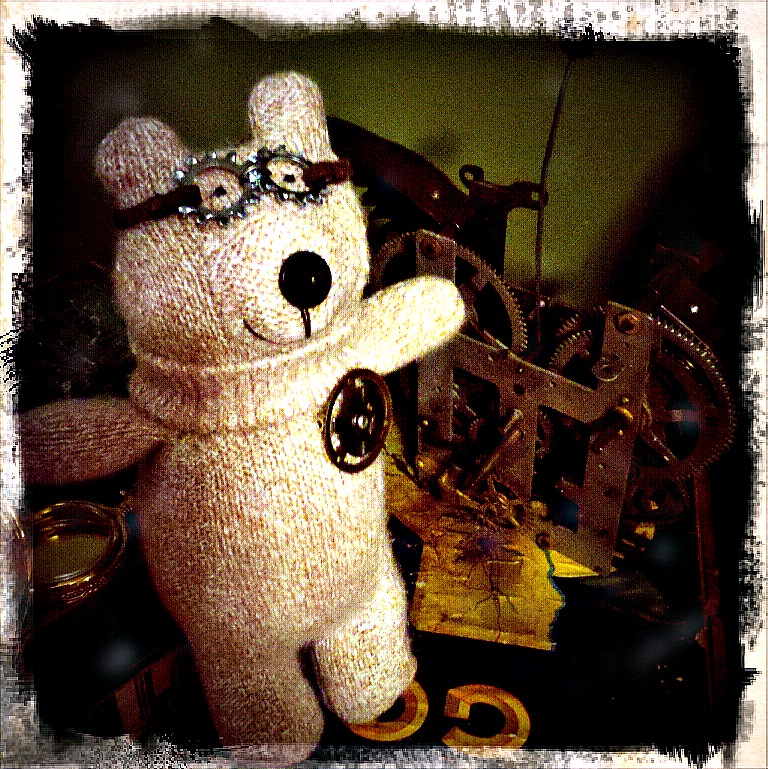
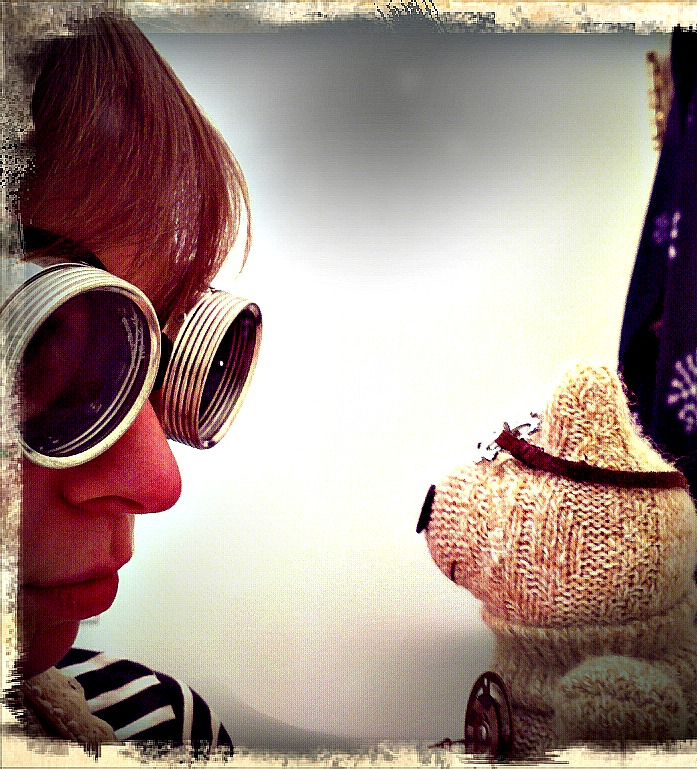
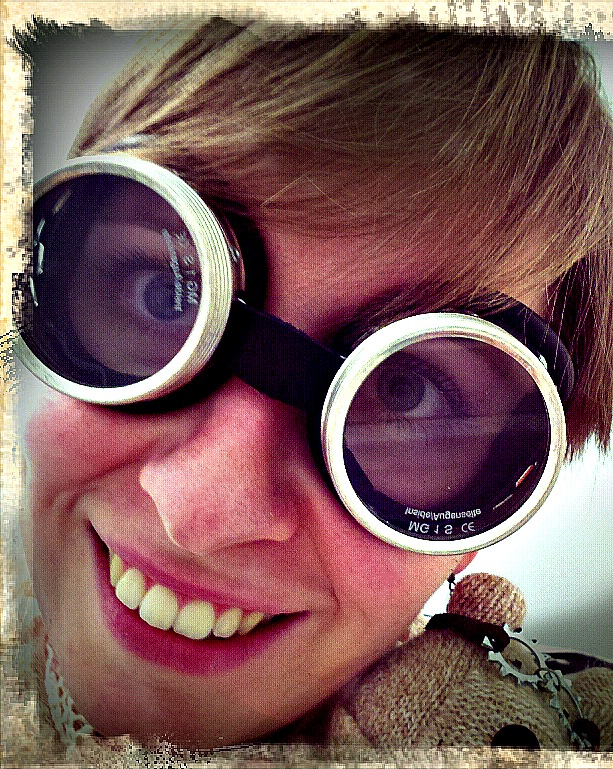
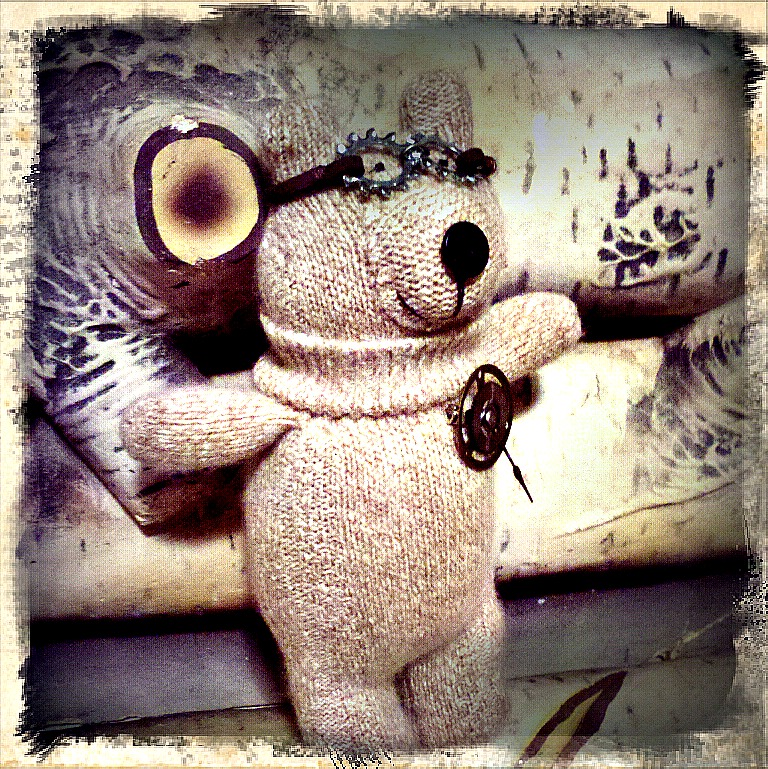
I made a friend today, quite literally! His name is Tinker Bear. My favorite part of being a kid was playing with stuffed animals and Barbie dolls--creating worlds for them and then getting lost in those worlds. Now that I'm grown up--though not really, ask anyone--I am a still a kid in many ways--I not only invent worlds, but the creatures that inhabit them. Here is a D.I.Y. on how to steampunk your teddy bear. As always, happy crafting!

Materials & Tools You Will Need:

Flat nosed pliers

1 pair of socks (your choice of color and texture)

Stuffing

Needle & thread (ideally you want black, brown, and whatever color thread matches your sock)

Brown or black embroidery thread (or another kind of heavy thread)

Scissors

2 small black seed beads (for the eyes)

1 button (for the nose)

1 pin back

2 clock cogs (or if you prefer, you can substitute 1 clock cog for a watch face or watch plate)

1 game spinner or clock hand

1 brad

Leather chord

2 lock washers

1 jump ring

Part One: To Make Your Teddy Bear:

You can certainly steampunk a teddy bear that you already have (& love) or you can make your own. I made mine according to a pattern in Daniel’s Stray Sock Sewing: Making One-of-a-Kind Creatures from Socks—a book I not only love, but highly recommend. There are ample pictures to guide you through the various stitches and steps and the instructions are easy to follow, particularly if you are new to sewing. The Teddy Bear pattern is on pages 122-131. Go buy it. It’s an amazing book and you will spend numerous hours fashioning things from the stray socks lying around your house.  

For this pattern, you need the following: 1 pair of socks (your choice of color and texture); Stuffing; Needle & thread (ideally you want black, brown, and whatever color thread matches your sock); Brown or black embroidery thread (or another kind of heavy thread); Scissors; 2 small black seed beads (for the eyes); 1 button (for the nose)

Alterations I Made to Daniel’s Pattern:

  • I skipped Step 26 because I think belly buttons on bears look weird.
  • I used a thicker sock (a cashmere woven one)
  • I slightly altered Step 25—while I did use the sock’s cuff around the neck, instead of rolling the sock cuff I fashioned it to look more like a turtleneck collar (by rolling under the rough edge)

Part Two: To Make Your Pin:

1)      Layer each of your elements with your pin at the back. My layers are as follows (from back to front): pin back, larger clock cog, clock hand/game spinner, smaller clock cog, and brad. If you are substituting one clock cog for a watch face or plate, place it where the smaller clock cog would be.

2)      Once you have your layers in place, close your brad by opening its ends. Squeeze the brad tightly—using your flat nosed pliers to ensure extra security.

3)      Pin to your bear!

Part Three: To Make Your Goggles:

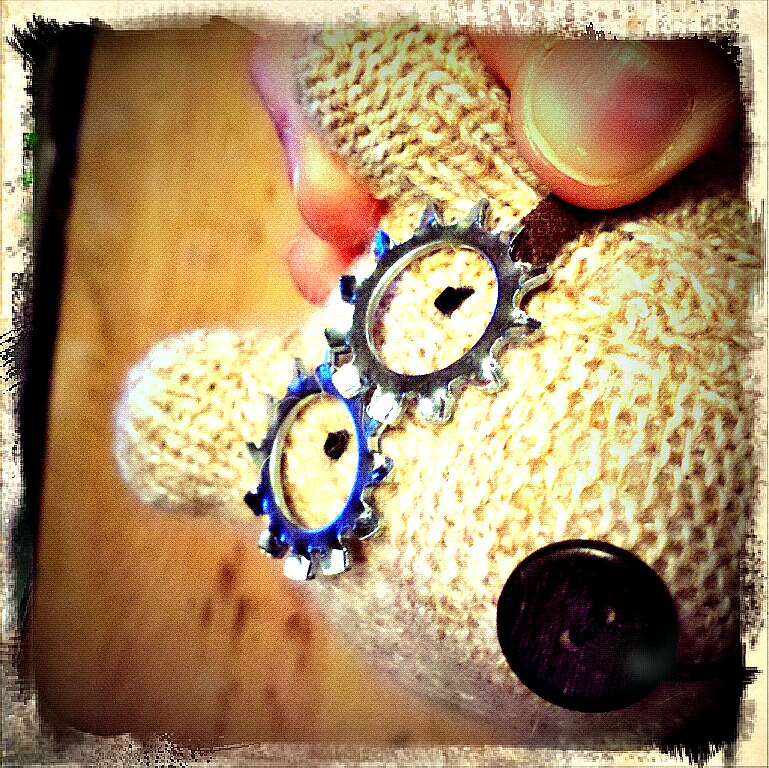
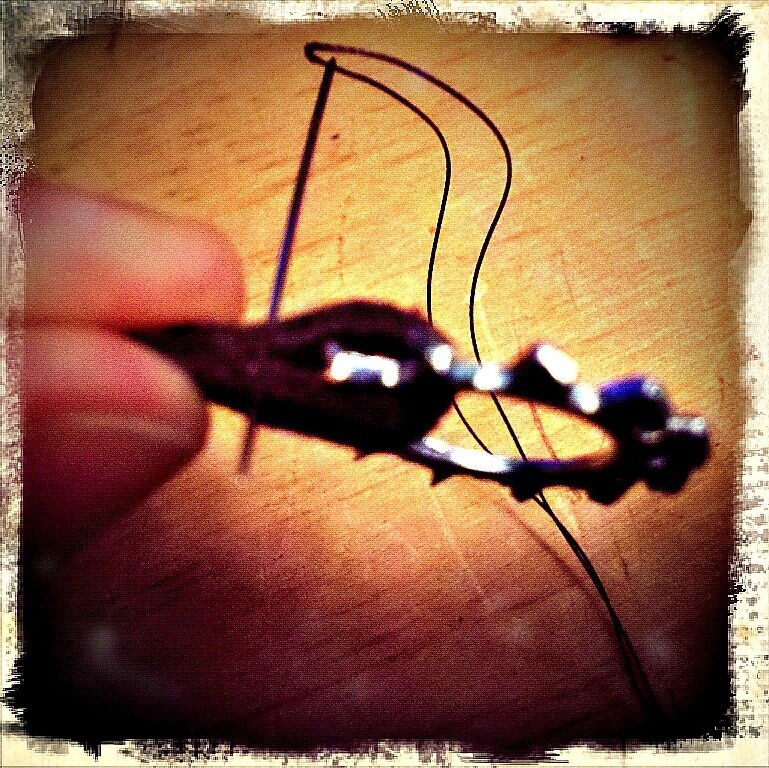
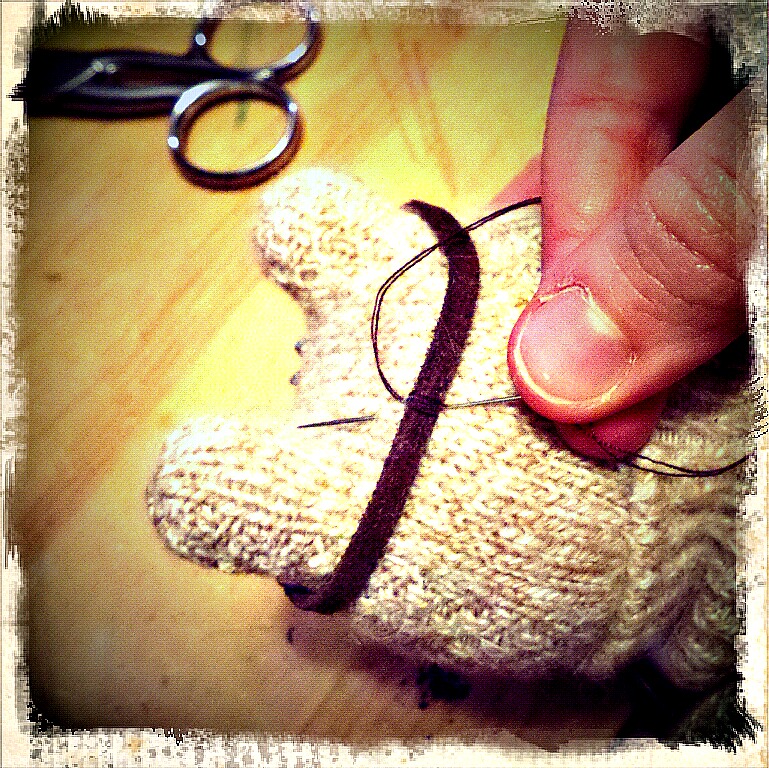
1)      Take your lock washers and place them over your bear’s eyes. Once you’re satisfied with their placement. Measure the amount of leather chord you will need to fit around your teddy bear’s head. Give yourself an extra ¼ inch to sew loops around each of the lock washers.

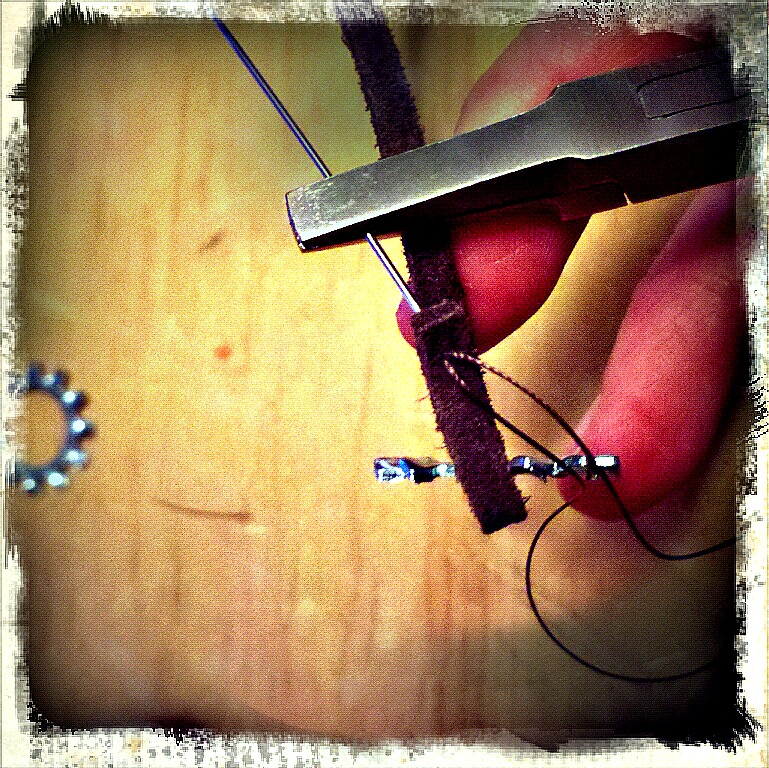
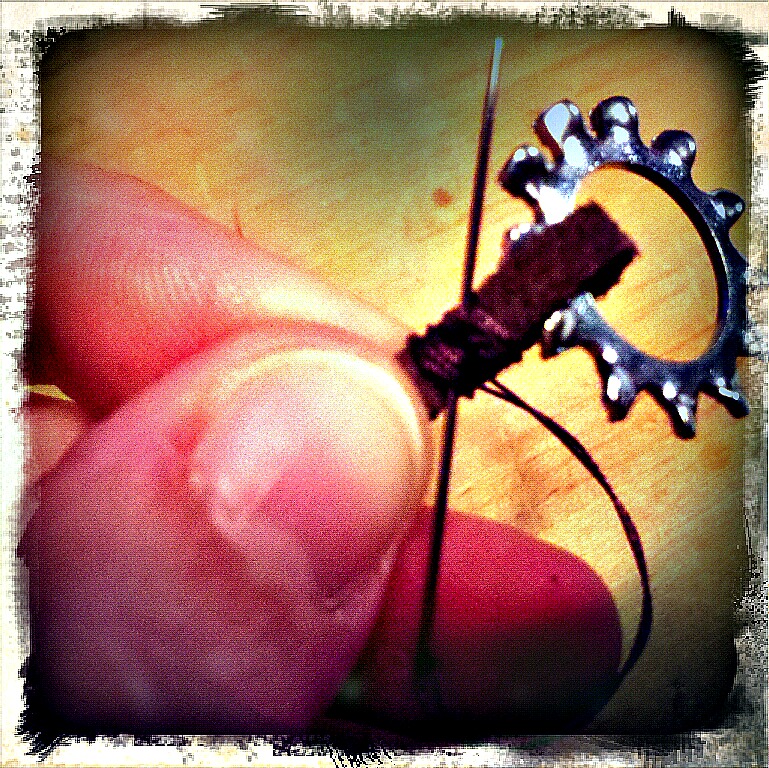
2)      Next, take one of your lock washers and loop your leather chord around it. Stitch in place. Stitching through leather can be difficult. If you are having trouble, you can make a small starter hole in the chord using an awl or you can use your flat nosed pliers to pull the needle through the leather. In the latter case, be sure not to place the pliers around the eye of your pin otherwise it will break or close shut.

Once you have stitched once through both pieces of your leather chord, wrap your thread around the chord to hold it together. Once you have wrapped it approximately 5-6 times, knot it and cut off any excess thread.

Repeat for the other lock washer, taking care to first measure the leather chord around your teddy bear’s head.

3)      Connect your lock washers together with your jump ring using your flat nosed pliers. If you do not have a jump ring or flat nosed pliers, you can either stitch the lock washers together (using embroidery thread or another kind of heaving sewing thread) or use of a bit of wire and wrap them together.

4)      Place your goggles on your teddy bear’s head and stitch the leather chord in place (using your brown thread) for extra security.

5)      And last, and most important, start adventuring!

Shall we go on an adventure, Tinker Bear? “Yes!” Well away we go—perhaps our airship will bump into yours along the way!

P.S. If you are looking for other friends to "make" before you go off on your adventure--check out Sarah Skeate & Nicola Tedman's Steampunk Softies: Scientifically Minded Dolls from a Past that Never Was! Craftzine shared a project from their book--you can learn how to make Marveletta, a very Steampunk Lady!

D.I.Y. Book Display

D-I-Y-Samantha Extance1 Comment

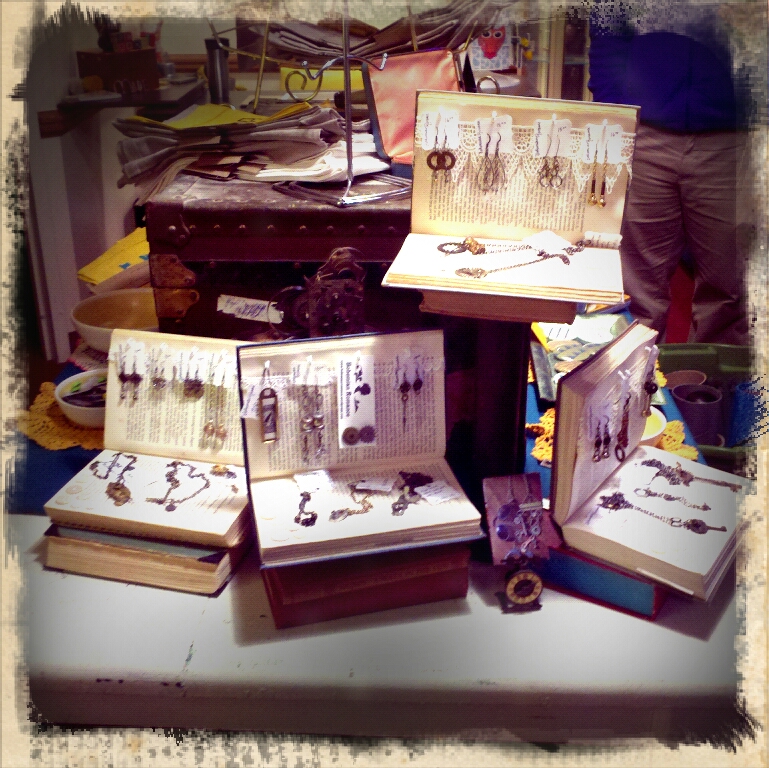
I like to use antiques and things I can upcycle and re-purpose to display my jewelry. As many of you probably already know if you have seen my booth at local craft shows--I have antique printer drawers, an old door that I use for a table, a shutter, and a wood kitchen drawer that I refurbished for display purposes. This display came about when I was thinking up creative ways to display my jewelry in a new shop that is opening up here in Tulsa. I am happy to be a part of Made; The Indie Emporium shop, located on the corner of 5th & Boston (the grand opening is February 1st & I hope to see you there!). I loved making these displays and I hope you will too!

Materials & Tools:

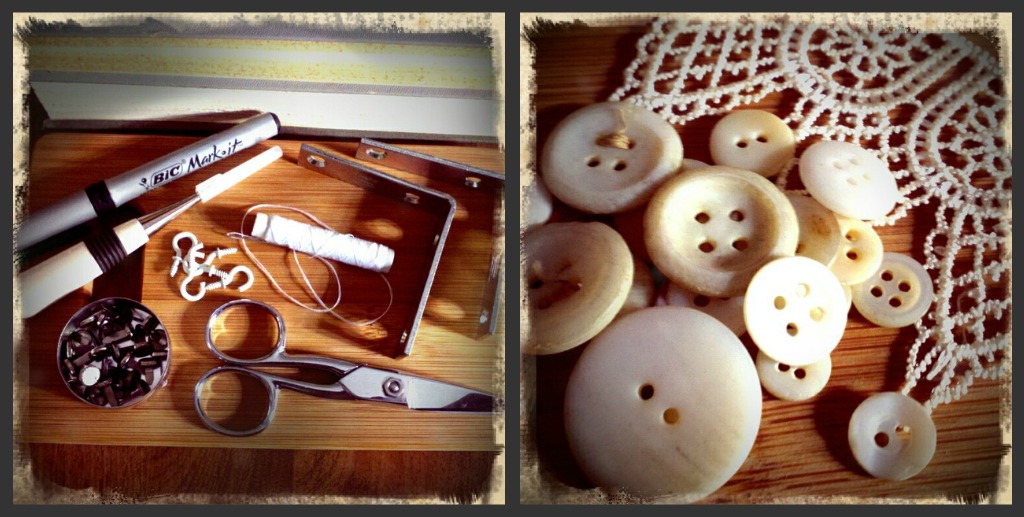
screwdriver; scissors; needle & thread; 2 books (1 to use as the display and the other to use as an anchor); cup hooks (white); Sharpie marker; awl; brads; lace; buttons; all-purpose glue; 1 pkg. of corner braces with screws (mine are 2 1/2" x 5/8") but really this just depends on the size of your book

What is great about this DIY is that it is simple and elegant while also being incredibly cheap to reproduce. I purchased the books for 50 cents each at a used bookstore, the lace was 50 cents in a bargain bin, the buttons were free! (I collect lost buttons, they are everywhere you look!), cup hooks 89 cents per pkg. of 5, and the corner braces came in a pkg. of 4 with the screws and only cost $3.95 at Lowes, and lastly a large pkg. of 20 brads were on sale for 76 cents--which brings me to a grand total of $7.10.

Steps:

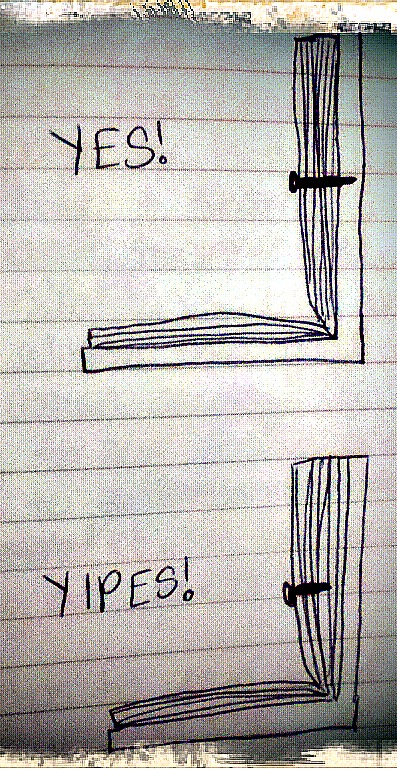
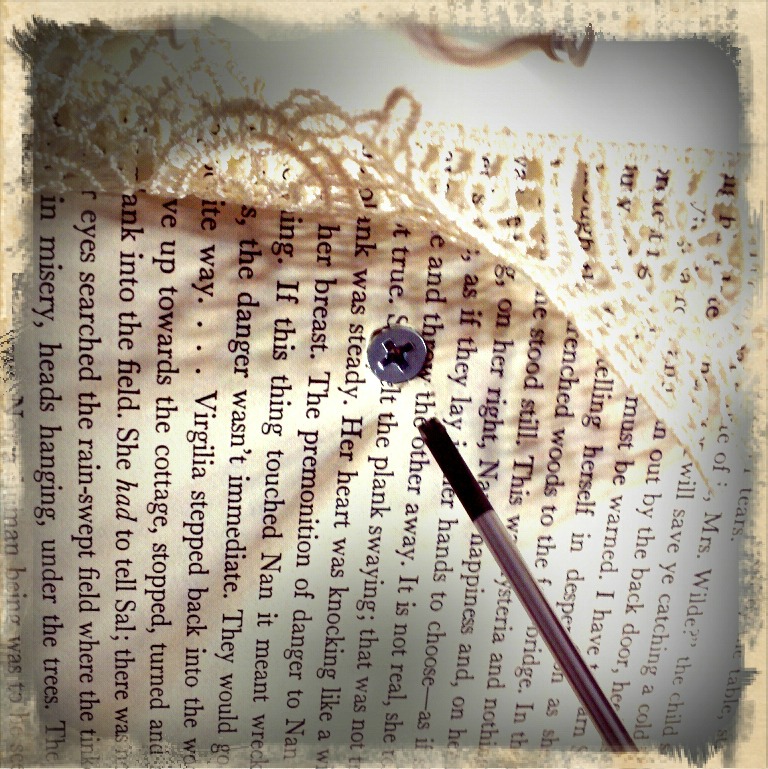
1) Before doing anything, first figure out which pages you would like to have your book display opened on. I read mine to make sure that there wasn't anything a potential customer might find offensive (like expletives, racy scenes, or racial/ethnic slurs). Also,  measure (eyeball it) to make sure that the screw (that you will fix in the middle of the top page of your book display to keep it securely open) can go through all of the pages that you have opened your book to. See figure below for clarification.

You want the screw to go into the book cover otherwise the book pages will fall down once you place jewelry on it.

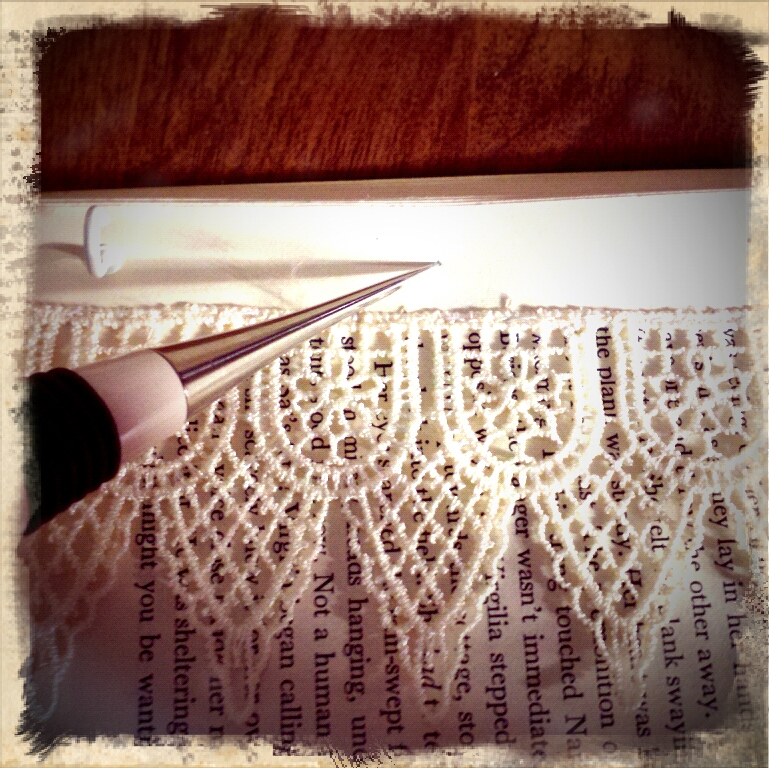
2) Once you have done this, measure and cut your lace to fit the top page of your book display. Your lace should wrap around to the other side of the book page to hide unsightly unraveling and seams. I suggest sewing 2-4 pages together (depending on your paper quality and its thickness) so that there is less of a chance of tearing the pages while you are sewing your lace in place. Too few pages and it's too flimsy to sew easily and too many pages leads to more paper tears because you are tugging at your stitches more.It helps to pin your lace in place on the book page.

3) Once you have your lace pinned in place, sew it. Try to keep your stitches small, even, and neat.

4) Next, place your buttons on the bottom book page of your display. I pinned mine in place (which is optional). You could sew as you go if you choose. Sew your buttons in place. Again, sew 2-4 pages together for maximum ease. 5) (Optional) Use your marker to write your business name or a cute phrase on the bottom page of your book display. You could also stamp a design on your page or doodle in the margins. Anything goes, have fun with it!

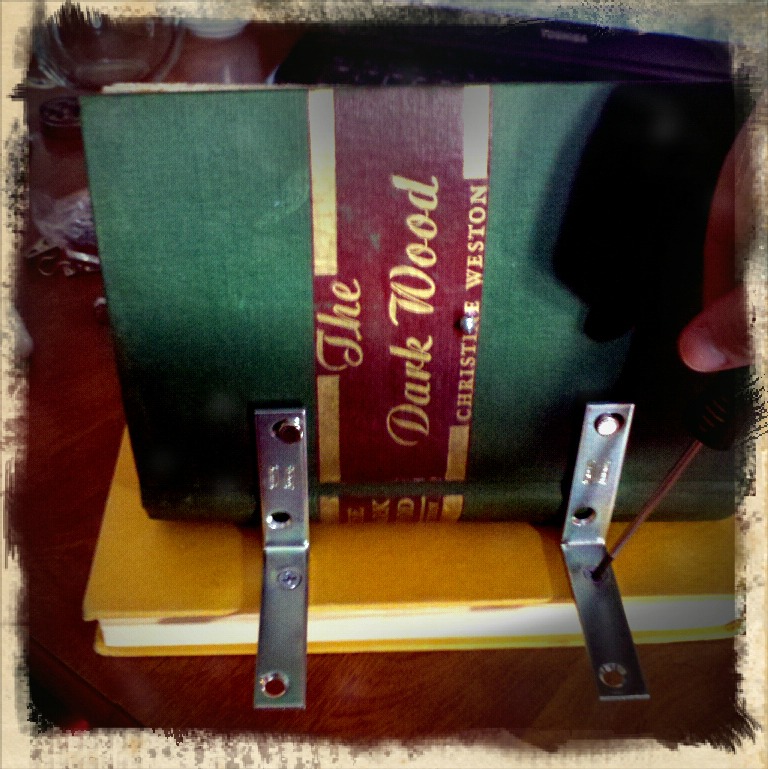
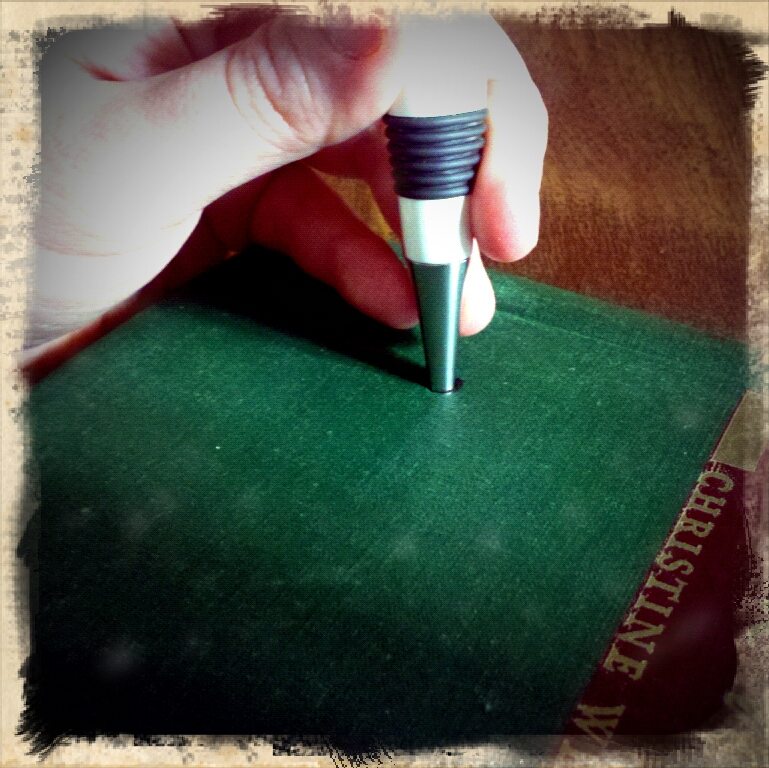
6) Once you are finished with decorating your display, it's time to fasten the display book to your anchor book. Place your anchor book underneath your display book. Grab one of your corner braces and place it up against the back cover of your display book situating the screw holes tightly against both the back cover of your display book and the top cover of your anchor book. See the image below for clarification. Once you have the corner brace places, take your Sharpie marker and mark each screw hole. Repeat for the other corner brace.7) Next, take your awl and poke a hole directly through the marks you made for your screw holes on both covers. When poking a hole in the display book cover, be sure not to go through your book pages--just the cover. 8) Once you have made all of your holes, take 2 brads and use them to fasten your corner braces to the display book. (You are putting the brad through the screw hole, book cover, and then opening the ends to hold the corner brace in place). The picture here is upside down, but you get the idea.

9) Next, take 2 screws and screw them in place (through the hole you poked through the anchor book cover). You know when you're done because the display book will feel more secure (essentially, it will no longer slide or fall closed but remain upright). 10) Turn your display book around so that it is facing you. Using your awl, poke tiny holes (starter holes) in your top book page for your cup hooks. And then, screw your cup hooks in place. I recommend alternating which cup hooks you screw in so that the page does not ripple or become uneven.  For instance, I had 5 total cup hooks so I screwed in the 1st hook and then the 3rd and 5th, and afterwards, the 2nd and 4th hooks.

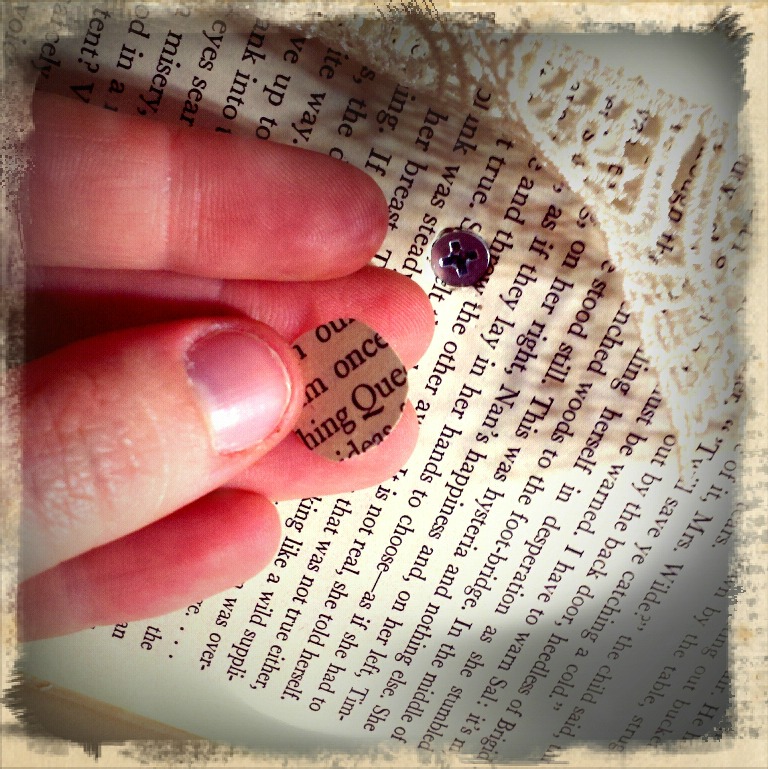
11) With the display book still facing me, I lifted up my lace, and using my awl made a starter hole in the very middle of the top page for my screw. Then I took a screw and secured it in place using my trusty screwdriver.12) Once I was  done, I cut a circle out of a scrap book page to cover the screw and glued it in place.13) Now comes the fun part--splaying your jewelry across the page and hanging it from the tiny cup hooks! For a layered look, stack books underneath your display to create height and use different angles.

As always, Happy Crafting! And please, do come visit Made; The Indie Emporium shop's grand opening on Feb. 1st!

Handmade Illumination: D.I.Y. Steampunk Candlestick Holder (3 ways)

D-I-Y-Samantha Extance2 Comments

These candlesticks are perfect for hosting an intimate dinner party for fantastical inventors, airship tinkerers, clockmakers' sons & daughters, and bicycle enthusiasts everywhere! D.I.Y.s and Materials needed for each candlestick are written below under their respective name. Before you begin, I would like to note that in each of these photos a tea candle is pictured. I did not have a candlestick on hand and so I substituted a tea candle for a candlestick in order to show each step completely. As always, happy making!

Atomventor's Candlestick Holder

Materials Needed:

Mason jar, medium sized bicycle gear (from a cassette), glass candlestick holder, a candlestick, and various odds & ends of your choosing to place inside your jar.

I used washers, springs, bicycle brakes, clock parts & gears.

A note on your mason jar & glass candlestick holder: These items must be able to stack inside one another. When purchasing your jar and candlestick holder, you should bring your bicycle gear with you to the store to ensure that you purchase the correct sizes.

Steps:

1) Fill your jar with your assorted odds & ends (also known bric-a-brac, couch treasure, & dumpster delights). Fill your jar about halfway.

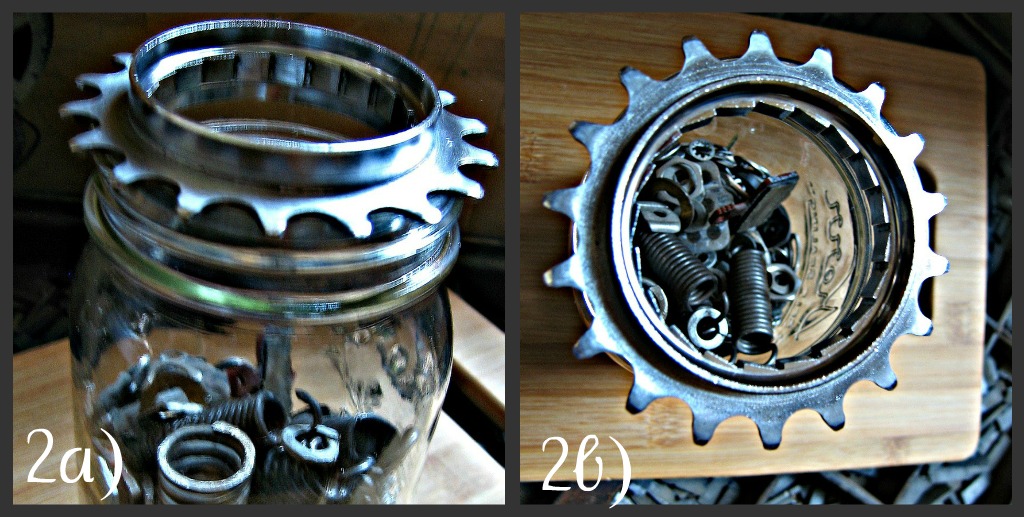
2) Place your bicycle gear atop your jar. See also figures 2a & 2b below.

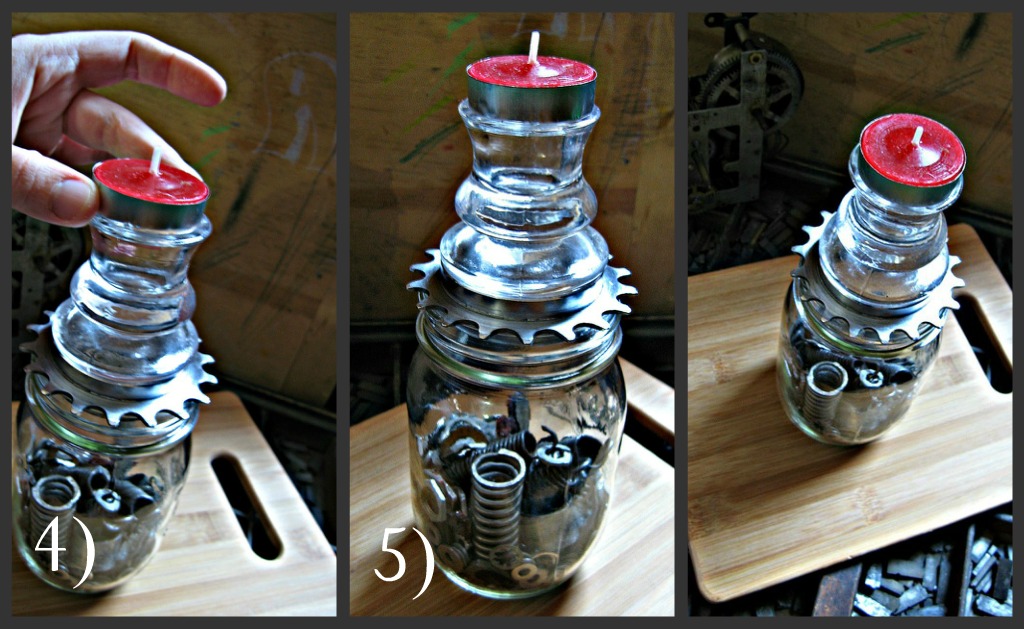
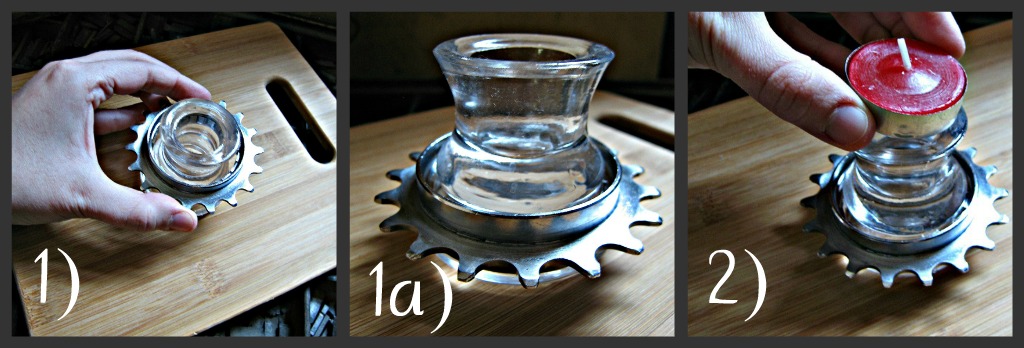
3) Place your glass candlestick holder on top of your bicycle gear. The candlestick I purchased (from Michaels) has a tiny "lip" on the bottom--this keeps the candlestick from falling off of the gear & sliding out.

4) Next, place your candlestick into the glass candlestick holder.

5) Enjoy your handmade illumination!

Simply Steampunk Candlestick Holder

Materials Needed:

Medium-sized bicycle gear, glass candlestick holder, and a candlestick.

A note on your glass candlestick holder: This item must be able to stack inside your gear. When purchasing your candlestick holder, you should bring your bicycle gear with you to the store to ensure that you purchase the correct size.

Steps:

1) Place your bicycle gear over your glass candlestick holder. You can see in figure 1a that the candlestick's "lip" keeps the gear in place.

2) Next, place your candlestick into the glass candlestick holder.

3) Enjoy your handmade illumination!

Simply Steampunk Easy Candlestick Holder

Materials Needed:

Medium-sized bicycle gear, glass candlestick holder, and a candlestick.

A note on your glass candlestick holder: This item must be able to stack inside your gear. When purchasing your candlestick holder, you should bring your bicycle gear with you to the store to ensure that you purchase the correct size.

Steps:

1) Place your bicycle gear on your table and then stack your glass candlestick holder on top of it. Again, the "lip" of teh candlestick holder keeps the gear in place & from sliding. See figure 1a.

2) Next, place your candlestick into the glass candlestick holder.

3) Enjoy your handmade illumination!

This D.I.Y. is versatile--once you have the materials you will be able to make each of these candlesticks. Since the candlesticks are made by stacking pieces into one another, you will also be able to change them to fit the mood or theme of your table setting.

There's a Whole Lotta Love to Be Thankful For

D-I-Y-, UncategorizedSamantha ExtanceComment

I have a lot to be thankful for this November--my brother married his longtime girlfriend on Sunday in the village of Piermont, down by the Hudson River. It was a beautiful day! Last week the whole house was abuzz, baking and making and getting ready for the big day. My grams made them a stunning Hidden Star quilt (where each block has a star hidden within the block). I made the happy couple a Scrabble picture frame with their names interlocking to hang in their hallway. And my mom and I fashioned earring and bracelet sets for the bridesmaids.

I tried a handful of recipes out this week--all from A Taste of Home magazine (which is fabulous by the way). I baked to my heart's content--a Chocolate cake with raspberry filling and white chocolate frosting, a rich strawberry & champagne cheesecake, and a lemon meringue pie. A new family favorite is the Apple Orchard Pork Loin Roast (very simple to make and incredibly tasty).

Here's an easy & elegant D.I.Y. for your dinner table, mantle place, or window sill:

Hope you have a lovely Thanksgiving this Thursday! Check later this week for holiday gift tag D.I.Y.S!

Living Arts Champagne & Chocolate Gala & Things Galore...

D-I-Y-, ShowsSamantha ExtanceComment

Hello everyone, I have been a bit M.I.A. on my blog lately. I've been busy trying to get everything together for a string holiday events. The first of which is Living Arts' Champagne & Chocolate Gala (Saturday, Nov. 19th from 7:00-10:00 pm). The event will include a silent auction where you can bid on two Bohemian Romance items: 1) a pair of Tick-Tock-Timepiece Earrings and 2) A earring & bracelet set made with pearl buttons, washers, and gunmetal chain! Both auction items come with a plum gift box and Steampunk holiday gift tag! Good luck to any bidders! I have also been working on a display for an Indie Emporium pop-up shop where you can find Bohemian Romance items for the holiday season! I love the holidays, mostly because I love giving gifts and this year I decided to include a small gift to anyone who purchases one of my items from the pop-up shop or on my Etsy shop--a Steampunk holiday gift tag! There are 3 choices: a gear evergreen Christmas tree, berry red gear scrolling holly & ivy, and a glittering gold light bulb invention! (All of which, are made with fantastic rubber stamps I purchased on 1-2-3 Stitch's website).
Also for the pop-up shop I made a giveaway D.I.Y. which I will post on my blog later this month on how to make your own holiday gift tags using salvaged or upcylced materials! I am super excited. Here's a preview of one of my gift tag creations with instructions!

Well, next week will not be any less busy--my brother is getting married & my mom and I are getting together to make the bridesmaids' jewelry and design the floral arrangements! I'll be sure & sneak a few minutes to post some picture

D.I.Y. Simply Steampunk Candle Holder

D-I-Y-Samantha Extance8 Comments

With so many holidays approaching, no doubt you have begun to think about decorations. My favorite part of Thanksgiving is dressing up the table. Here is a simple and beautiful way to steampunk your dinner table. Here's what you'll need: ~The light bulbs & gears can be substituted for other various machine parts that you desire. It is best to use a majority of clear items so that the flame will shine through them. Possible substitutes include: radio or vaccum tubes, broken glass or even bits of ornaments that have broken, & washers.

Making this candle holder is easy, finding your materials will take longer than assembly (which is great, because if you're entertaining last minute this is a quick table fix!). Here's what you do:

1) Place the tea candle inside the smaller candle holder. Then place the small candle holder inside of the larger one.

2) Arrange your light bulbs & gears (or what have you) and fill in the space surrounding the small candle holder. Be sure not to fill the (larger) candle holder over the height of the small candle holder.

3) Once your items are arranged, light your tea candle and enjoy its illumination!