 As always, Happy Junkin'!
Uncategorized
Custom Order Spotlight:Wedding Earrings
UncategorizedCommentI love custom orders, especially custom orders for weddings. I am always so honored that someone trusts me to create jewelry for their special day. It's also a great excuse to sing sappy love songs in my studio at the top of my lungs and just have a good time making. Besides singing "Chapel of Love" and "Will You Still Love Me Tomorrow," one of the other things I love about custom orders is the challenges they present. Fitting the jewelry to the person, their style and their personality and often keeping within certain parameters.
My latest custom wedding order came from one of my co-workers, Sarah. She had a jewelry set from her grandmother that she wanted to wear on her wedding day. The necklace and earrings were beautiful, but the earrings were posts and not the dangle-ly, long earrings that Sarah wanted for her wedding.
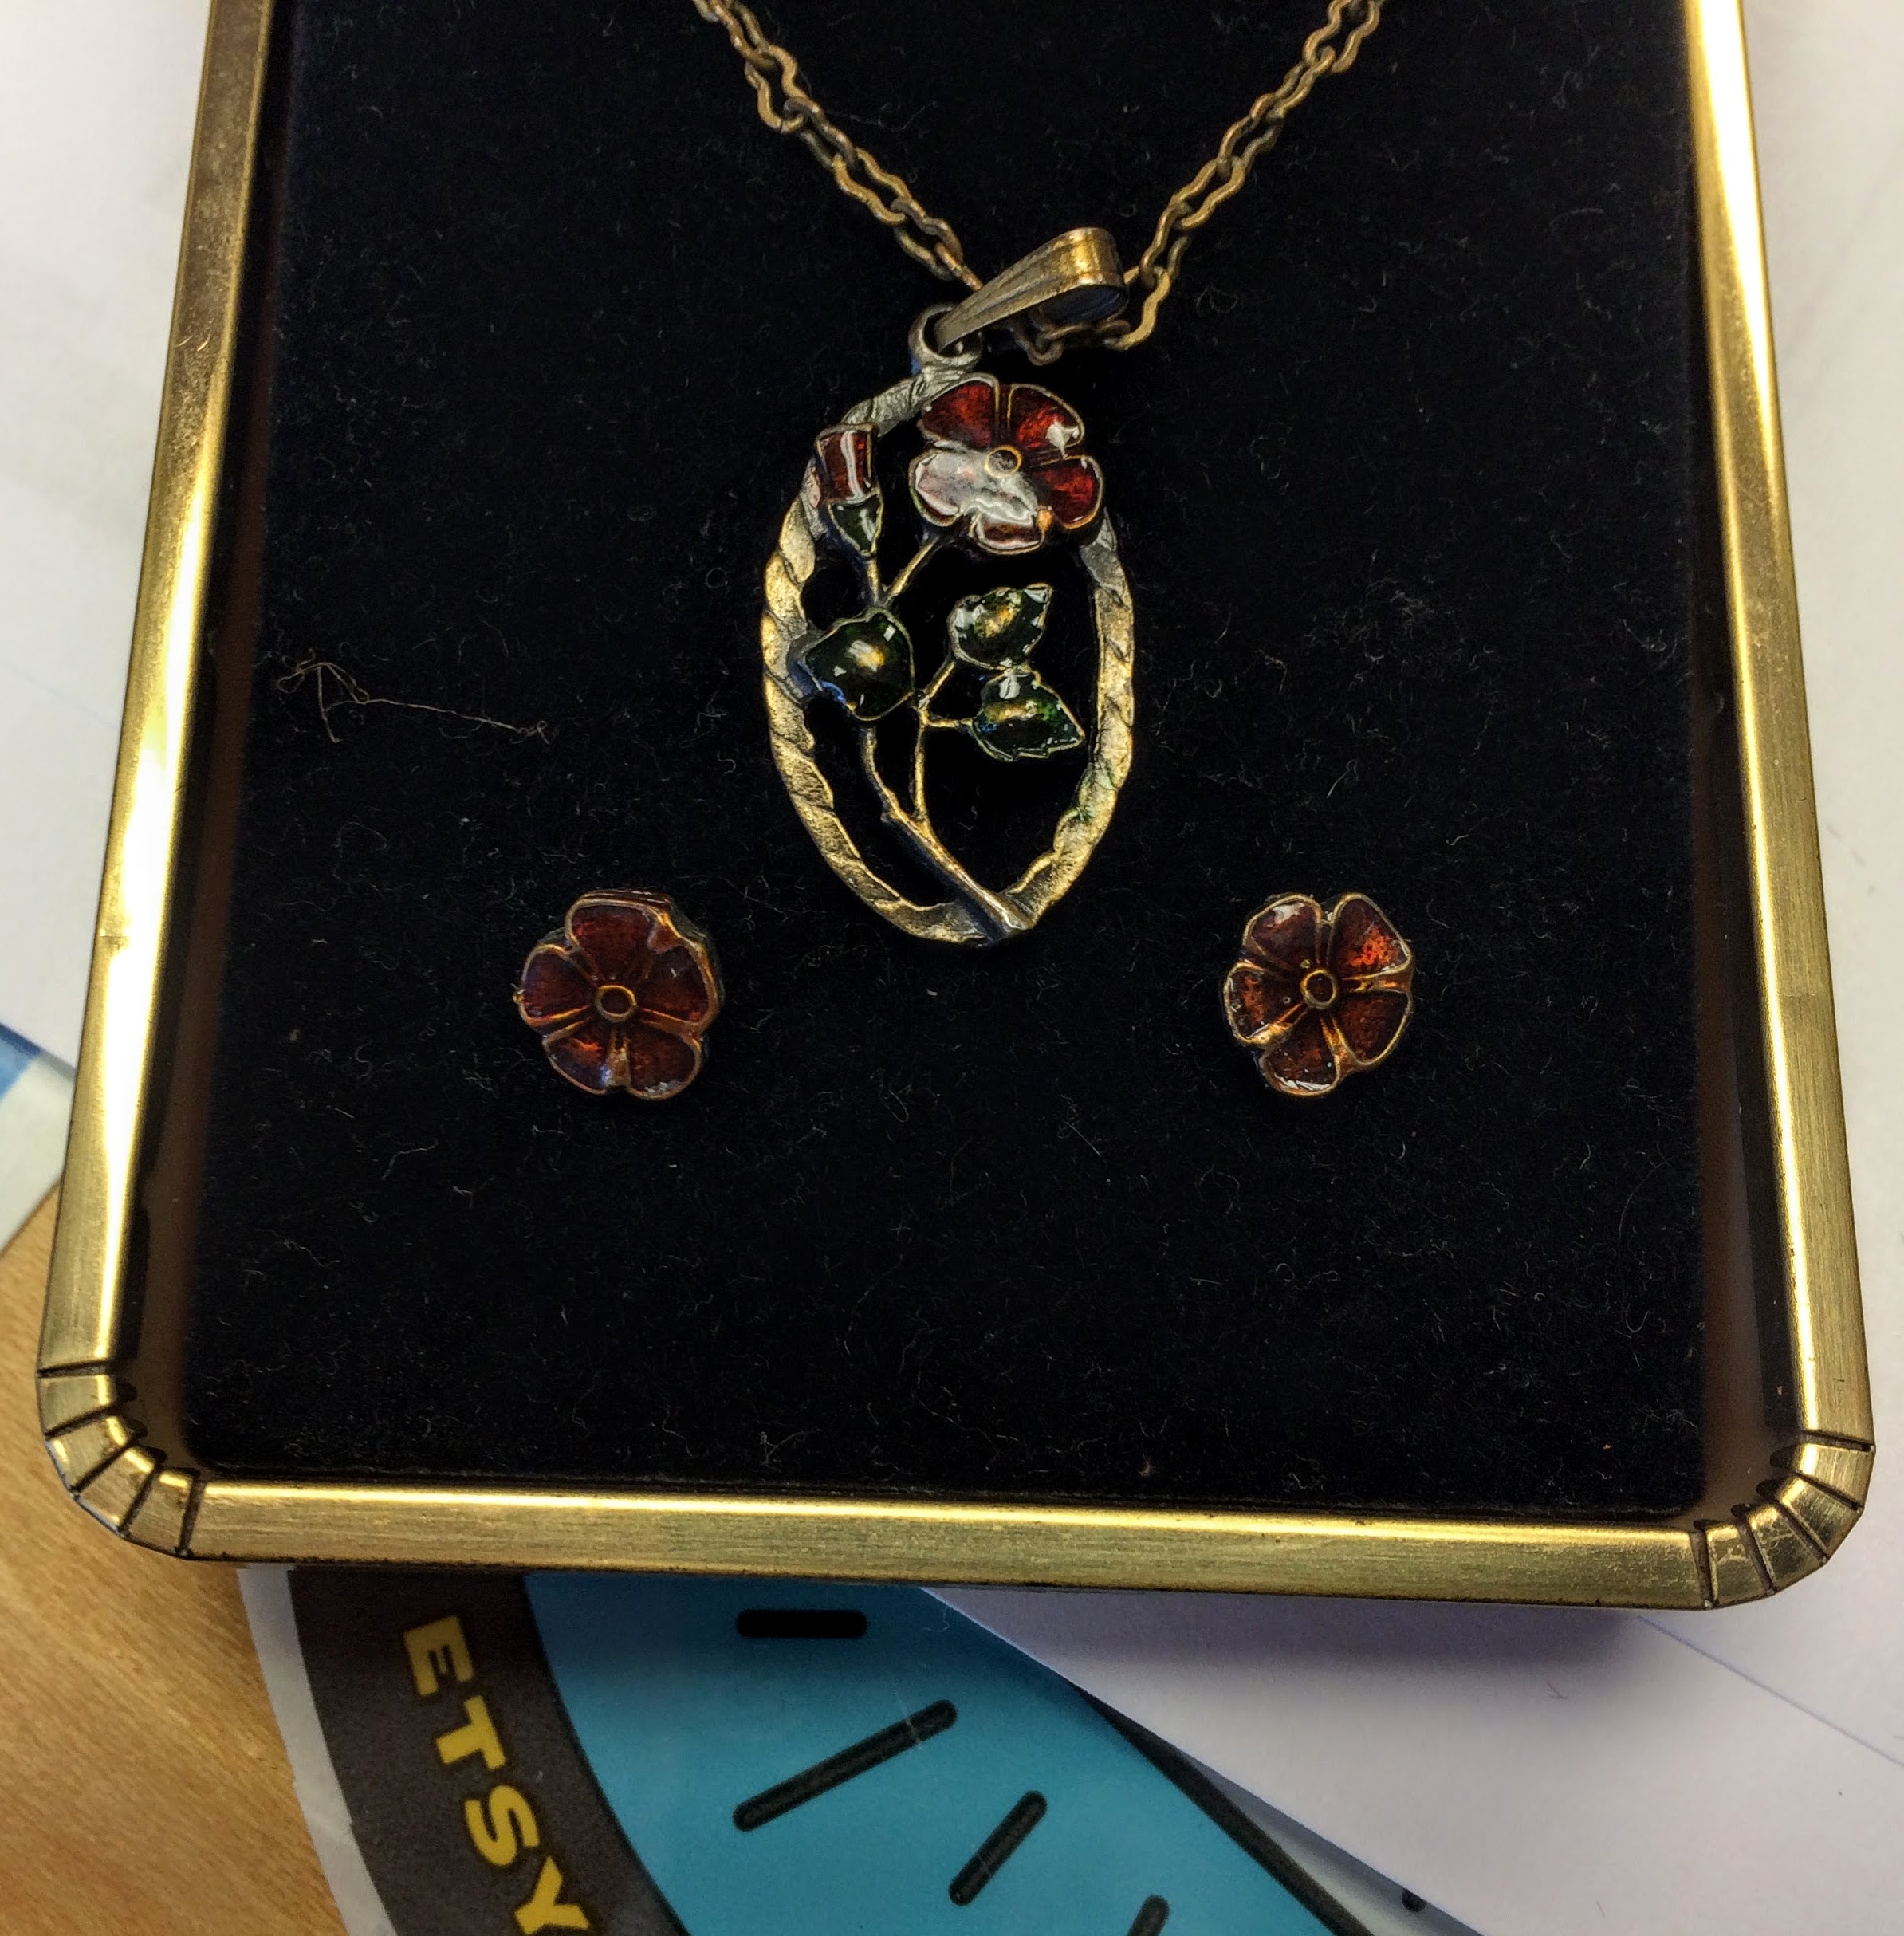
So, my challenge was how to turn posts into long, dangle-ly earrings. That itself is not much of a challenge, but creating temporary dangles are a different matter.
In a lot of my pieces I try my best to respect the original object, and not create new holes or altering it, and thereby keeping the original piece in tact.
To create dangle-ly earrings out of posts the answer was to build on top of filigree and essentially fasten (as you would to your ear) the earring to the filigree--keeping the earring in its original state and not altering it. Especially since Sarah will want to wear these again.
What's fun about fastening earrings posts to filigree is that you have 2 pairs of earrings, 2 different styles, and 2 different looks that you can easily change up yourself.
Here's the "After":
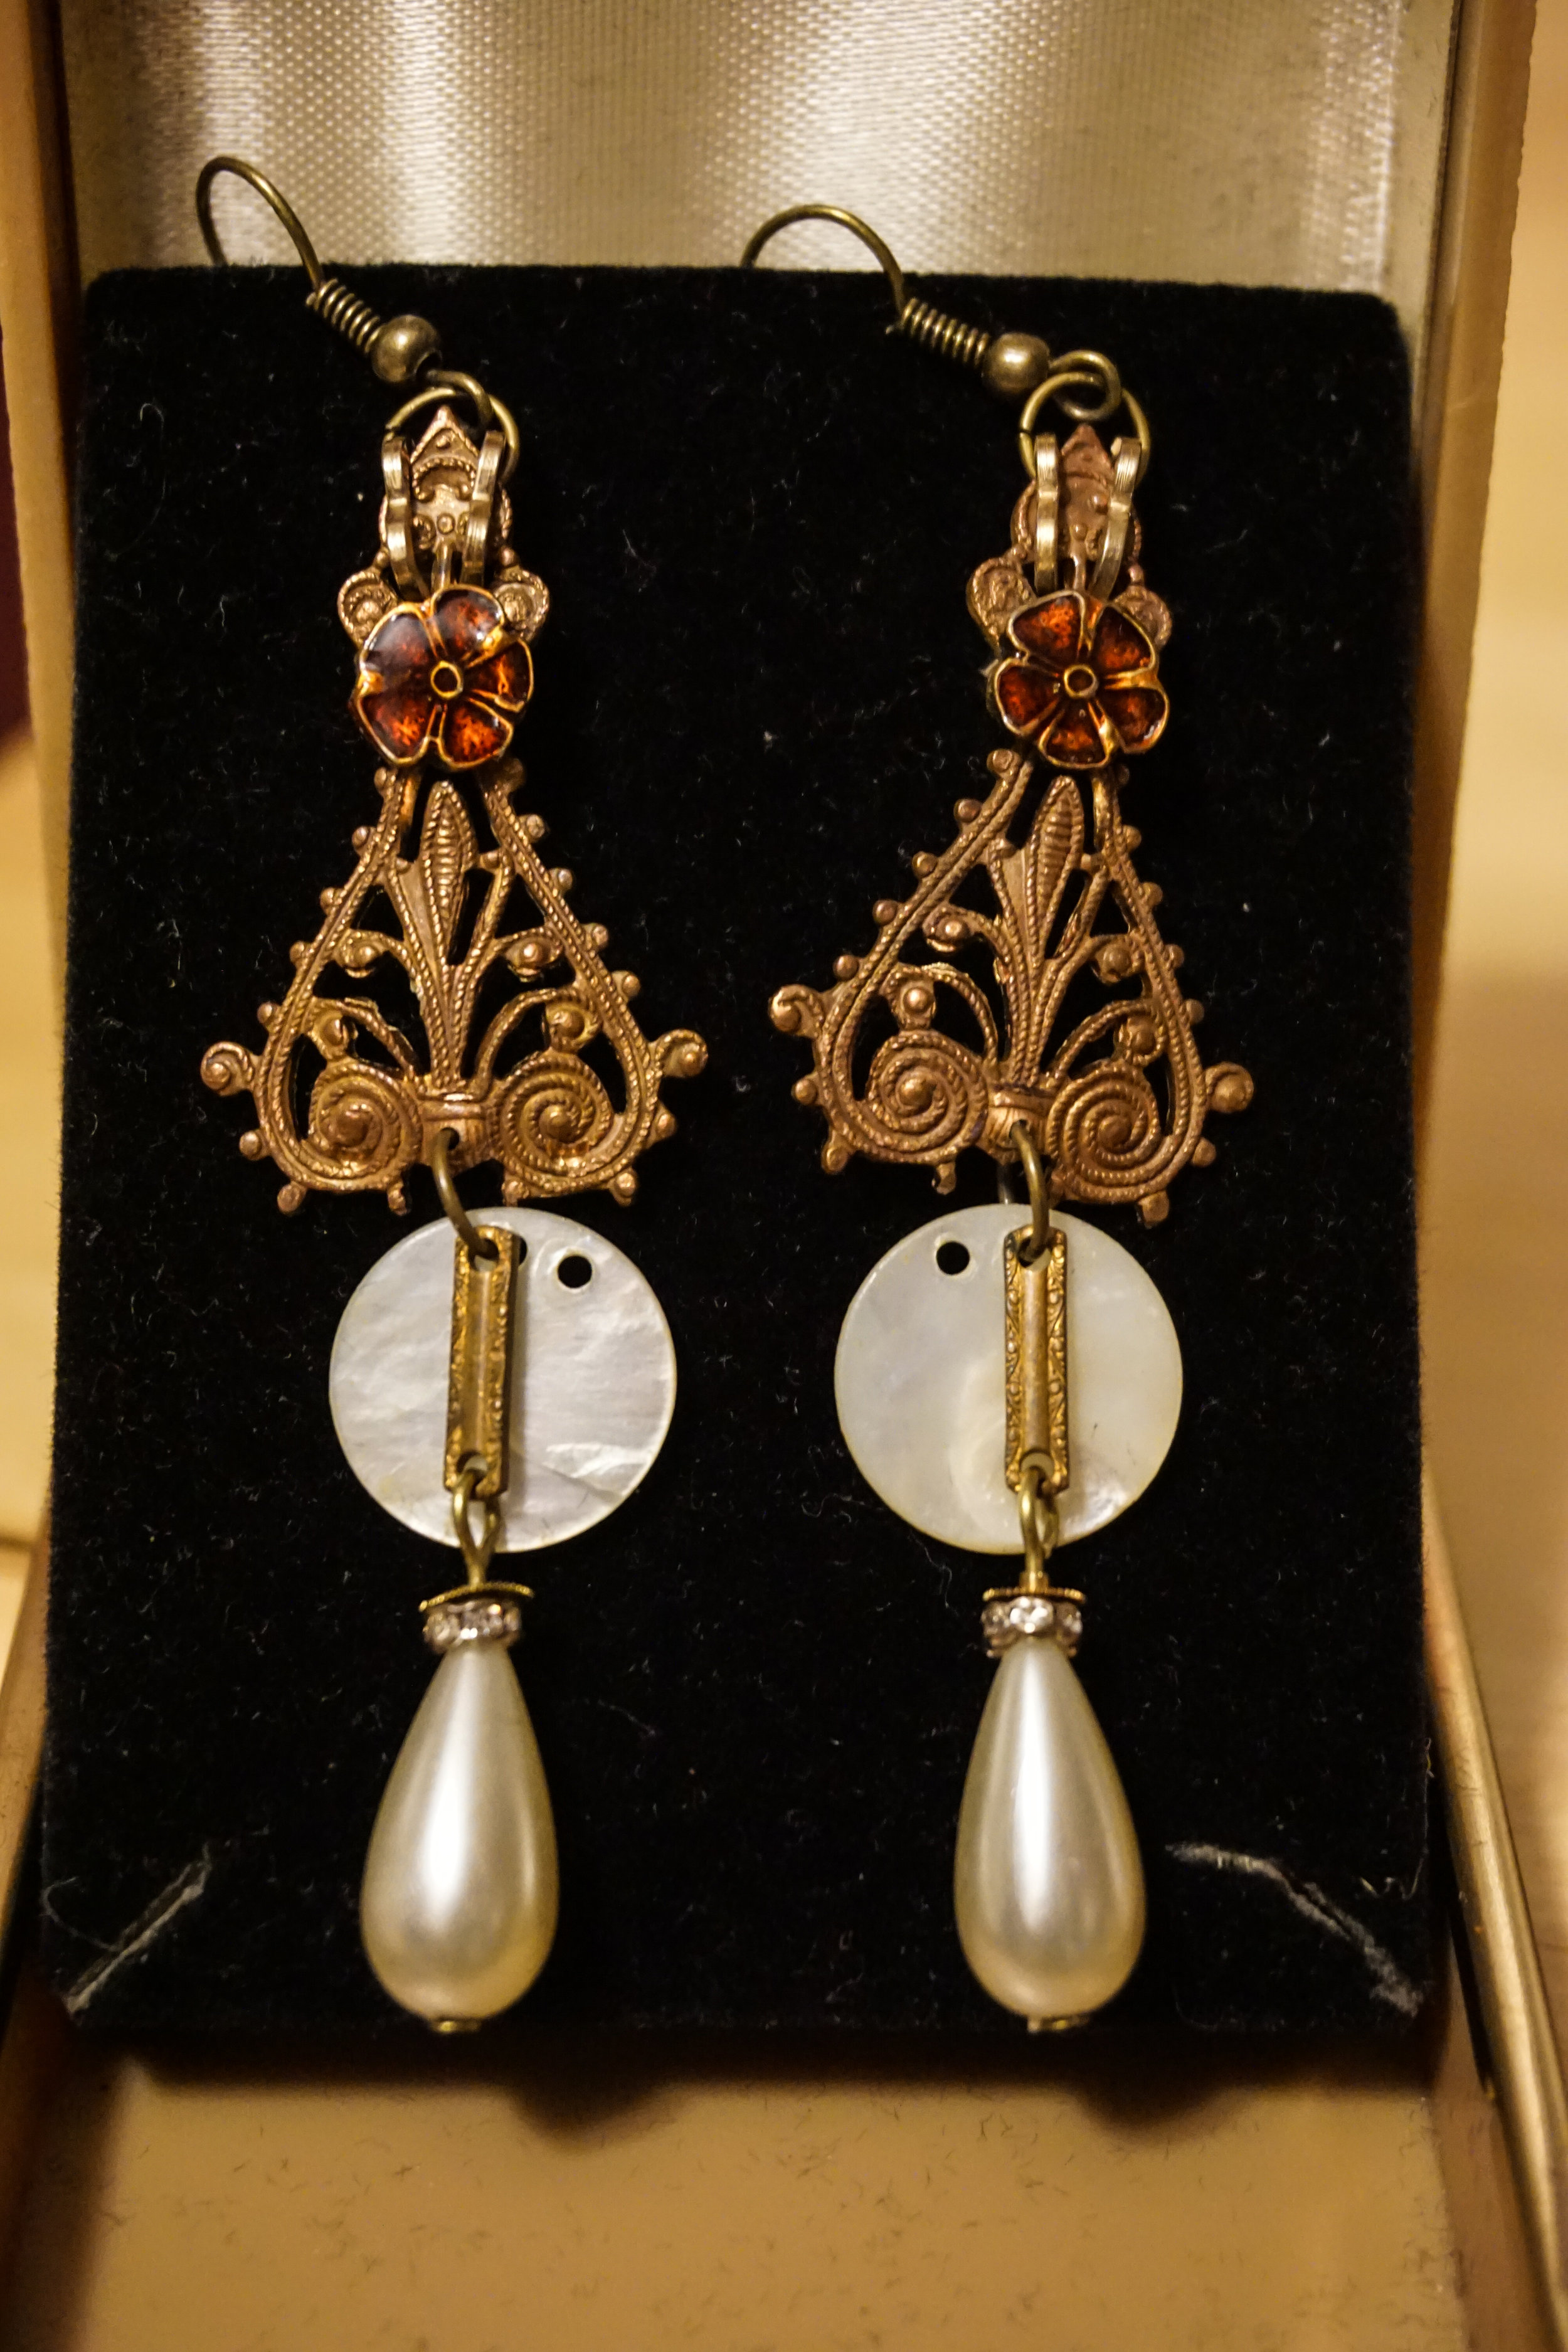
Sarah's wedding earrings are made with vintage brass filigree that my mom and I found at a Paris flea market (I used some of my private stash because the metals matched perfectly!), antique gold watch chain links, clock cogs, rhinestone rondeles, brass chain links (that matched the necklace's chain links), flat mother of pearl buttons, pear shaped pearls, and Sarah's grandmother's crimson flower earrings.
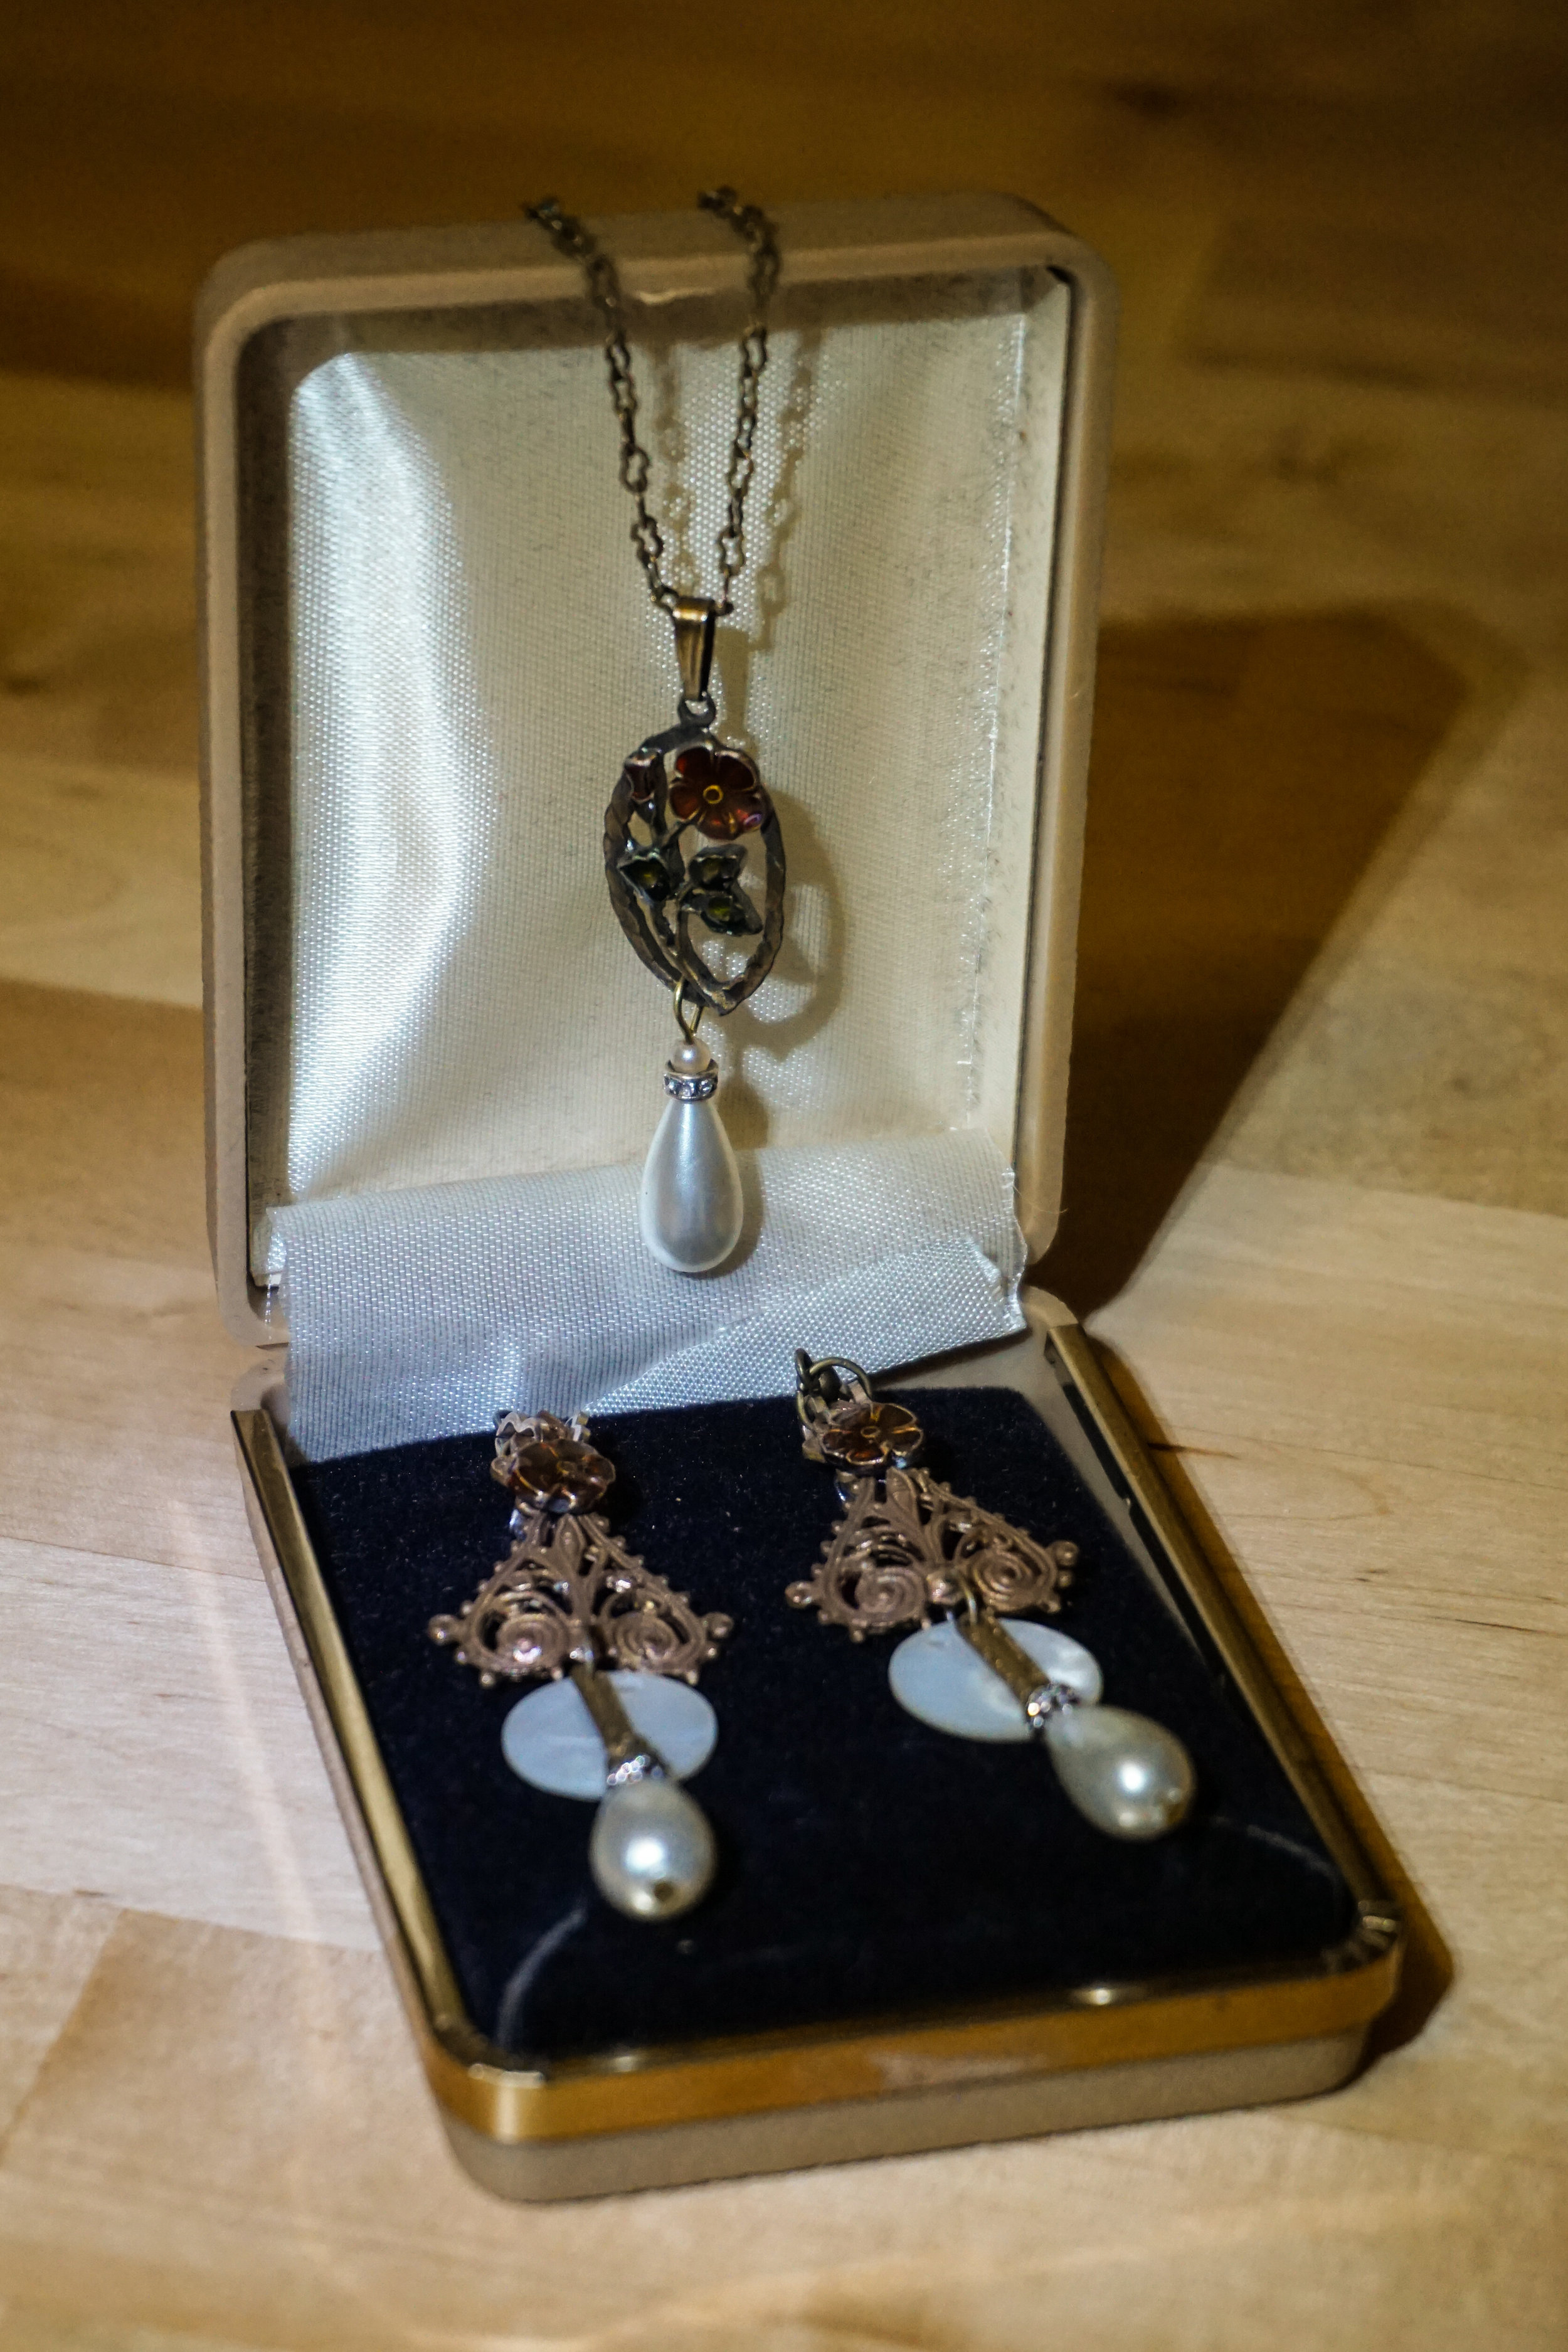
To match the earrings, I added pearls and a rhinestone rondele to the bottom of her grandmother's necklace.
I couldn't wait to go to work Monday morning and see Sarah's face. She is someone with such a big heart and I am so happy that she is getting married in September. She is going to be a beautiful bride. Congratulations Sarah!
For those of you who are interested in custom orders, email me at bohemianromancejewelry@gmail.com. I'm ready for the next fun challenge!
Junkin Tips & Tricks: 29
UncategorizedComment As always, Happy Junkin'!
Alluring New Pieces
UncategorizedCommentSometimes there is a material I find that inspires a lot of new pieces. One such material is a recent find, a bunch of vintage brass fishing lures. Their shape and size were perfect for adding to earrings, necklaces, and bracelets. With them, I've made some "alluring" new pieces. (Forgive the pun, my husband is really rubbing off on me.) I wanted to share them with all of you!

I made some fun pairs of earrings--all with that great shape of the fishing lure, especially for dangle-y, long earrings.

The fishing lures were also perfect for layering dainty, hard to see clock parts.They provided a neutral backdrop.

With the lures, I also made some pretty, yet simple necklaces. To me, they're very summery--gold and brilliant blue. The lures also resembled feathers to me too, so I've been making more multicultural style steampunk pieces with them as well.
Been having fun in the studio as you see. More new pieces to come soon.
All of these pieces and more, I've added to my online shop in the New Section!
Junkin Tips & Tricks: 28
UncategorizedComment As always, Happy Junkin'!
Junkin Tips & Tricks: 27
UncategorizedComment As always, Happy Junkin'!
Junkin Tips & Tricks: 26
UncategorizedComment As always, Happy Junkin'!
Junkin Tips & Tricks: 25
UncategorizedComment As always, Happy Junkin'!
Junkin Tips & Tricks: 24
UncategorizedComment As always, Happy Junkin'!
Junkin Tips & Tricks: 23
UncategorizedComment As always, Happy Junkin'!
Steampunk Buttons!
UncategorizedCommentOn a recent trip to JoAnn Fabrics I discovered a wonderful new supply--steampunk style buttons! They are relativity inexpensive and can be added to any sewing project to 'punk it up. I bought some to refurbish my winter coat!

The majority of them are gears in a variety of metal finishes, sizes, and gear styles. Some are more intricate and highlight old objects or fiction themselves, like:

Skeleton keys (which I can't wait to use to fasten a cloak and a coat) and an elaborate Octopus button (which I would use as a brooch instead of a button because it is so fabulous).

There were also some compasses and clock faces, which could be improved upon with a little bit of painting!
As always, Happy Crafting!
Junkin Tips & Tricks: 22
UncategorizedComment As always, Happy Junkin'!
Junkin Tips & Tricks: 21
UncategorizedComment As always, Happy Junkin'!
Junkin Tips & Tricks: 20
UncategorizedComment As always, Happy Junkin'!
Junkin Tips & Tricks: 19
UncategorizedComment As always, Happy Junkin'!
Junkin Tips & Tricks: 18
UncategorizedComment As always, Happy Junkin'!
Junkin Tips & Tricks: 17
UncategorizedComment As always, Happy Junkin'!
Daydreaming about a Steampunk Tea Party
UncategorizedCommentCloudy days are the best for daydreaming. I have dreams of opening up a shop with my mom one day and I've always imagined the grand opening being a steampunk tea party. I've been on a baking kick lately, in part thanks to my friend Eilis who has turned me on to watching The Great British Baking Show.
If you want to host a steampunk tea party, here are a couple of ideas & recipes to get you started...or daydreaming like me too:

Tea Cup & Saucer silicone cupcake holders

Easy Petit Four Batter Recipe (From Rose Bakes)

Teacup floral arrangements (From Mary Moon)

Rose biscuits (from Izyumka)

Chocolate Gears Edible Decorations (DIY here)

Sprocket & Gear Cookie from Sweet Sugar Belle (Recipe here)
Chocolate Gear Cupcakes from Elizabeth's Kitchen Diary (Recipe here)
Happy Daydreaming & Baking!
Junkin Tips & Tricks: 16
UncategorizedComment As always, Happy Junkin'!
DIY Toy Tea Sets
UncategorizedCommentI love making toys for my niece and godkids and the toy I've been working on lately definitely has a steampunk/Victorian flare: fabric tea bags for tea time.
If you search on Pinterest, there are a variety of great DIYs on how to make these. I'd recommend the following: Fresh Paint (for a standard DIY), Weibo (for a great felt version), and my favorite which I based my own on--Lil Blue Boo (which has a cute idea for a tea box too).
I added my own touches to Lil Blue Boo's DIY, I used patterned fabrics and used scrapbook paper to decorate the outside of my lil tea box. I also achieved the feel and consistency of tea leaves with shredded paper (like the kind you'd buy for a gift or Easter basket).
This is also a wonderful sewing project because it's inexpensive. I had some 5 x 5 squares left over and I could make approximately 2 tea bags out of 1 5 x 5 square. This is flexible enough that you can also use fabric scraps.
My niece loved hers, and I am still dutifully sewing more for friends who've asked. It's a fun, relatively quick project. Merry Making!
