Bohemian Romance Jewelry

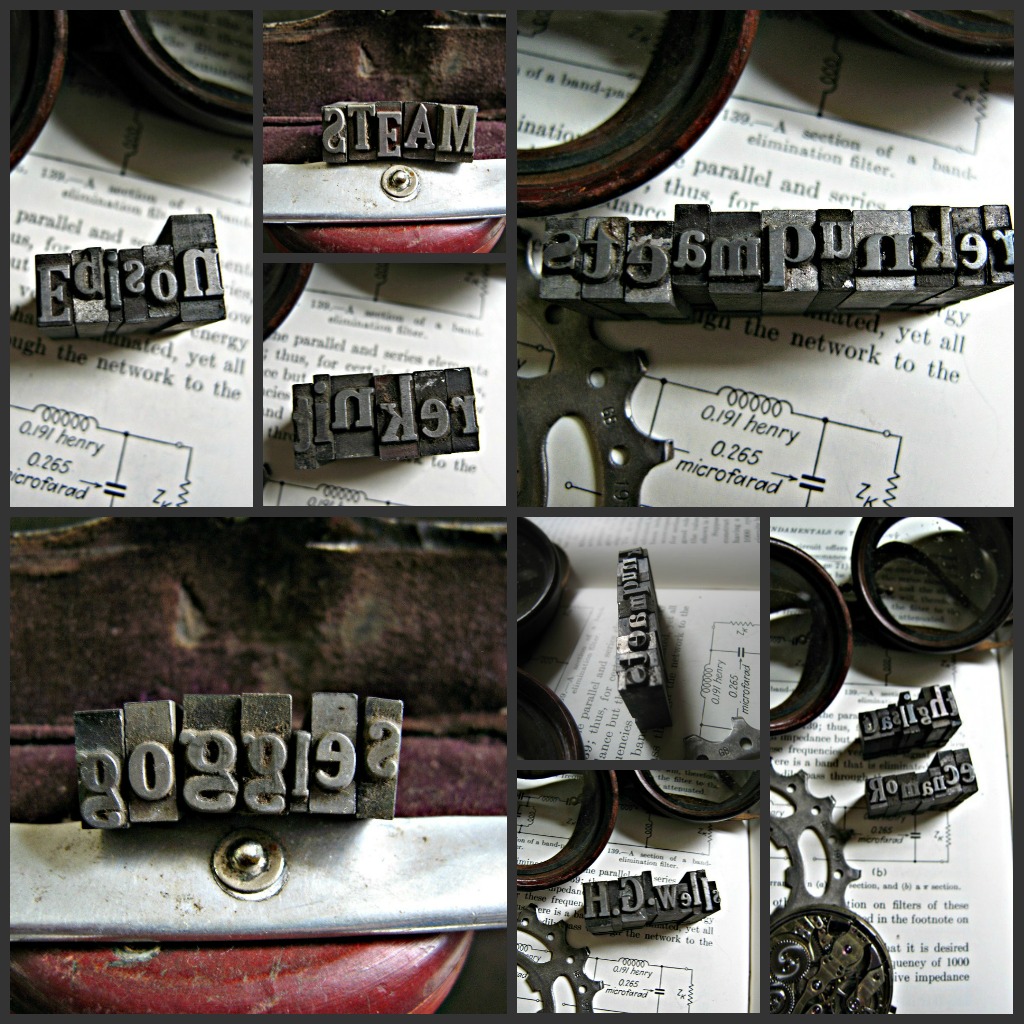
Steampunk Letterpress!

Flea Market FindsSamantha Extance1 Comment

I have finally organized my antique printer drawers' letterpress letters (what an undertaking that turned out to be! phew!). While I was sorting through the wayward consonants and vowels and ruffling through punctuation marks galore I marveled at the old way of printing. Handsetting the type would have taken what might seem to us living in the digital age where print is so easily produced & reproduced--hours upon hours. There are a couple of printing presses that I would love to call your attention to--the first of which is a project  & dream (called, Moveable Type) started by Kyle Durrie. Kyle is a letterpress printer who rides across the U.S. in her truck spreading knowledge about old fashioned printing. To follow her blog or learn more about Kyle's travels & printing press, visit her website.

The second printing press I'd like to share with you is one that is opening up right here in Downtown Tulsa! Isn't that exciting?! Tulsa Letterpress will also be a bar--a place where you can meet with friends or perhaps even curl up to a good book in a place that clearly worships print. Tulsa Letterpress will open up next to Dilly Deli.  I will be delighted to learn more about old fashioned printing and cannot wait until their doors open. I'll keep you all posted on their grand opening date.

To check out my latest Etsy listings involving letterpress letters--visit my shop!

Upcycling from Bicycles!

UncategorizedSamantha ExtanceComment

I have a brand new reason to love bicycles--other than green, heart healthy transportation and tons of fun on a sunny day--bicycles have beautiful gears that are perfect for steampunking! Mine were given to me by a friend who works in Tom's Bicycles here in Tulsa (thank you Casey!). For other steampunkers out there--be warned that bike gears are incredibly tough to clean. It will take you a couple of washes and a ton of elbow grease. I would recommend using a brillo pad saturated with Dawn (or any grease cutting soap of your choice). Despite the hours (and believe me you will be at it for an hour or two) of cleaning, used & worn bike gears are ideal steampunk material because the rough edges have already been worn down from riding and are no longer sharp.

Another great thing about bike gears (those from cassettes, that is) are their many holes. So while you will spend a great deal of time cleaning them, you do not have to file or drill at all! This is even more perfect for beginner steampunkers who have not built up an arsenal of tools or for those who are steampunking on a budget. Without further ado, here are my bicycle creations!

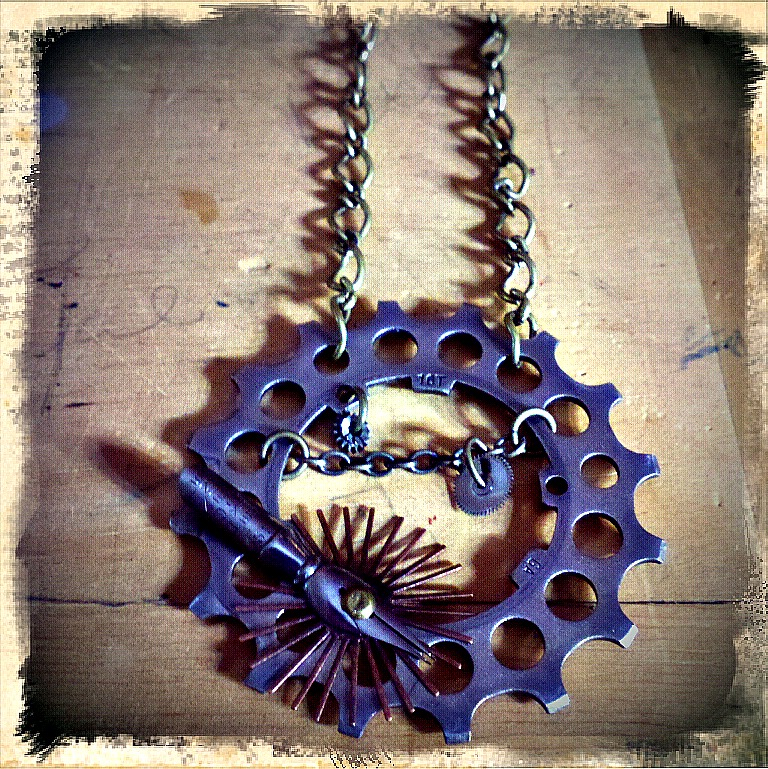
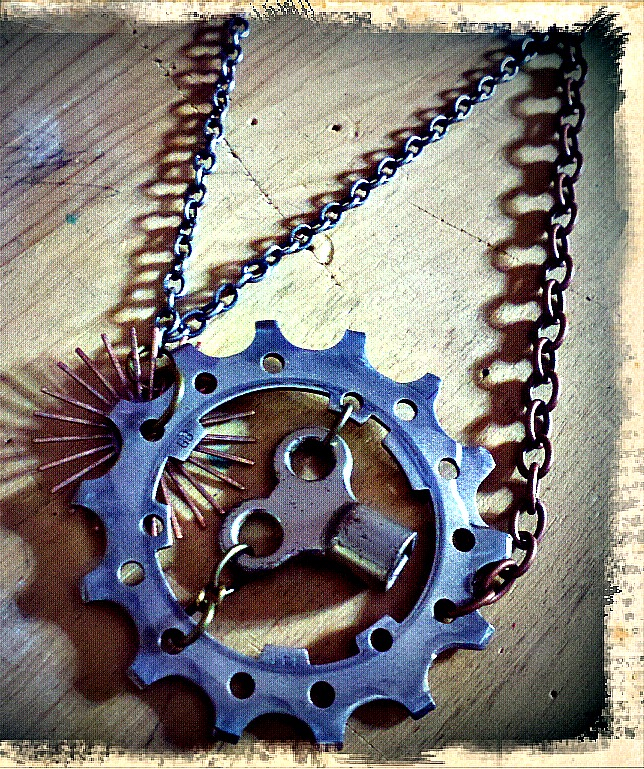
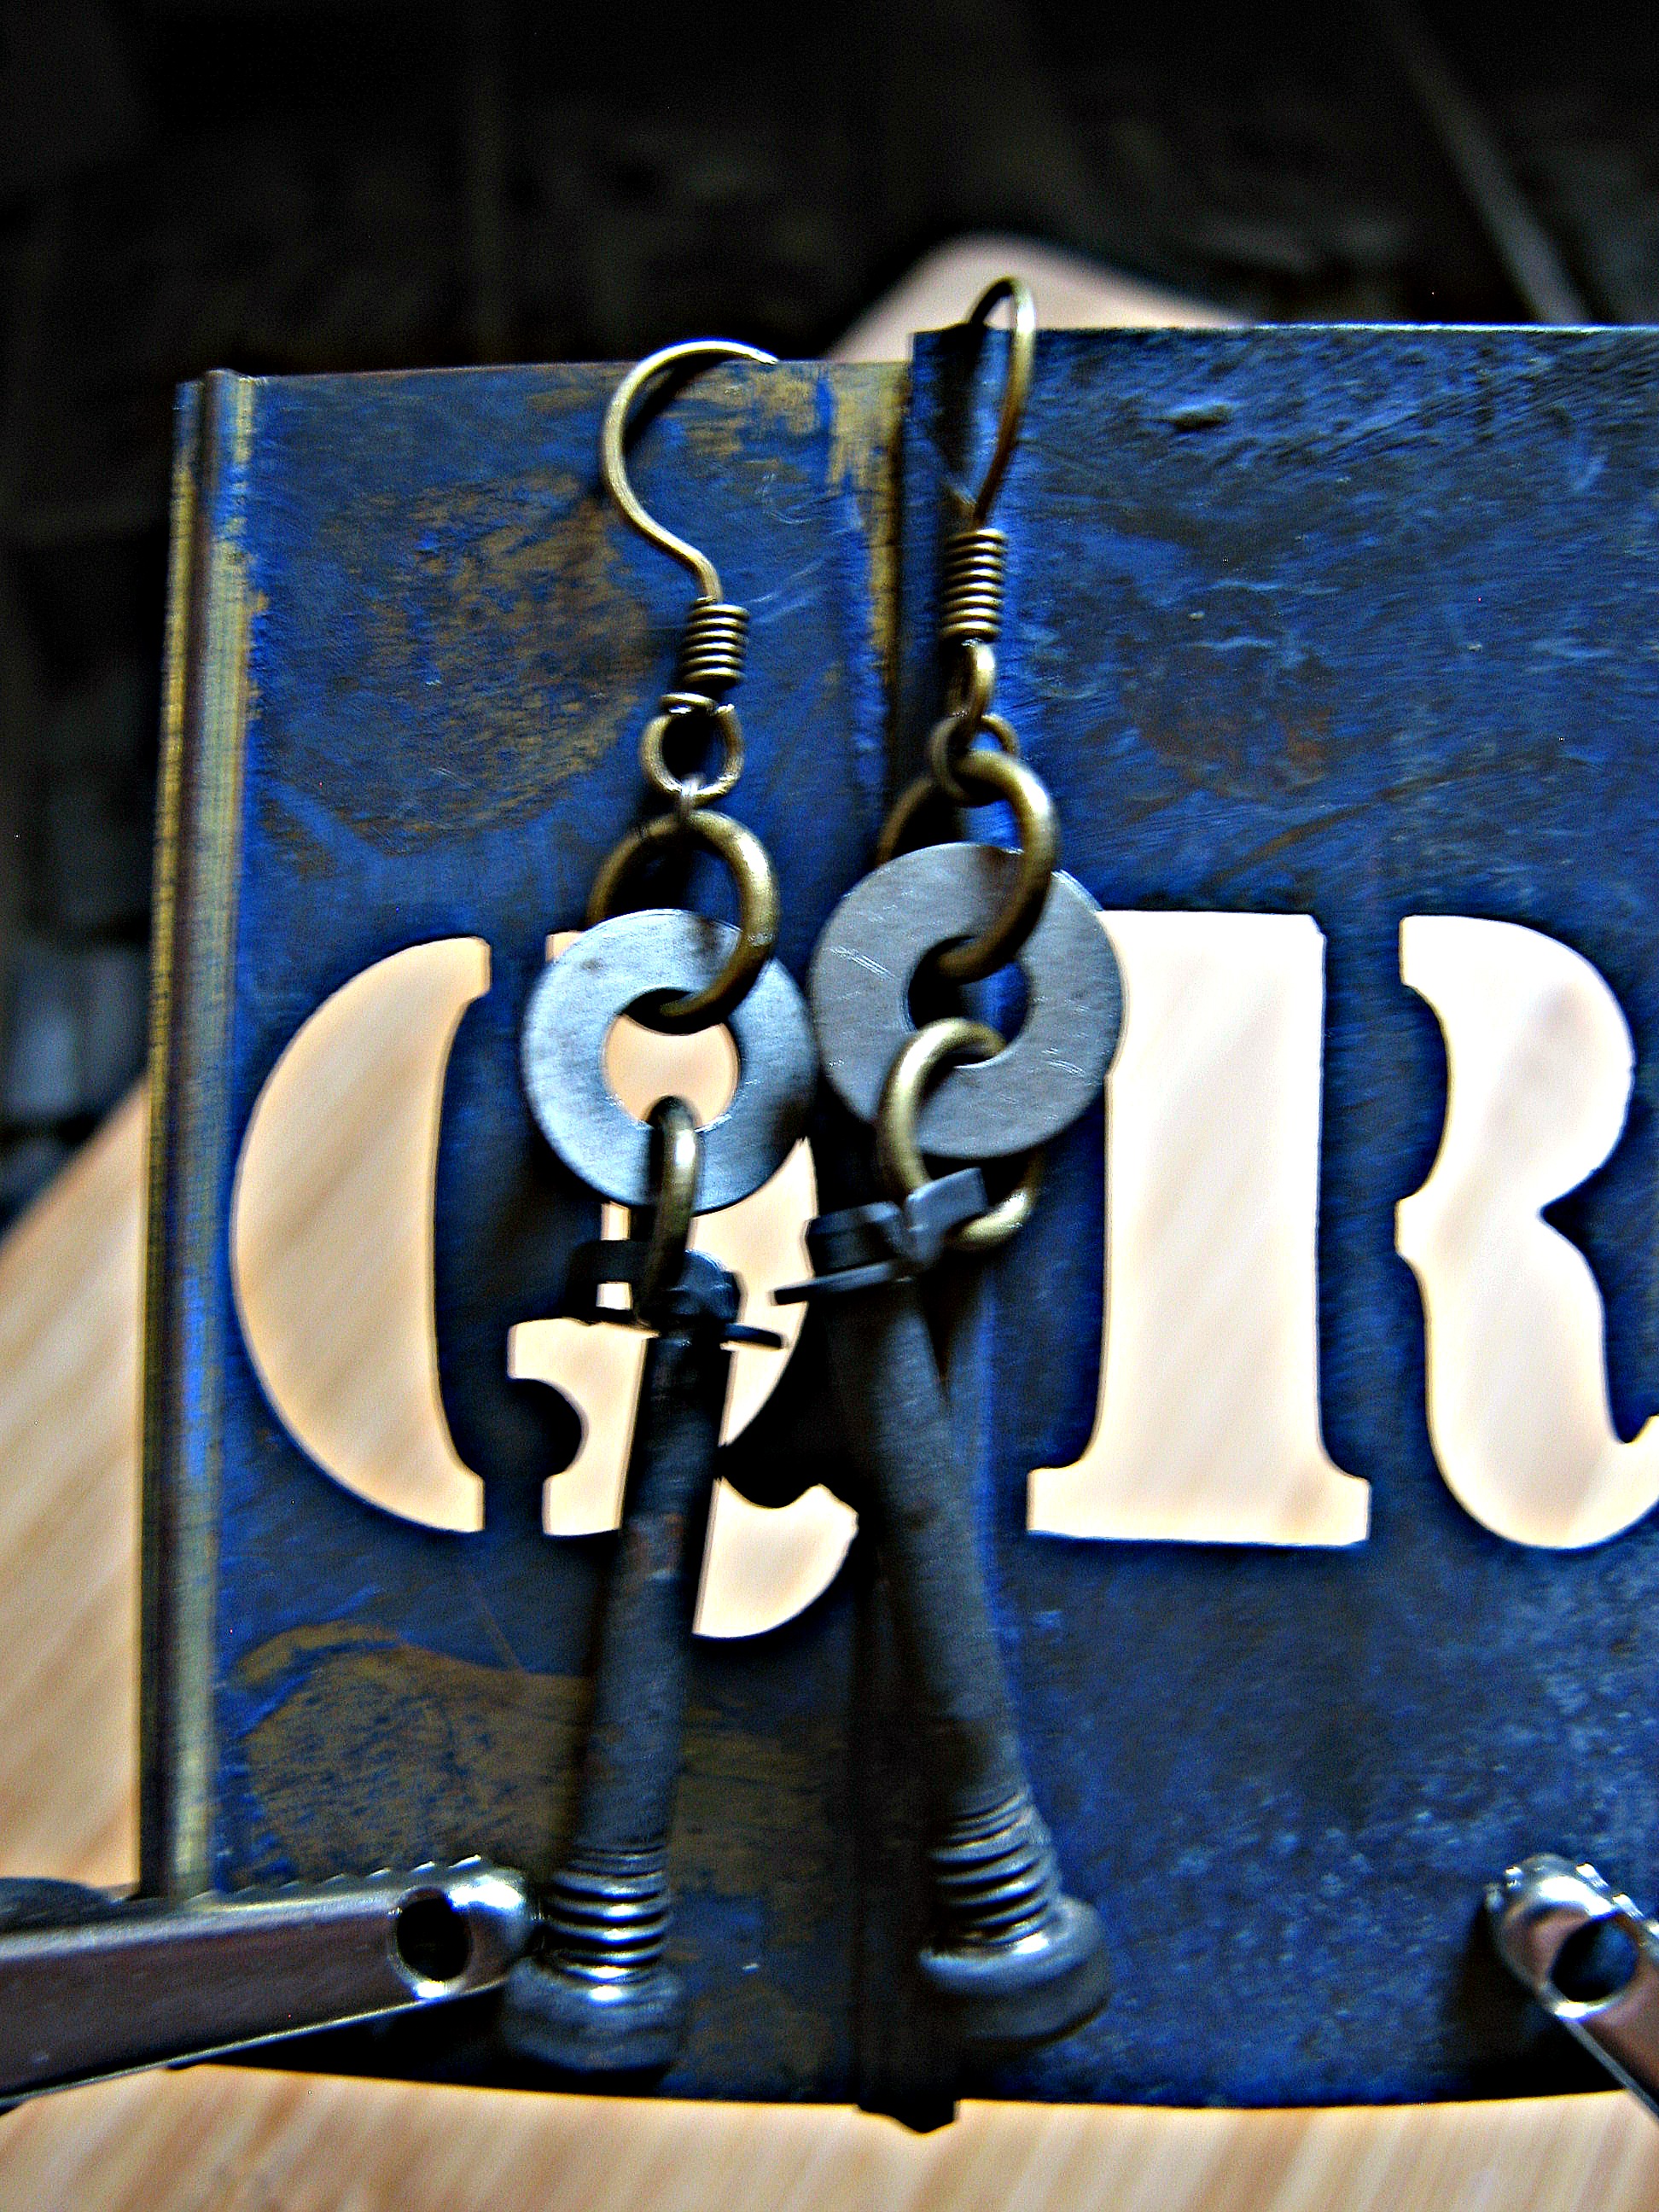
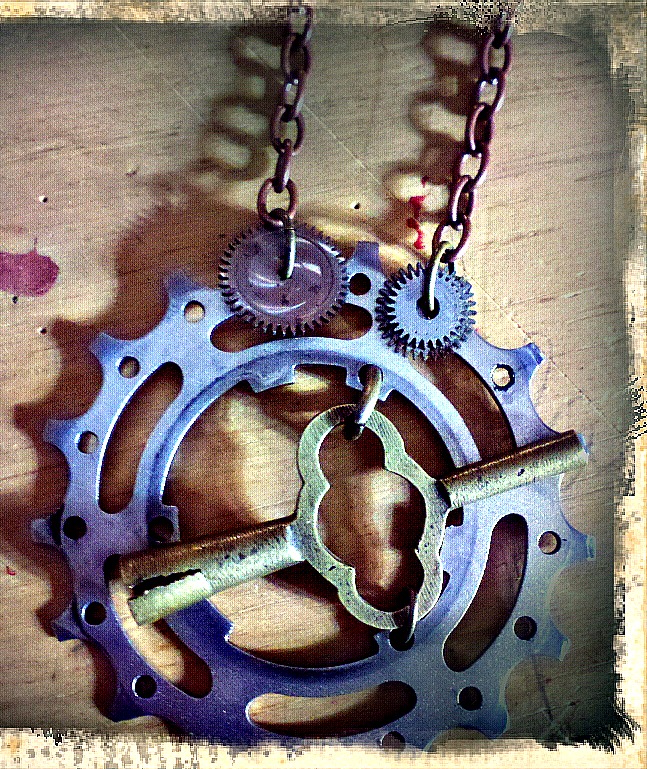
Steampunk Cyclist-Poet's Necklace: Made with various chains, a pen nib, metal filigree, and clock cogs & gears.Asymmetrical Steampunk Cyclist's Necklace: Made with key, various chains, and metal filigree.Steampunk Brake Pad Earrings: Made with bicycle brake pad parts, chain, and washers.Steampunk Cyclist's Key Chain: Made with key, various chain, and clock gears.Steampunk Brake Pad Necklaces: (Left) Made with brake pad, chain, washers, and grandfather clock gear; (Right) Made with chain, brake pad, washer, and lock washer.

Hope this inspires you to upcycle!

D.I.Y. Book Display

D-I-Y-Samantha Extance1 Comment

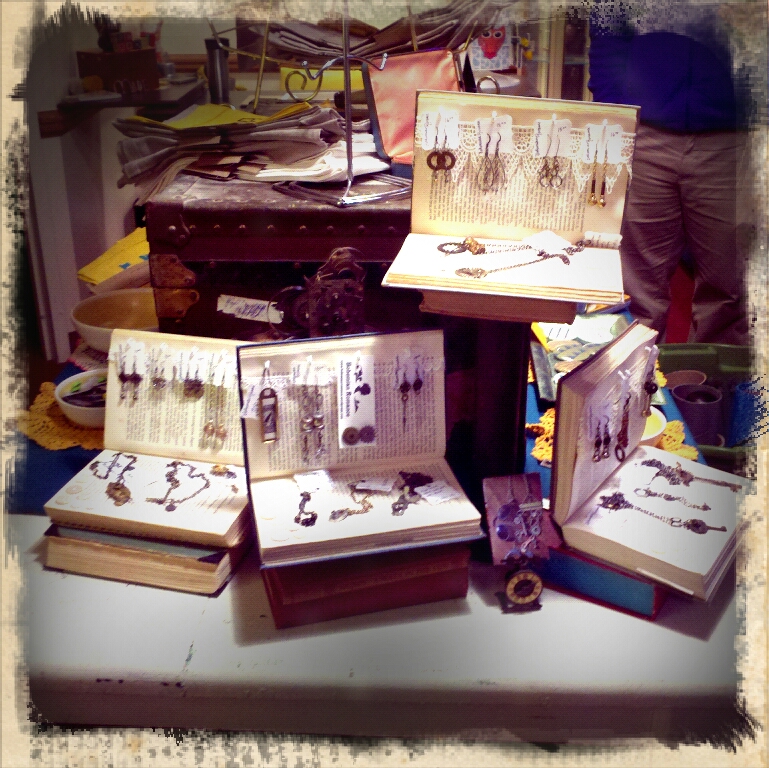
I like to use antiques and things I can upcycle and re-purpose to display my jewelry. As many of you probably already know if you have seen my booth at local craft shows--I have antique printer drawers, an old door that I use for a table, a shutter, and a wood kitchen drawer that I refurbished for display purposes. This display came about when I was thinking up creative ways to display my jewelry in a new shop that is opening up here in Tulsa. I am happy to be a part of Made; The Indie Emporium shop, located on the corner of 5th & Boston (the grand opening is February 1st & I hope to see you there!). I loved making these displays and I hope you will too!

Materials & Tools:

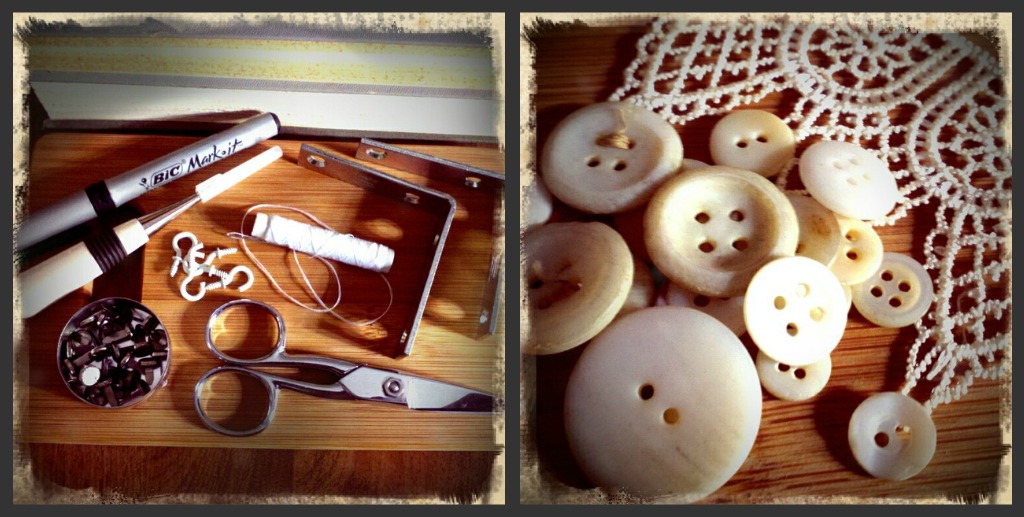
screwdriver; scissors; needle & thread; 2 books (1 to use as the display and the other to use as an anchor); cup hooks (white); Sharpie marker; awl; brads; lace; buttons; all-purpose glue; 1 pkg. of corner braces with screws (mine are 2 1/2" x 5/8") but really this just depends on the size of your book

What is great about this DIY is that it is simple and elegant while also being incredibly cheap to reproduce. I purchased the books for 50 cents each at a used bookstore, the lace was 50 cents in a bargain bin, the buttons were free! (I collect lost buttons, they are everywhere you look!), cup hooks 89 cents per pkg. of 5, and the corner braces came in a pkg. of 4 with the screws and only cost $3.95 at Lowes, and lastly a large pkg. of 20 brads were on sale for 76 cents--which brings me to a grand total of $7.10.

Steps:

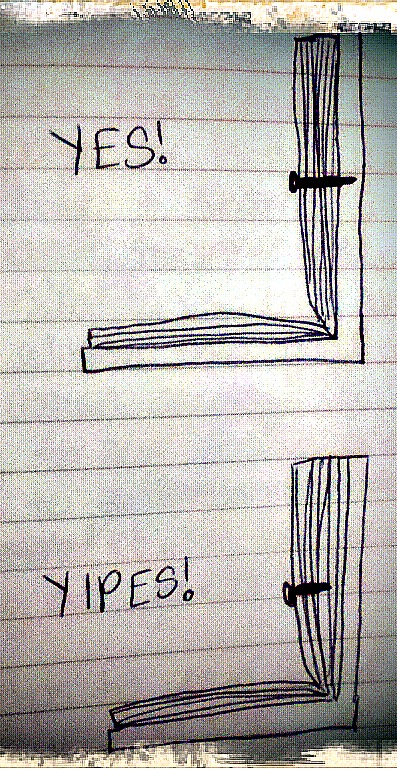
1) Before doing anything, first figure out which pages you would like to have your book display opened on. I read mine to make sure that there wasn't anything a potential customer might find offensive (like expletives, racy scenes, or racial/ethnic slurs). Also,  measure (eyeball it) to make sure that the screw (that you will fix in the middle of the top page of your book display to keep it securely open) can go through all of the pages that you have opened your book to. See figure below for clarification.

You want the screw to go into the book cover otherwise the book pages will fall down once you place jewelry on it.

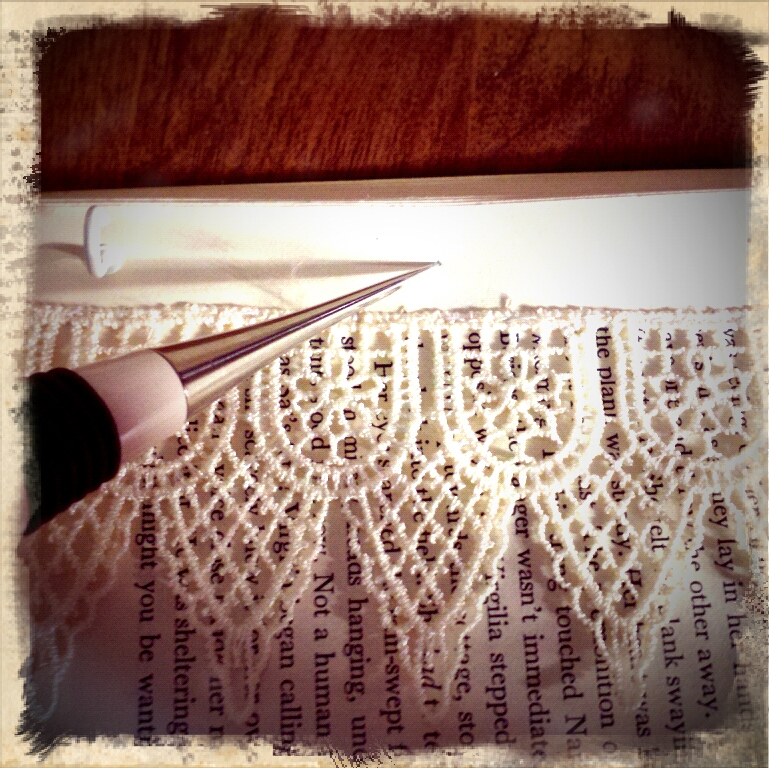
2) Once you have done this, measure and cut your lace to fit the top page of your book display. Your lace should wrap around to the other side of the book page to hide unsightly unraveling and seams. I suggest sewing 2-4 pages together (depending on your paper quality and its thickness) so that there is less of a chance of tearing the pages while you are sewing your lace in place. Too few pages and it's too flimsy to sew easily and too many pages leads to more paper tears because you are tugging at your stitches more.It helps to pin your lace in place on the book page.

3) Once you have your lace pinned in place, sew it. Try to keep your stitches small, even, and neat.

4) Next, place your buttons on the bottom book page of your display. I pinned mine in place (which is optional). You could sew as you go if you choose. Sew your buttons in place. Again, sew 2-4 pages together for maximum ease. 5) (Optional) Use your marker to write your business name or a cute phrase on the bottom page of your book display. You could also stamp a design on your page or doodle in the margins. Anything goes, have fun with it!

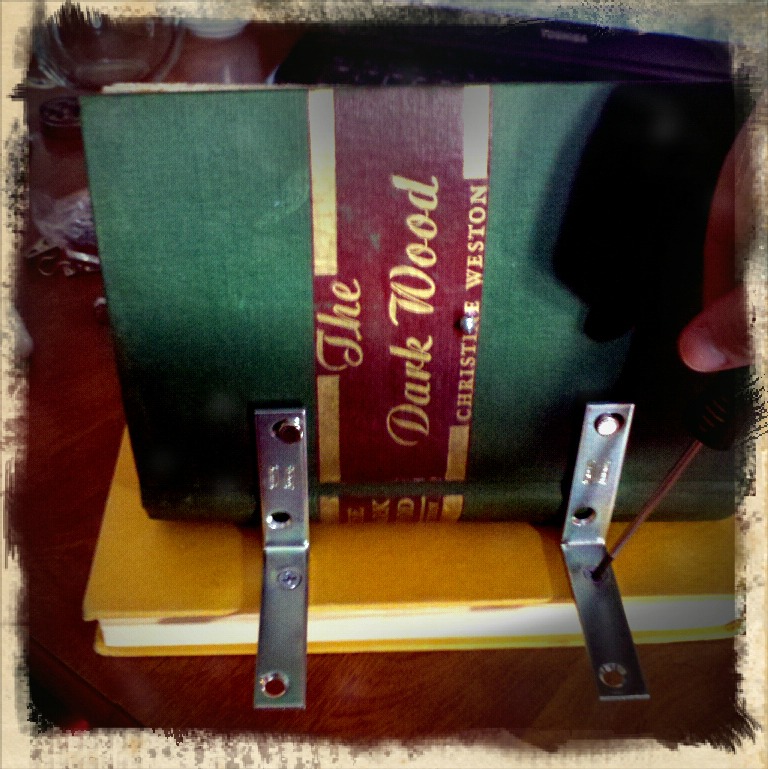
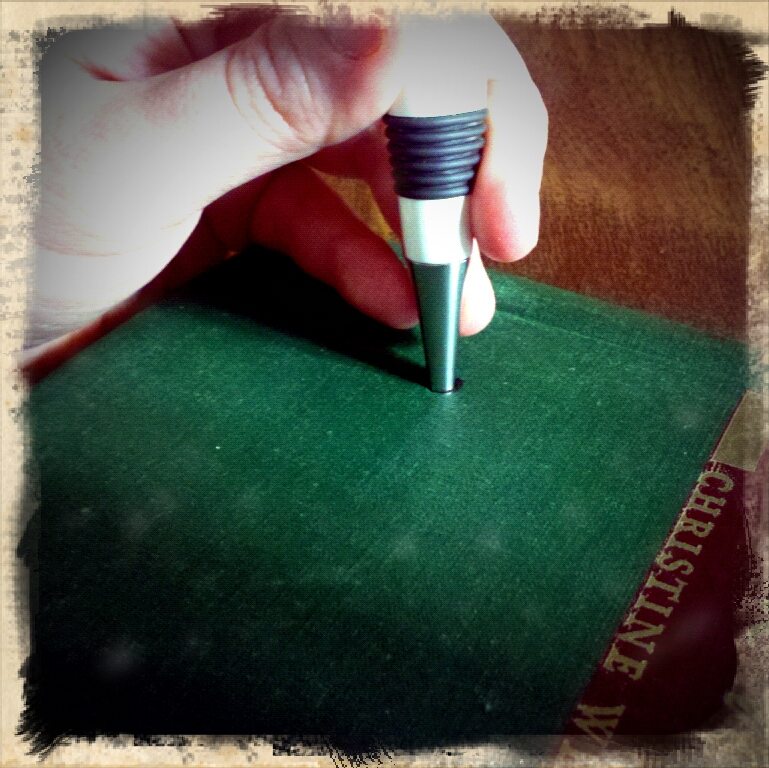
6) Once you are finished with decorating your display, it's time to fasten the display book to your anchor book. Place your anchor book underneath your display book. Grab one of your corner braces and place it up against the back cover of your display book situating the screw holes tightly against both the back cover of your display book and the top cover of your anchor book. See the image below for clarification. Once you have the corner brace places, take your Sharpie marker and mark each screw hole. Repeat for the other corner brace.7) Next, take your awl and poke a hole directly through the marks you made for your screw holes on both covers. When poking a hole in the display book cover, be sure not to go through your book pages--just the cover. 8) Once you have made all of your holes, take 2 brads and use them to fasten your corner braces to the display book. (You are putting the brad through the screw hole, book cover, and then opening the ends to hold the corner brace in place). The picture here is upside down, but you get the idea.

9) Next, take 2 screws and screw them in place (through the hole you poked through the anchor book cover). You know when you're done because the display book will feel more secure (essentially, it will no longer slide or fall closed but remain upright). 10) Turn your display book around so that it is facing you. Using your awl, poke tiny holes (starter holes) in your top book page for your cup hooks. And then, screw your cup hooks in place. I recommend alternating which cup hooks you screw in so that the page does not ripple or become uneven.  For instance, I had 5 total cup hooks so I screwed in the 1st hook and then the 3rd and 5th, and afterwards, the 2nd and 4th hooks.

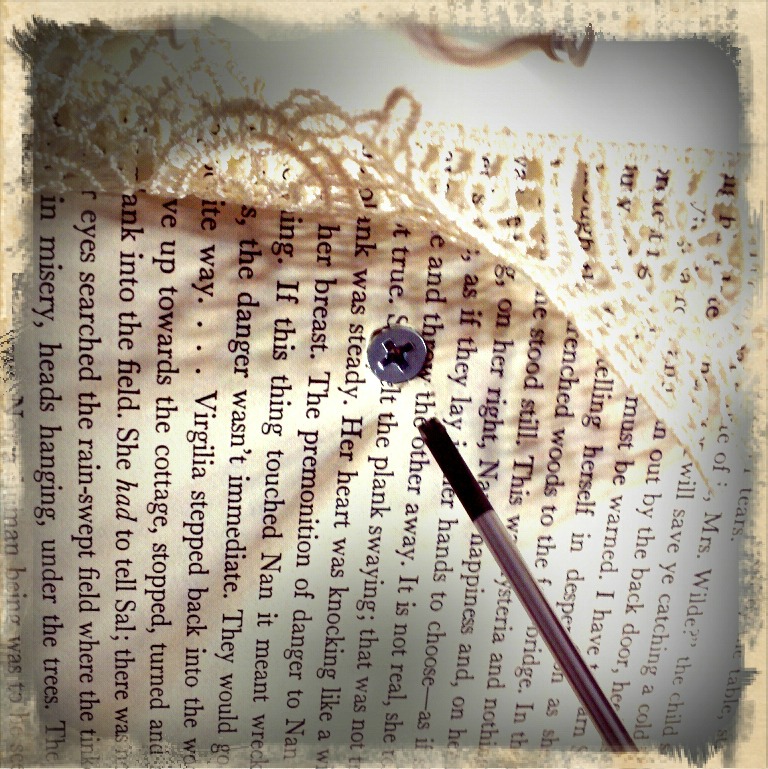
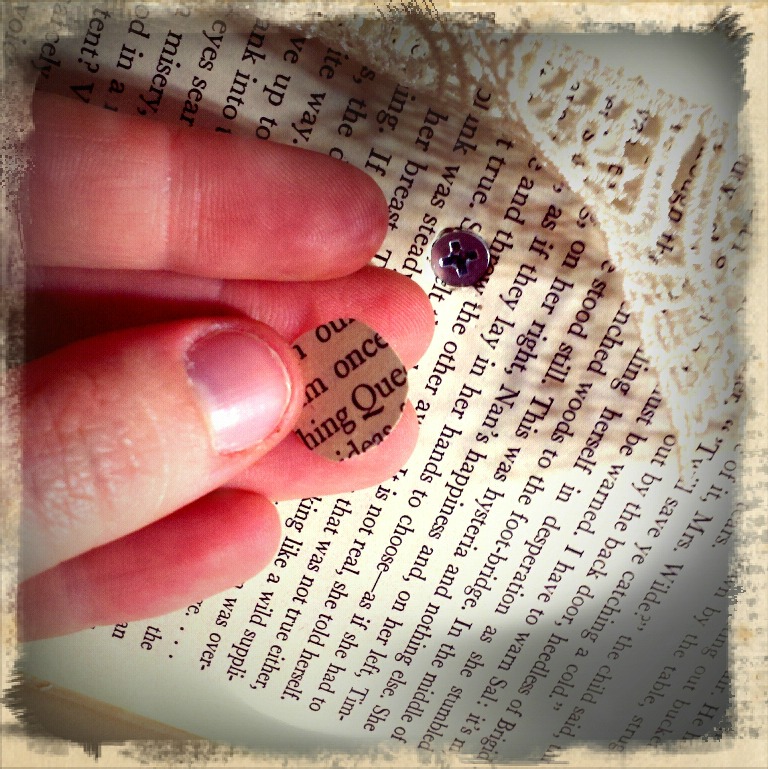
11) With the display book still facing me, I lifted up my lace, and using my awl made a starter hole in the very middle of the top page for my screw. Then I took a screw and secured it in place using my trusty screwdriver.12) Once I was  done, I cut a circle out of a scrap book page to cover the screw and glued it in place.13) Now comes the fun part--splaying your jewelry across the page and hanging it from the tiny cup hooks! For a layered look, stack books underneath your display to create height and use different angles.

As always, Happy Crafting! And please, do come visit Made; The Indie Emporium shop's grand opening on Feb. 1st!

My Furry Valentine Silent Auction Benefit

Contests & GiveawaysSamantha ExtanceComment

Bohemian Romance is proud to be a part of this year's Street Cat's "My Furry Valentine" silent auction. "My Furry Valentine" is a benefit to help Street Cats, Inc. (a non-profit organization here in Tulsa) fund their incredible work placing abandoned & lost cats with families. Among a simply Steampunk earring and bracelet set up for auction, you can find other items from local artists and enjoy a night of wine and desserts at the Tulsa Historical Society, 2445 South Peoria Avenue, on February 12th from 1:30 to 4:30 pm.

Good luck to those bidding, though with events like these--everyone kinda wins!

Handmade Illumination: D.I.Y. Steampunk Candlestick Holder (3 ways)

D-I-Y-Samantha Extance2 Comments

These candlesticks are perfect for hosting an intimate dinner party for fantastical inventors, airship tinkerers, clockmakers' sons & daughters, and bicycle enthusiasts everywhere! D.I.Y.s and Materials needed for each candlestick are written below under their respective name. Before you begin, I would like to note that in each of these photos a tea candle is pictured. I did not have a candlestick on hand and so I substituted a tea candle for a candlestick in order to show each step completely. As always, happy making!

Atomventor's Candlestick Holder

Materials Needed:

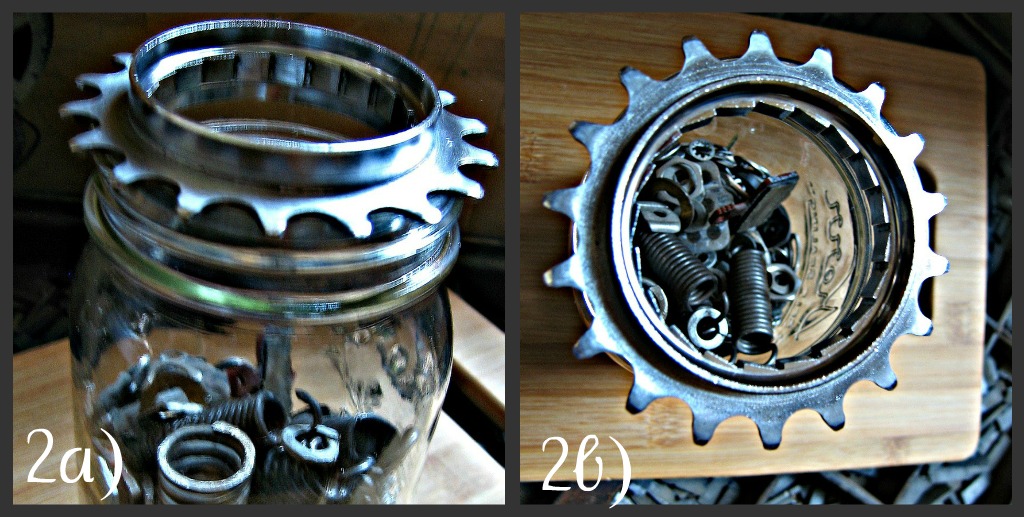
Mason jar, medium sized bicycle gear (from a cassette), glass candlestick holder, a candlestick, and various odds & ends of your choosing to place inside your jar.

I used washers, springs, bicycle brakes, clock parts & gears.

A note on your mason jar & glass candlestick holder: These items must be able to stack inside one another. When purchasing your jar and candlestick holder, you should bring your bicycle gear with you to the store to ensure that you purchase the correct sizes.

Steps:

1) Fill your jar with your assorted odds & ends (also known bric-a-brac, couch treasure, & dumpster delights). Fill your jar about halfway.

2) Place your bicycle gear atop your jar. See also figures 2a & 2b below.

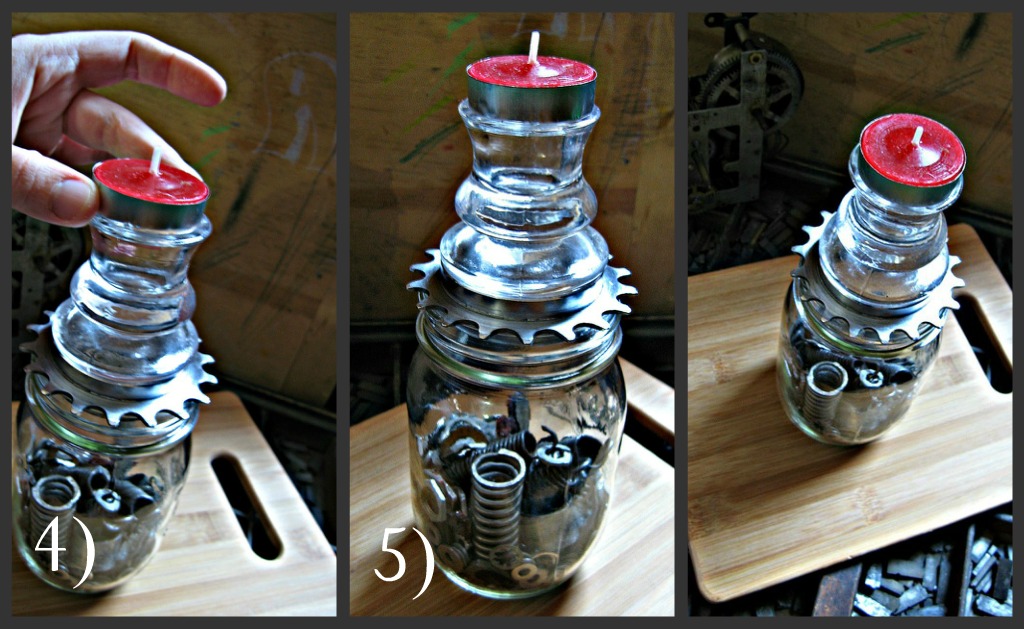
3) Place your glass candlestick holder on top of your bicycle gear. The candlestick I purchased (from Michaels) has a tiny "lip" on the bottom--this keeps the candlestick from falling off of the gear & sliding out.

4) Next, place your candlestick into the glass candlestick holder.

5) Enjoy your handmade illumination!

Simply Steampunk Candlestick Holder

Materials Needed:

Medium-sized bicycle gear, glass candlestick holder, and a candlestick.

A note on your glass candlestick holder: This item must be able to stack inside your gear. When purchasing your candlestick holder, you should bring your bicycle gear with you to the store to ensure that you purchase the correct size.

Steps:

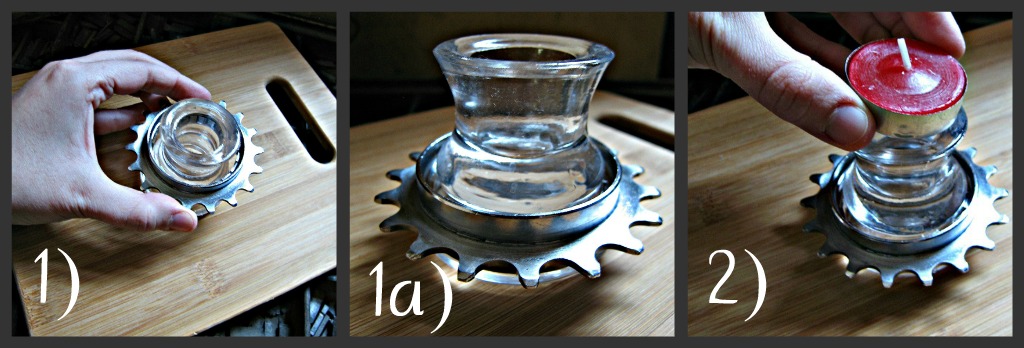
1) Place your bicycle gear over your glass candlestick holder. You can see in figure 1a that the candlestick's "lip" keeps the gear in place.

2) Next, place your candlestick into the glass candlestick holder.

3) Enjoy your handmade illumination!

Simply Steampunk Easy Candlestick Holder

Materials Needed:

Medium-sized bicycle gear, glass candlestick holder, and a candlestick.

A note on your glass candlestick holder: This item must be able to stack inside your gear. When purchasing your candlestick holder, you should bring your bicycle gear with you to the store to ensure that you purchase the correct size.

Steps:

1) Place your bicycle gear on your table and then stack your glass candlestick holder on top of it. Again, the "lip" of teh candlestick holder keeps the gear in place & from sliding. See figure 1a.

2) Next, place your candlestick into the glass candlestick holder.

3) Enjoy your handmade illumination!

This D.I.Y. is versatile--once you have the materials you will be able to make each of these candlesticks. Since the candlesticks are made by stacking pieces into one another, you will also be able to change them to fit the mood or theme of your table setting.

Inspiration Begins at Home

InspirationSamantha Extance1 Comment

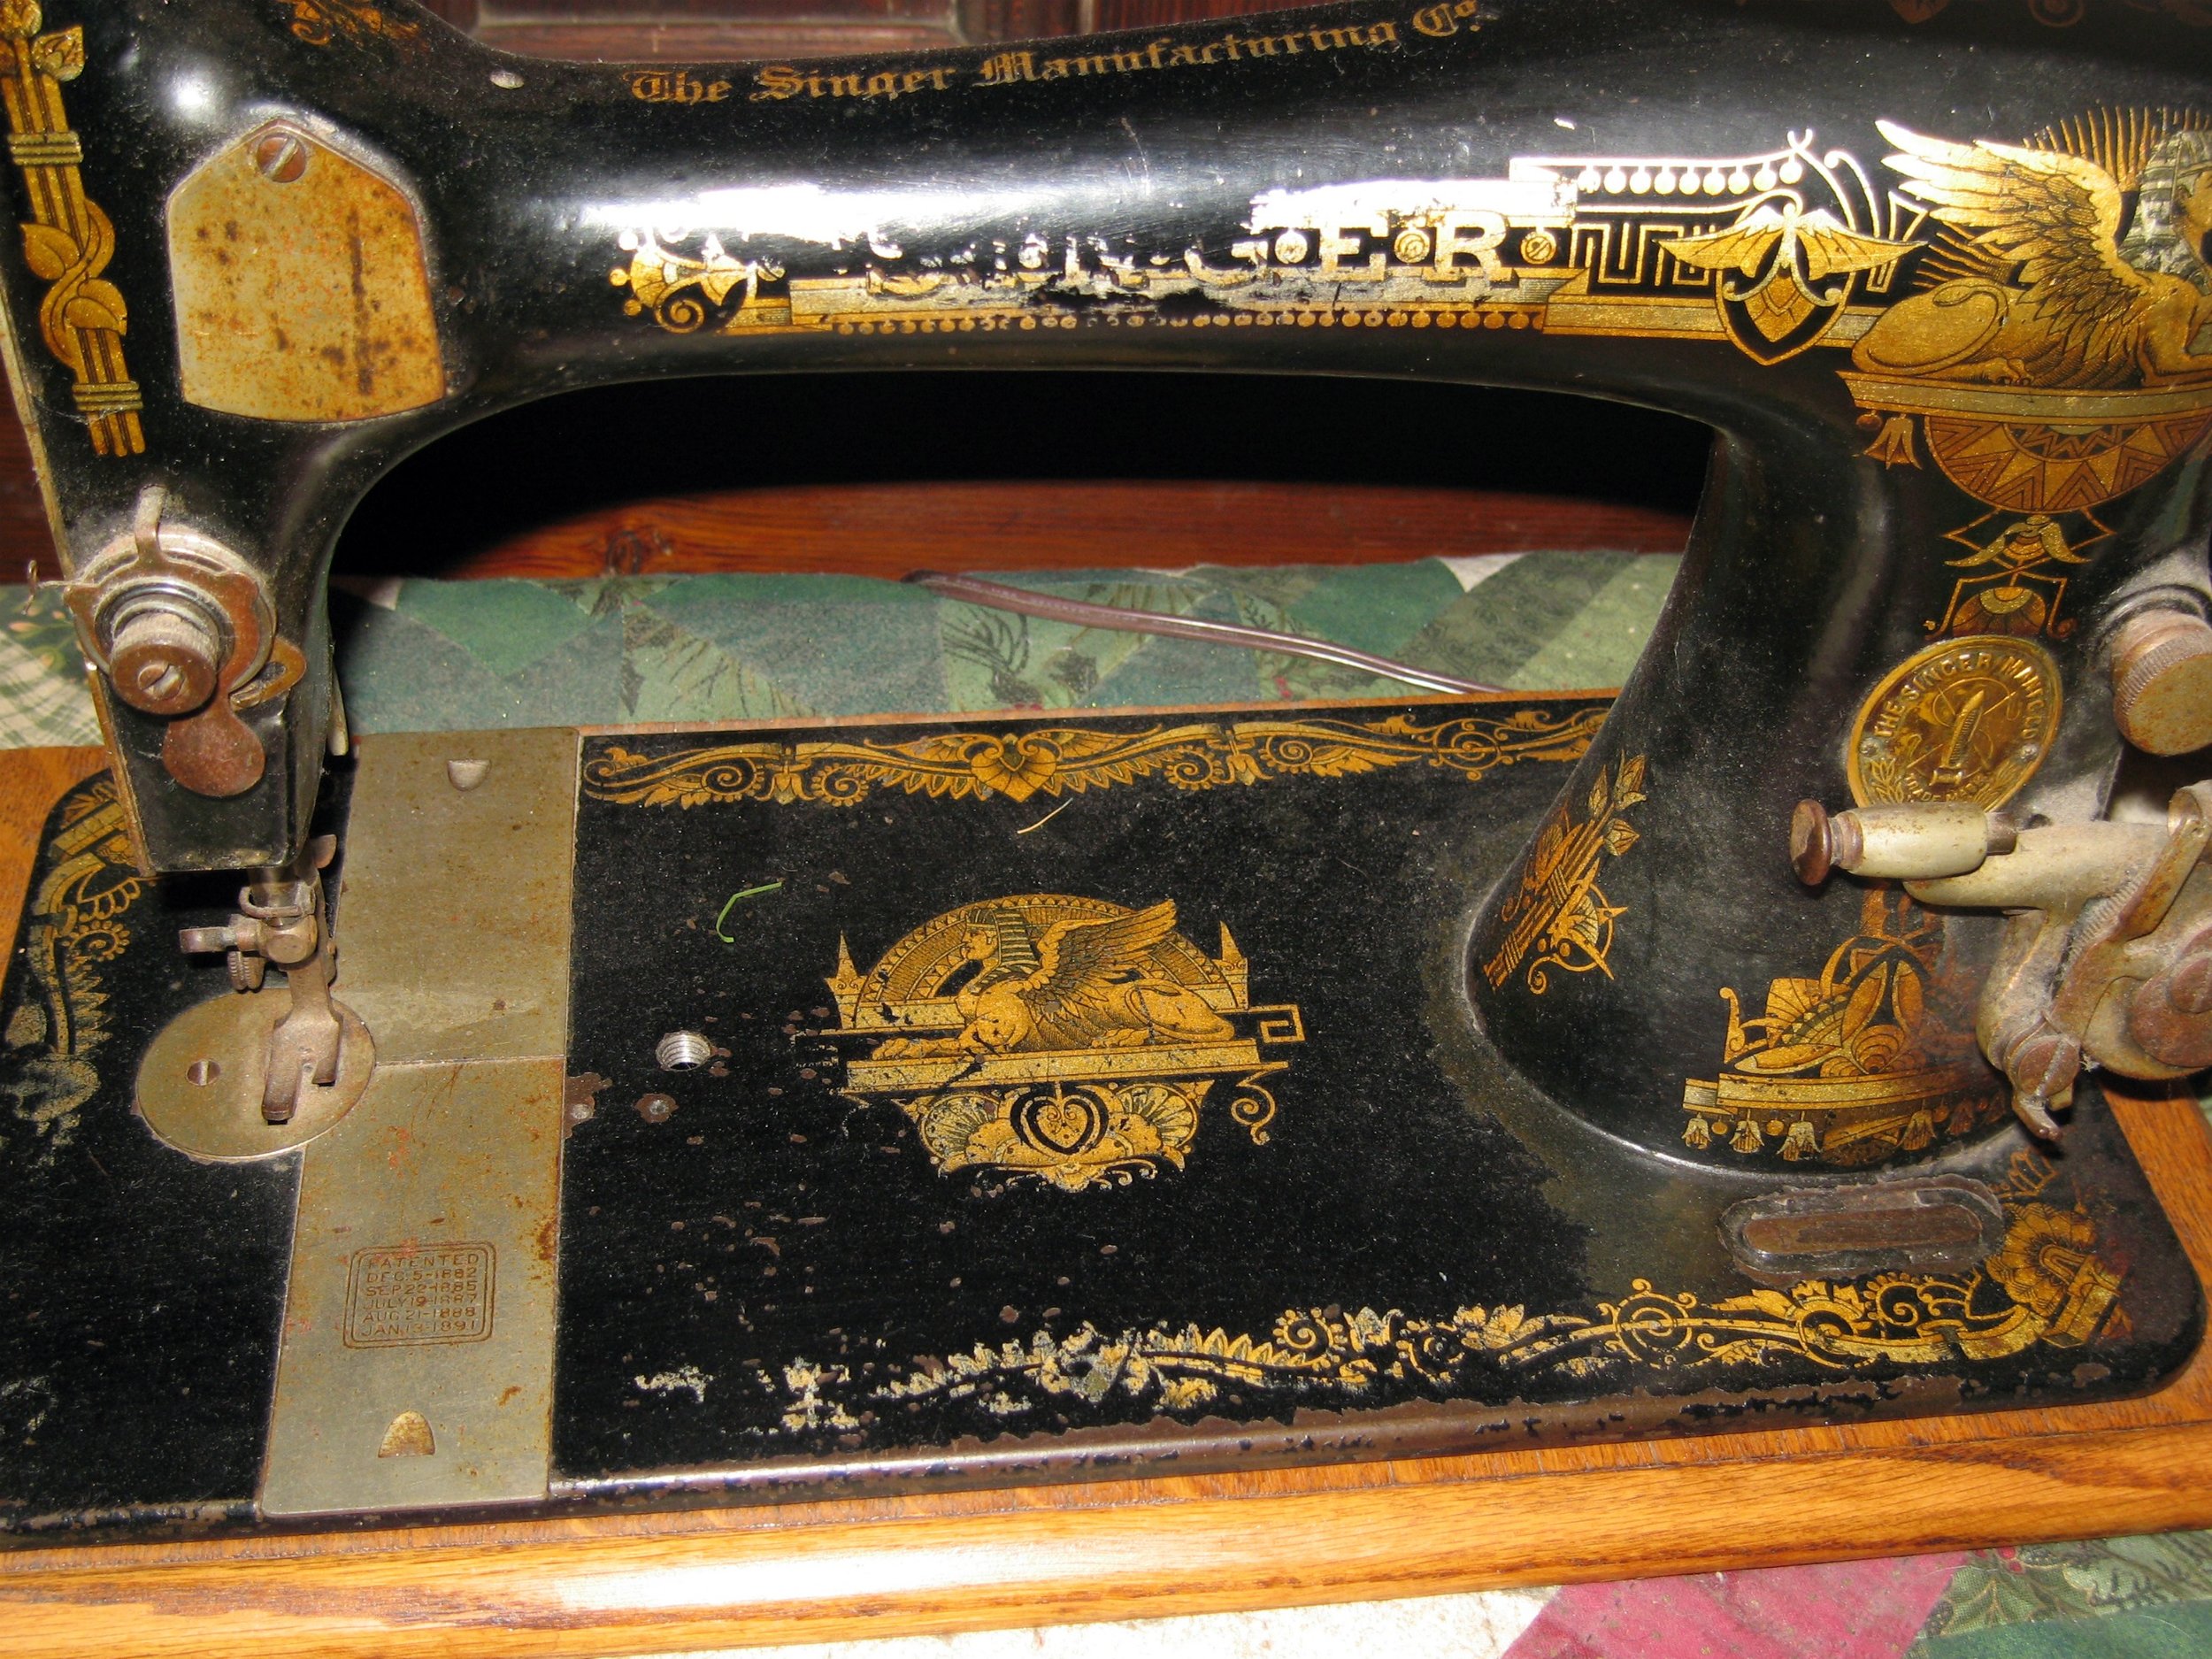
Happy New Year everyone! I would like to share a bit of my childhood home with you which I realized (over the holidays) is such a source of inspiration for my steampunk creations. So, welcome! One of the things everyone notices immediately is the vast number of antique sewing machines stashed in every corner of the house. I have never counted them, it would take a while, but my grams collects them. Some are encased in large, ornate wooden desks and others are tiny and fit on the fireplace mantle! Here is one of my favorite sewing machines--an 1882 Singer with gold embellishments. I grew up with the whirr of sewing machines and have (as some of you know from seeing it at Indie Emporium 2 years ago) an old Singer sewing machine of my own! Other antique sewing ephemera litter the house and among the most treasured are these crazy quilted pincushions (made by my mom).

In the living room hangs my mother's family crest (carved by my Uncle Jeff). The crest of the Crawfords--a shield with small trees (my family resided in Scotland and lived near the species of tree etched into the shield), a helmet, and adorned with looping scrolls. Below reads "Stant Innixa Deo," Latin for "They Stand Supported By God."

Upstairs you can find just as many old-world marvels, wooden ships, medicine jars, and water basins.

Scattered about the house are old clocks--ones whose chimes I can still hear if I close my eyes at the start of a new hour. Pictured left is a doll hand sewn by my mom. Her name is Cordelia, the Victorian Lady. She has a high collar and lace embellishments on her dress and a marvelous green sash. Her jet beads set of her jet hair amassed in a Gibson Girl bun atop her head.

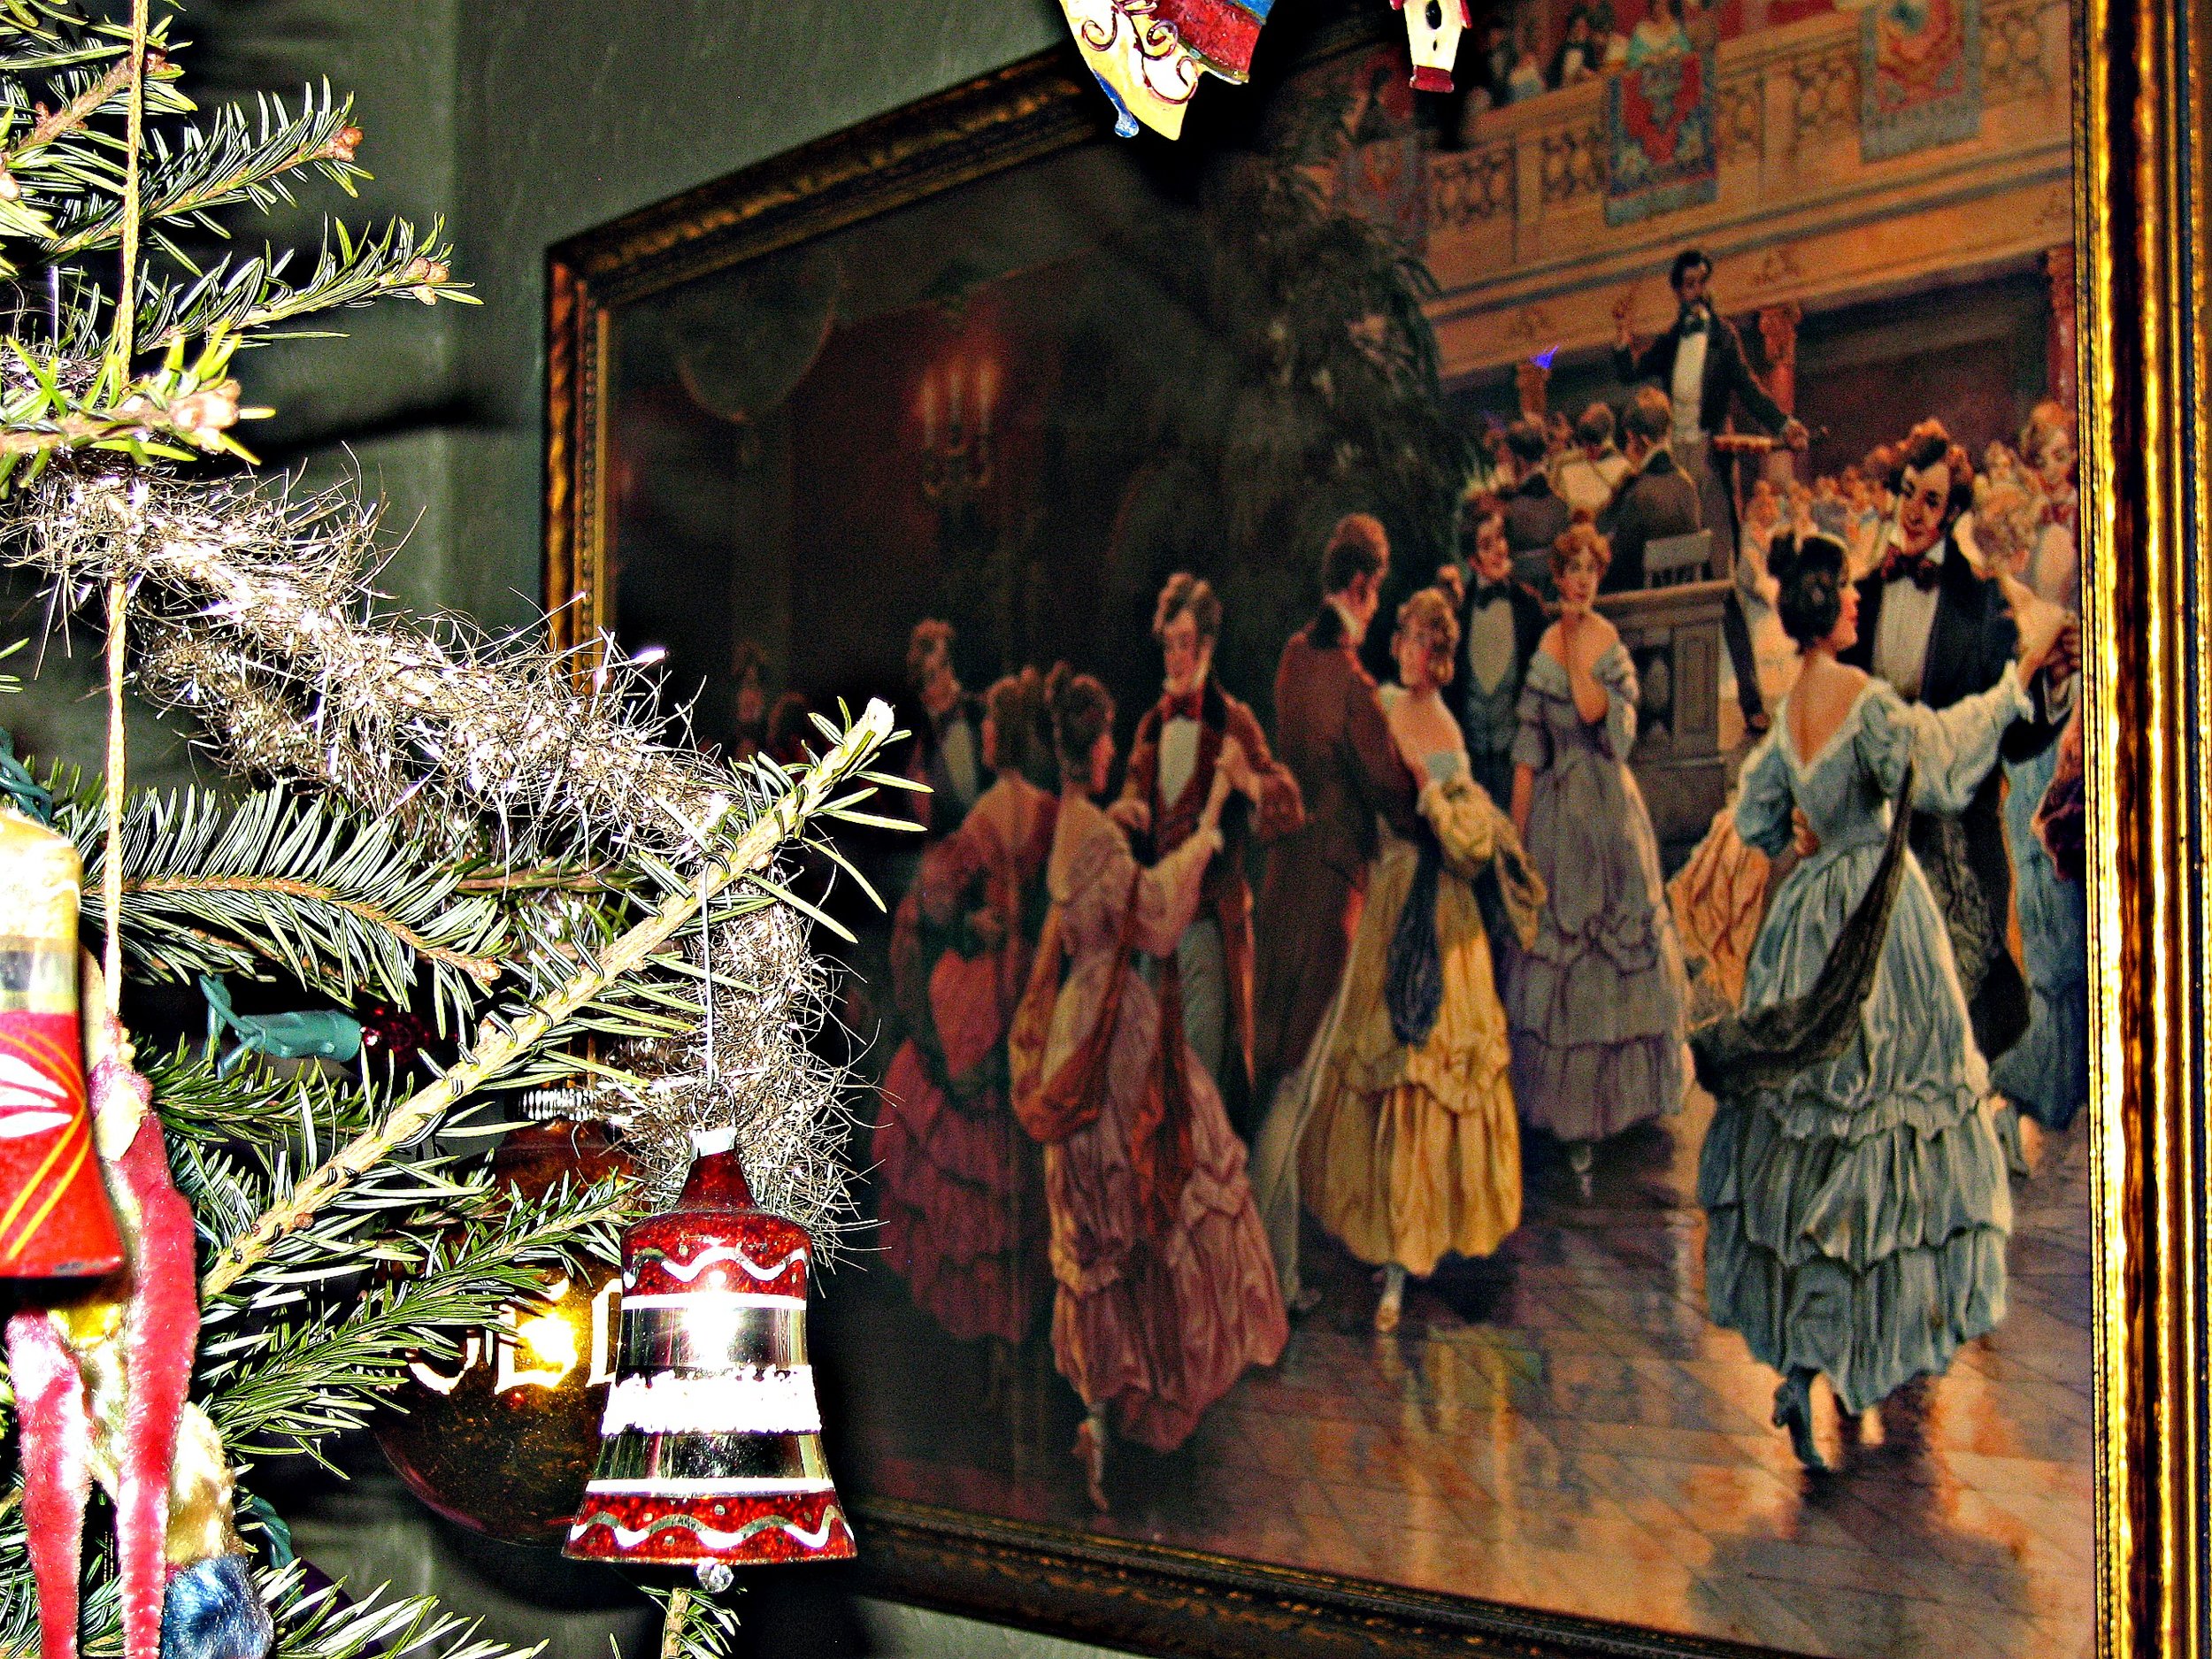
The last treasure I will share with you is a painted picture of a ball. It rests in our living room. I can almost hear the rustling of the ladies' dresses as they are sashayed past by their beaus and the merry music of the orchestra.

These are just a few of the inspirations I have found around home. What are yours?

Join Me in Making Holiday Gift Tags from Salvaged Items!

UncategorizedSamantha ExtanceComment

For those of you in the Tulsa area, I hope you will join me for a fun evening of making. Tomorrow night at the Indie Emporium Pop-Up Shop (located in the Thompson Building on Boston Ave. bet. 4th and 5th) from 5:00 pm to 8:00 pm I will be teaching a class on how to make holiday gift tags from salvaged things you might have lying about your home. Hope to see you all there! For those of you who are farther away, I have not forgotten you--here is a D.I.Y. PDF of what I'll be teaching tomorrow. If you have any questions, please email me I'd love to help if you get stuck or need more pictures to complete one of these gift tag projects. As always, Happy Making everyone!

There's a Whole Lotta Love to Be Thankful For

D-I-Y-, UncategorizedSamantha ExtanceComment

I have a lot to be thankful for this November--my brother married his longtime girlfriend on Sunday in the village of Piermont, down by the Hudson River. It was a beautiful day! Last week the whole house was abuzz, baking and making and getting ready for the big day. My grams made them a stunning Hidden Star quilt (where each block has a star hidden within the block). I made the happy couple a Scrabble picture frame with their names interlocking to hang in their hallway. And my mom and I fashioned earring and bracelet sets for the bridesmaids.

I tried a handful of recipes out this week--all from A Taste of Home magazine (which is fabulous by the way). I baked to my heart's content--a Chocolate cake with raspberry filling and white chocolate frosting, a rich strawberry & champagne cheesecake, and a lemon meringue pie. A new family favorite is the Apple Orchard Pork Loin Roast (very simple to make and incredibly tasty).

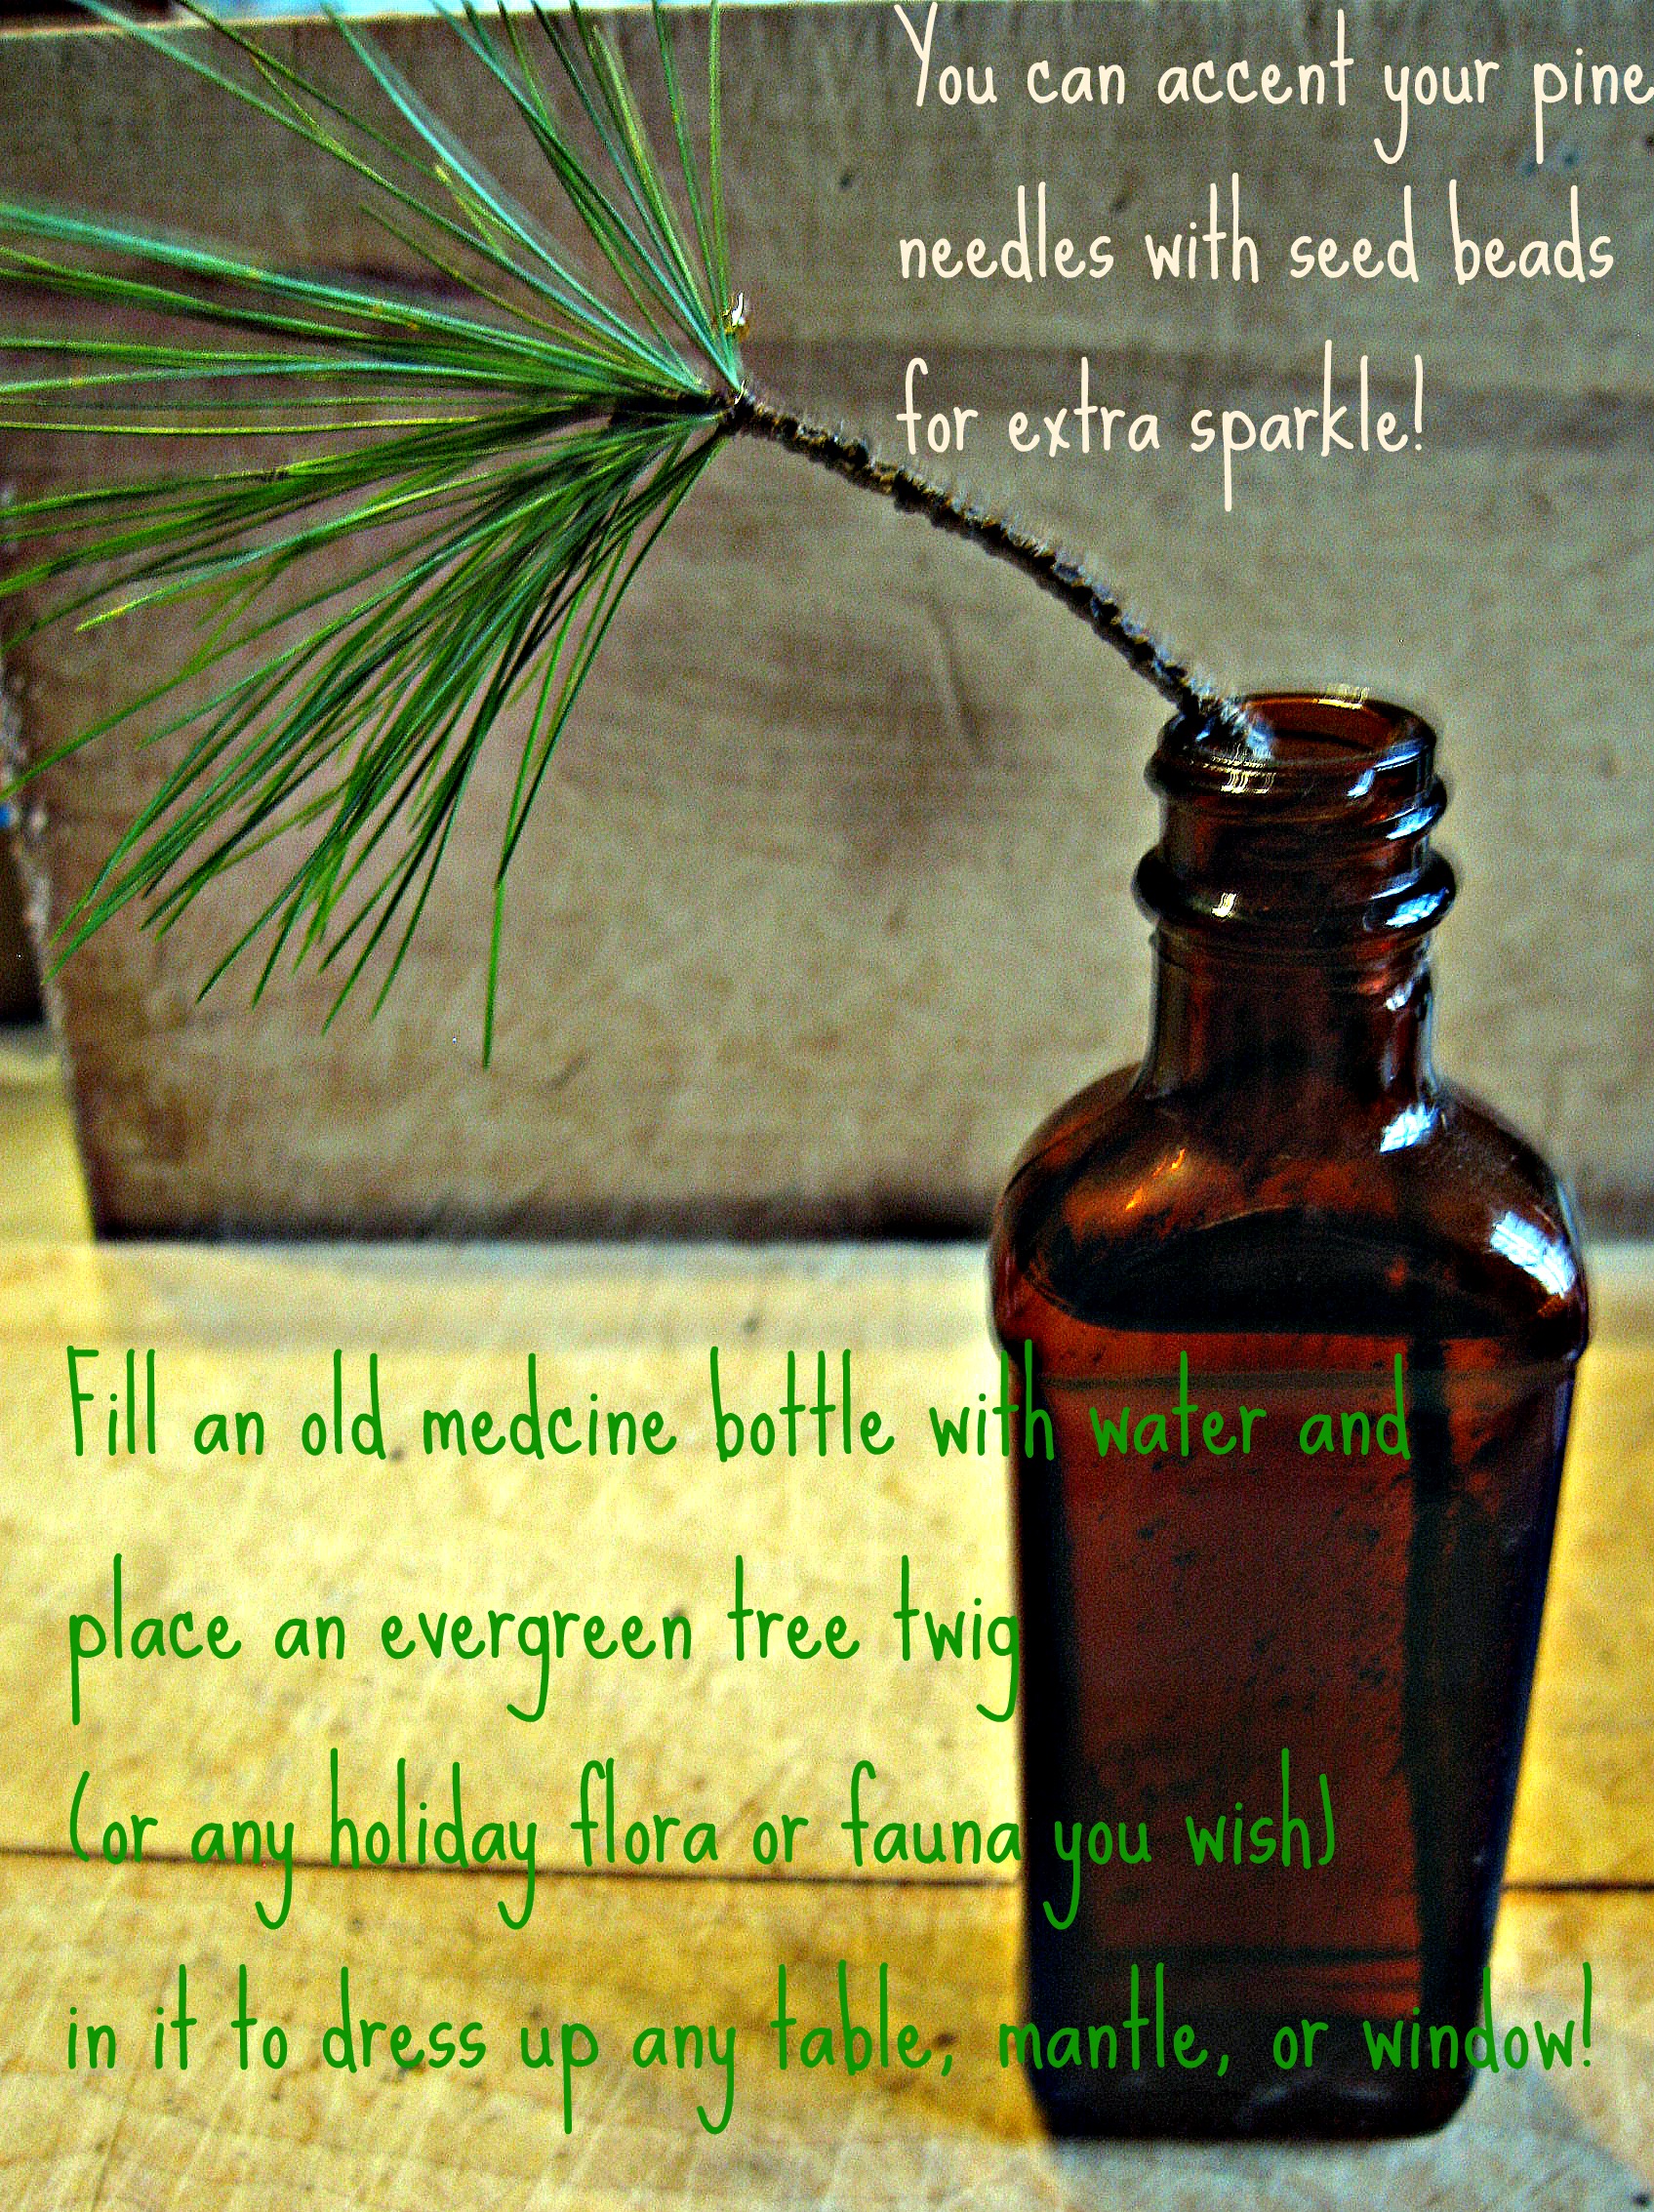
Here's an easy & elegant D.I.Y. for your dinner table, mantle place, or window sill:

Hope you have a lovely Thanksgiving this Thursday! Check later this week for holiday gift tag D.I.Y.S!

Living Arts Champagne & Chocolate Gala & Things Galore...

D-I-Y-, ShowsSamantha ExtanceComment

Hello everyone, I have been a bit M.I.A. on my blog lately. I've been busy trying to get everything together for a string holiday events. The first of which is Living Arts' Champagne & Chocolate Gala (Saturday, Nov. 19th from 7:00-10:00 pm). The event will include a silent auction where you can bid on two Bohemian Romance items: 1) a pair of Tick-Tock-Timepiece Earrings and 2) A earring & bracelet set made with pearl buttons, washers, and gunmetal chain! Both auction items come with a plum gift box and Steampunk holiday gift tag! Good luck to any bidders! I have also been working on a display for an Indie Emporium pop-up shop where you can find Bohemian Romance items for the holiday season! I love the holidays, mostly because I love giving gifts and this year I decided to include a small gift to anyone who purchases one of my items from the pop-up shop or on my Etsy shop--a Steampunk holiday gift tag! There are 3 choices: a gear evergreen Christmas tree, berry red gear scrolling holly & ivy, and a glittering gold light bulb invention! (All of which, are made with fantastic rubber stamps I purchased on 1-2-3 Stitch's website).

Also for the pop-up shop I made a giveaway D.I.Y. which I will post on my blog later this month on how to make your own holiday gift tags using salvaged or upcylced materials! I am super excited. Here's a preview of one of my gift tag creations with instructions!

Well, next week will not be any less busy--my brother is getting married & my mom and I are getting together to make the bridesmaids' jewelry and design the floral arrangements! I'll be sure & sneak a few minutes to post some picture

Sneak Peak: The Atomventures

UncategorizedSamantha Extance1 Comment

I am a bit of a dabbler, like most artsy folk and in addition to making Steampunk jewelry I am writing my first novel (tentatively titled, The Atomventures). I wanted to share a bit of my writing so that I can introduce you to some of the characters in my mind when I'm creating my jewelry pieces. You only need to peruse my Etsy shop to see all of the odd characters: airship pirates, courtesans, time travelers, time portal guardians, gatekeepers, imperial cartographers, steamstresses...the list goes on! So without further ado, here is the first chapter of my book and my favorite character, an atomventor.

Chapter One: Escape & Escapades

 “Many women keep secrets. Mine is rather a good one. I am what the Royal Society would call an Atomventor. I can read aether and particles, matter I think Newton classifies it. Everything is made up of aether or particles. Understanding aether is unquestionably the most prized skill in all the world. And the most dangerous to possess as possession of such a skill means one is under constant threat of abduction or attack. Not to mention the government’s control of Atomventors. My kind sought protection a century ago when our unique ability was discovered. I never knew my parents—only that they were gypsies from Ireland—would account for the red hair. I was found at Paddington Station in a worn carpetbag. Hmph, sounds an awful lot like a character out of some wild play of manners! Nevertheless, the family that took me in as their own named me Philomena Paddington—Philomena after their beloved matriarch and Paddington, of course, after the station in which they happened upon me.”

It was a short confession. Margaret did not have time. She had been wounded and the air was running out. Philomena did not find it appropriate to keep her in the dark any longer about her secret identity. Truthfully, Philomena was relieved that she finally had a confidante. Margaret, weak from the bullet lodged in her shoulder, spoke feebly: “Why are you telling me this now Mena?”

Philomena smiled and said, “Because I am going to transform the bullet in your shoulder into a shovel and when I do—I do not want you to be frightened.” Margaret laughed.

“Frightened? Oh my dear, I dare say being buried alive has already accomplished just that. If you can get us out of here I will be exhilarated!”

Philomena sighed, “Right, of course. Now I must concentrate.” Mena closed her eyes. Aether. Aristotle’s theory was only part right. Aether is the “quintessential element” and it does move in a circle; however, aether is in every other element as well—earth, water, fire, the heavens—and by concentrating on any object and its movement, Philomena could interrupt its particular motion and change it. She and other Atomventors were born with the ability to transform matter. Of course to do so Philomena had to follow natural laws. She could not simply transform the earth above them into air. Particles were malleable not exchangeable. Air could never be earth. But the earth could be stone or sand or grass. Mena had thought of a plan. “Margaret, I am going to transform the earth on top of us and this tomb into flowers, primroses.”

Margaret interrupted, “Primroses!” Philomena quipped back,

“Yes, we are in Devon after all and primroses are in season.”

Margaret asserted, “Mm, quite right. Then what?” Philomena continued,

“The flowers will be easy to dig a tunnel through and once that is done, I’ll atomvent us a rope ladder so we can climb out. But before any of this I’m afraid I must pull that bullet out of your shoulder. It’s going to hurt.”

“Mena—if I do not make it…” Philomena hushed Margaret angrily,

“None of that kind of talk now, Mag. You’ll get through this.” Margaret’s brown eyes filled with tears.

“Mena, just let me say this. Tell George I accept and I return his affection.”

“Finally! You’ve made up your mind! I cannot believe it took being buried alive to see it. Oh Mag, you will tell him yourself soon enough.” Margaret smiled weakly.

“I hope so.”

“Alright, brace yourself.” Philomena pulled out her knife and fished the bullet out of Margaret’s shoulder. Margaret groaned—the pain nearly caused her to faint. She buckled and slumped sideways in the tomb. Margaret lay there bleeding profusely though Mena had bandaged her shoulder. She needed a doctor, and soon. Philomena combined her knife and the bullet in her hands. She concentrated—sensing each object’s motion. The knife and bullet began to vibrate violently in Mena’s hand and emitted a sharp, loud sound. In a flash of silver light, the objects shifted form. A sturdy steel shovel lay in Mena’s hand. It was not over yet. She focused; this next transformation would be much harder. There was a ton of earth on top of them. The density and area was larger. Mena sat, closed her eyes once more, and began reading the earth’s very particles. There was dirt—heavy from rain, grass above, roots, larvae, centipedes, worms wriggling about, water trickling through the earth’s pores…it all began to vibrate. The earth above them quivered as it shifted from solid dirt to piles of beautiful white primroses—their stems green and leafy, rootless and loose. The tomb’s grainy stone tumbled into piles of flowers. Mena felt the soft petals fall against her face. The smell was overwhelming. She grasped the shovel and dug out Margaret and finally a tunnel upward. Last she changed one side of the primrose tunnel into a rope ladder. Clasping Margaret to her side, she helped her climb. Margaret inhaled the fragrant passageway deeply.

“Have we died? Is this heaven?” Mena smiled,

“No.”

“It’s so beautiful.” They were two steps from the top. Margaret slackened. Her body grew rigid. Philomena struggled to keep hold of Margaret and the ladder. She was losing grip.

“Margaret. Margaret.” Her voice grew desperate.

“Margaret!” howled a familiar gruff voice.

“George!” Philomena was relieved. George helped Mena and Margaret to the top.

“What in the bloody hell happened?”

“There’s no time for that now George, later. Margaret’s been shot.” George’s face was white with fear. “You have to heal her.” George nodded. Philomena politely turned around. George did not wait to remove his clothing before shifting. In his wolf form, he could heal Margaret’s wound. Werewolf saliva is a cure-all. Mena wanted to study its aetheric properties in the future to see if it might be synthesized in some way. The slim brindle wolf sweetly licked Margaret’s shoulder. The saliva coated her whole upper arm until it worked its way past her epidermis. Within minutes Margaret’s wound was completely healed. Margaret lay asleep. The only side effect of werewolf saliva—an intense R.E.M. cycle. She would be unconscious for a day or so. George shifted again and took out a spare set of clothes from his travel bag.

“Are you alright Mena? Do you need me to heal you?” Philomena shook her head, her back still respectfully turned.

“No, thank you George. We must get back. Margaret and I uncovered who is behind this most recent attempt on the Empire. We must warn Parliament.”

“Yes. Wesley is bringing the airship round. He is going to meet us at the rendezvous point in a quarter-of-an-hour.”

“Then we must hurry. Ivybridge is still a ways off.” George mounted his dispatch horse and pulled out a tiny leather parcel. The parcel had a large red tag sticking out from its center. George pulled the tag until a harness emerged and placed the harness round the horse’s neck. He dismounted and tapped the parcel thrice. Philomena could hear the parcel’s interior cogs turning and steam slowly emitted from inside. The cogs finally clicked into place and the parcel unfolded into a carriage large enough to convey them to Ivybridge. Though time was of the essence Mena could not help but marvel at the invention. “Extraordinary! Wesley has certainly outdone himself.”

“He seems to think so.” George scoffed. George gathered Margaret into his arms and got into the carriage. Philomena entered after them.

“Who is going to drive the horse?”

“That’s the best part.” George pushed a series of buttons on the side panel of the carriage and off they went. “The wheels will turn accordingly. I’ve entered our coordinates into the control panel. It will give us time to talk. What went wrong?”

“We were discovered but I have confirmed that the Earl of Devon has been colluding with the French. He has taken over the island of Eddystone and hidden munitions there. He also plans to launch an attack on Buckingham Palace with an army of French mercenaries. We must warn parliament and stop him.” George gasped.

“Treason. Well he will be the one to be buried alive when word gets out.”

“If we get there in time. He may move his plan ahead now that he’s been discovered. He cannot think Margaret and I were alone.”

“Yes, you’re very right.” The carriage jostled to and fro as they sped toward Ivybridge. Philomena poked her head out of the window. They weren’t followed, thank heavens. She’d had enough excitement for one trip. Up ahead, on the outskirts of Ivybridge, their airship awaited to transport the spies to London.

D.I.Y. Simply Steampunk Candle Holder

D-I-Y-Samantha Extance8 Comments

With so many holidays approaching, no doubt you have begun to think about decorations. My favorite part of Thanksgiving is dressing up the table. Here is a simple and beautiful way to steampunk your dinner table. Here's what you'll need: ~The light bulbs & gears can be substituted for other various machine parts that you desire. It is best to use a majority of clear items so that the flame will shine through them. Possible substitutes include: radio or vaccum tubes, broken glass or even bits of ornaments that have broken, & washers.

Making this candle holder is easy, finding your materials will take longer than assembly (which is great, because if you're entertaining last minute this is a quick table fix!). Here's what you do:

1) Place the tea candle inside the smaller candle holder. Then place the small candle holder inside of the larger one.

2) Arrange your light bulbs & gears (or what have you) and fill in the space surrounding the small candle holder. Be sure not to fill the (larger) candle holder over the height of the small candle holder.

3) Once your items are arranged, light your tea candle and enjoy its illumination!

Stop by B.A. Zaar at the Broken Arrow Farmers Market

ShowsSamantha ExtanceComment

I am so excited for B.A. Zaar tomorrow. Stop by and see me and start your holiday shopping early!

Where? The Broken Arrow Farmers Market, 418 South Main Street, Broken Arrow, OK 74012

When? Tomorrow, Saturday Oct. 22nd from  8:00 am till 6:00 pm

Who'll be there? Why me of course! And a number of my make:Tulsa artists, Plume Perfume, Hollyrocks, Somer Knits, & Tweet Baby Designs!

I created a new collection, Steamstresses and Sky Captains, for this show. Drop by and check it out.

Falling in Love with Fall

Contests & GiveawaysSamantha ExtanceComment

I'm known for my odd sense of style (those of you who have seen me at shows know this)--here's a layered look I styled entirely around a beautifully hand stitched pumpkin pin my mom made for me (pictured top right).

Fall to me means textures, layers, and deep hues. So take a look around your closet and find some odd textures, play around with your sweaters and even some of your summer clothes. The red dress and striped sheer sleeveless shirt are part of my summer wardrobe but coupled with my mustard yellow polka dot sweater and tall brown leather boots--I was able to convert them into fall wear.

Email me a picture of your favorite fall outfit--the one with the wackiest couplings and textures will win a pumpkin pin just like mine! Contest will end on Saturday! Can't wait to see all of your fabulous fall fashions!

Flea Market Finds: Stafford Stencil Combination

Flea Market FindsSamantha ExtanceComment

Everyone who stops by my booth at craft shows always has something to say about my display. I thought I might begin sharing weekly posts on my flea market finds. On my latest flea market excursion I found a fascinating piece of print culture--a box of "Stafford's Stencil Combination." It is a complete set, with brass alphabet letters, figures, a can of stencil ink, a sponge, and a stencil brush. The worn green box details the stencils' function "For marking boxes, barrels, bags and packages for shipment. Printing all manner of show cards, notices, signs, number, prices, &c., and many other purposes. Instructive and amusing for Boys."

The Directions read: "After wetting the brush with water from the sponge, rub it over the ink until a sufficient quantity adheres. The Ink works freely, does not gum the plate or brush, and will keep in any climate without evaporation or waste." The brass plates themselves slide together to form words, phrases, and numerical figures.

In an attempt to date the stencils I did a google search for "Stafford Stencils Combination" and one of the first entries that I came across was an advertisement for Stafford Stencils in  the  January 7th, 1886 issue of The American Stationer. The size stencil set that I have, 1 1/2 inches, was $1.50 in 1886. Now a set in mint condition with all of the pieces runs between $300-$500. My set is complete but the box is in very poor shape and missing its cloth lining and stand which is why it was such a bargain. An interesting piece of American print history!

Happy thrifting and flea marketing!


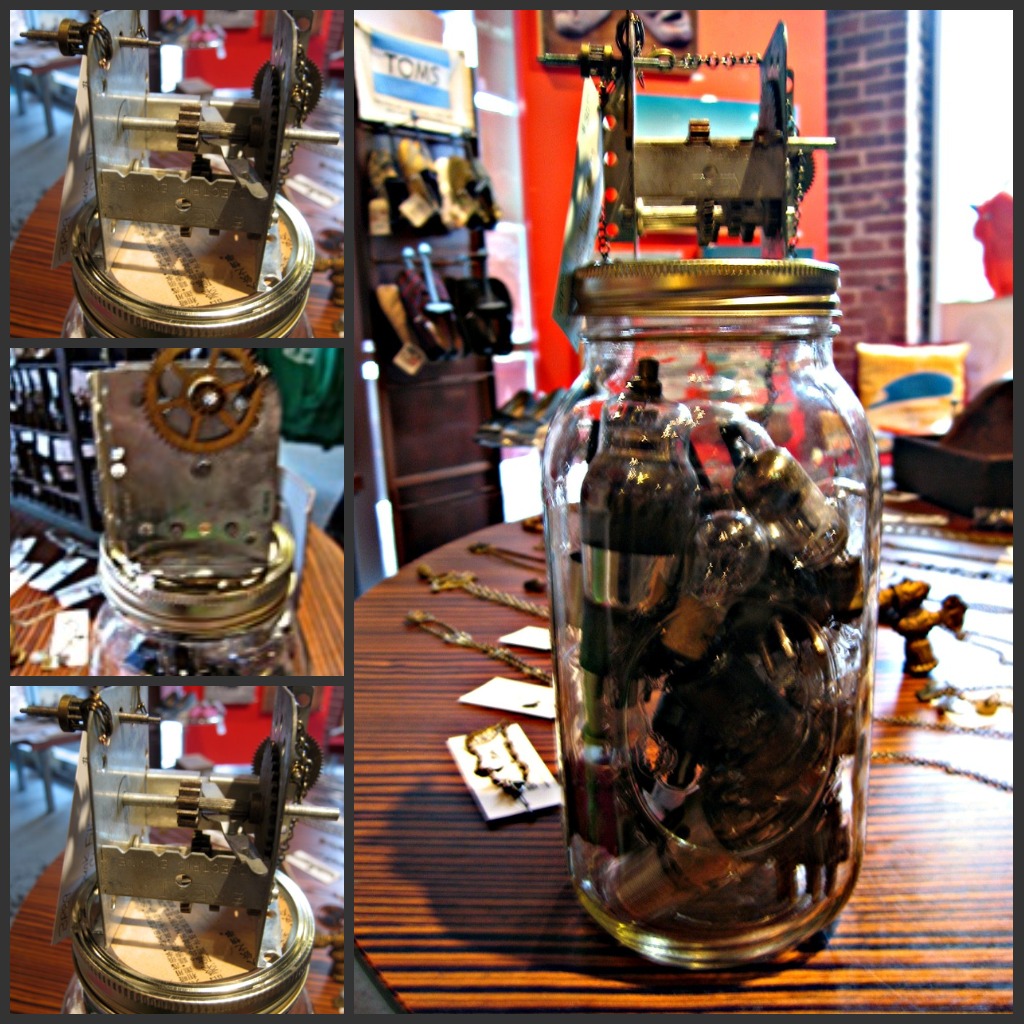
D.I.Y. Atomventor's Jar

D-I-Y-Samantha Extance1 Comment

An Atomventor's Jar is a Steampunk Halloween decoration that will give your party the feel of a mad scientist's laboratory.

Note Before you Begin: Steampunk D.I.Y.s are tricky because not everyone will have access to these materials. The materials I have listed below should be relatively easy for you to procure--with one exception--a grandfather clock part or machine part. I will list a few alternative ideas that you might find more readily available and would work just as well: music box innards, computer board circuits or springs.

Materials:

1 large Mason Jar

light bulbs (of various sizes and shapes)

2-3 clock gears

grandfather clock part or a machine part with two plates (a 1/4 inch larger than your mason jar top)

22 gauge Artist wire (or floral wire will do) in a color of your choice (I used copper colored wire)

Modgepodge

book page (can be an old book or one that you love)

Tools You'll Need:

Wire cutters (or if you do not own a pair, toe nail clippers work well)

flat nosed pliers

paintbrush

scissors

Before you begin--study your machine/clock part. Locate its usable holes and play around with the various ways you can fix it atop of your mason jar.

Steps:

1. Unscrew the lid of your mason jar and arrange your lightbulbs inside. Be careful when putting the lightbulbs in the jar--you do not want any of them to break. Feel free to add your own personal touch--you can include gears, washers, nuts & bolts, buttons, radio tubes, or vacuum tubes or even an old photograph into your jar along with your lightbulbs.  (My jar is a combination of radio tubes and lightbulbs).

2. Take the top part of your mason jar (the piece that rests on the mouth of the jar, not the piece that screws in place) and trace its outline onto your book page. Cut inside the circle you've drawn with your scissors and then apply Modgepodge to the mason jar lid. Place the book page circle onto the mason jar lid and smooth out the lid to remove any bubbles. Next coat the top of the mason jar lid with a fine layer of Modgepodge to protect the book page. Let dry.

3. Once the lid is dry (approx. 15-20 mins.), place it atop your mason jar. Next, take your grandfather clock part or machine piece and affix it in the middle of your jar.* This is the difficult step because each part is going to be different. You may require additional tools. My grandfather clock part was just a little larger than the part of the mason jar that screws on and so I bent that part of the lid so that I could fit the clock part through it and then bent it back to hold the clock part in place.

You will have to play this step by ear; however, if Step 3 will not work with your particular clock part or machine piece, here is a suggestion: if your clock or machine part has holes in the base, drill holes in the mason jar (so that they line up with the holes you already have in your clock or machine part) and then use screws & washers to affix the clock or machine part in place.

4. Screw the remaining part of the lid onto the mason jar.

5. (Optional) Your clock or machine part may already have plenty of gears on it. If it doesn't--or if you'd like more--use your extra gears for decoration. Place your gears where you would like them and then cut 1-2 inches of wire (depending on the size of your gear and the location of a hole for you to weave the wire through) with your wire cutters/nail clippers.

6. Weave the wire through your gear and into the holes using your pliers/fingers whichever is easier until the gear is securely fastened. Cut any excess wire with your wire cutters/nail clippers and use your pliers to pinch the end in place.

7. Find a home for your jar--on your desk, mantel, or among your eclectic Halloween decorations!

The beauty about using salvaged objects is that your Atomventor's Jar will look different from mine--so please email me a picture of yours. I'd love to see what you come up with!

Bohemian Romance now at Dwelling Spaces!

UncategorizedSamantha Extance1 Comment

I am delighted to say that you can now find my jewelry in Dwelling Spaces!  I am honored and proud to be among such crafty folks and fellow make:Tulsans (Gleeful Peacock & Weather & Noise)! I had tons of fun last week creating my display: another antique printer drawer upcycled, a vintage gardener's tray (which I fashioned with a pin cushion and filled with some tiny lightbulbs, various vintage buttons, a page from an old Japanese novel, & a bit of lace), and an Atomventor's Jar (pictured on the top right).

I will be posting a D.I.Y. on how to make your own Atomventor's Jar on Wednesday! So if you're going to a garage sale, flea market, or simply raiding your dad's barn or shed--be sure to snag a couple lightbulbs! Try and find ones that will fit through a Mason Jar's opening.

Thanks Indie Emporium!

ShowsSamantha Extance1 Comment

What a wonderful weekend! Music, fashion, crafters going toe-to-toe in challenges, and D.I.Y. work stations! My favorite part of the show is hearing stories from everyone when they come across something in my display or jewelry that reminds them of a memory. Sometimes I am lucky enough, and they share them with me. I heard stories about a grandmother's button box (that was raided frequently as pirate treasure), a father's electrical fuses (that were studied with wonder), and some who could recall days when subway tokens were used instead of disposable electronic tickets.

Now, I have a memory I would like to share with all of you. A girl and her mom were perusing my jewelry and came across my giant skeleton key. The young girl exclaimed, "Wow. That's a big key."

I replied, "Imagine the door that that key opened. It'd have to be a very big door. I wonder what's behind it." Before I blinked, she replied:

"An ice cave." She explained that the ice cave was very cold and we needed to wear coats and boots. The cave was also guarded by monsters. These monsters had 20-100 (twenty hundred) arms and heads, seventy eyes, and luckily for us they were ticklish. We snuck past them and used they key to open the door. Once the door was open we had to do a special dance to gain access. The young girl pirouetted and leaped. We were in the cave!

Intrigued to know more I asked her, "What's in this ice cave?"

"A bubble robot."

"Wow, a bubble robot! What is the robot guarding?"

The young girl quipped, "A treasure chest. We need to find another key to open it." She looked on my table and found one (I have tons of key necklaces!). Here it is!" We used the key to open the treasure chest (which opened with a creak) and inside found a rare treasure--a bubble blowing flower!

What an adventure and what an imagination!Congratulations to Jessica Hanback, the winner of a $40 gift certificate!


Thanks to everyone for coming out to see me at Indie Emporium. I'll be at Art on Main in Jenks, OK in front of Miss Isabelle's antique shop on Saturday, October 8 from 10 am to 5 pm!

Indie Emporium

ShowsSamantha Extance1 Comment

I am delighted to be a part of Indie Emporium again. It is a great show--there's something for everyone--shopping, D.I.Y. crafts, good local food, a fashion show, and this year, an Iron-Crafter "make-off"! I have been busy making new pieces for this show (you can check out my new collection on my FB page!), as well as some new outfits. Stop by to see me in my freshly sewed Edwardian bloomers (btw, plackets are a pain to sew!) and top hat (here's a sneak peak).

If these are not enticements enough, come by and enter for a chance to win a $40.00 gift certificate! See you there!